
Do you want to learn how to add Google Analytics to WordPress?
Using Google Analytics will give you real-time data that helps you understand how people interact with your website. Oh, and Google Analytics gives you this information for free.
The problem is, it’s not always straightforward to install or use this important tool.
Fortunately, it’s incredibly easy to add Google Analytics to WordPress using a plugin.
In this article, we will share why you should be adding Google Analytics to WordPress. Plus, we will walk you through how to add Google Analytics, step-by-step, both with and without a plugin.
Here’s a quick overview of the article, so you can easily navigate where you’d like.
- Why Add Google Analytics to WordPress
- Creating a Google Analytics Account
- Method 1: Installing Google Analytics Plugin on WordPress
- Method 2: Adding Google Analytics Without a Plugin
Why Add Google Analytics to WordPress
As someone that runs a website and online business, your #1 goal is to pull in more traffic and sales.
If you don’t understand how visitors interact with your page and who is finding you, how can you reach this goal?
Google Analytics is your best way to understand that and many other things about your site and visitors. This tool will help you identify your most popular pages, offers, and traffic sources. On the flip side, Google Analytics will help you pinpoint areas that aren’t resonating as well with your potential customers. Basically, it removes all the guesswork so you can get right into fixing the problem areas.
Using Google Analytics, you can view data like:
- Website hits
- Conversion rates
- Revenue
- User demographics (age, location, gender, device used)
- Referral sources
- Bounce rates
- And more…
Google Analytics has what seems like an endless supply of data. So, chances are that if you have a question about your audience or site, Google Analytics can help you figure out the answer.
Without it, you are simply left guessing and wondering how your website marketing campaigns resonate with people.
So, you are probably wondering how you can tap into this fantastic resource and add it to your site.
With that in mind, let’s start the tutorial.
Creating a Google Analytics Account
Before adding Google Analytics to our WordPress site, we need to create an account.
If you already have a Google account, like Gmail, you’ll need to sign in to set up Google Analytics.
First, you’ll need to navigate to the Google Analytics website. There, click on the Start Measuring button.

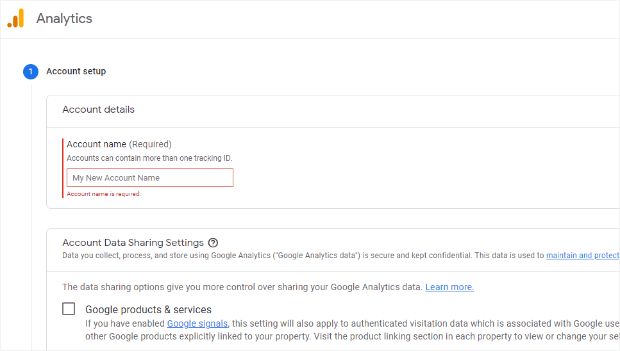
Google Analytics will prompt you to provide some additional information. To start, you’ll need to choose an account name and choose your account data sharing settings.
Click the Next button to move to the next step when you are done.
Now, you will provide Property details. This is information specific to your website, like the name, local time zone, and local currency.
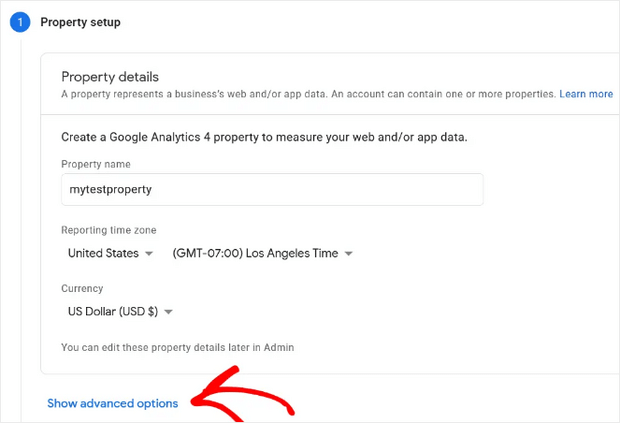
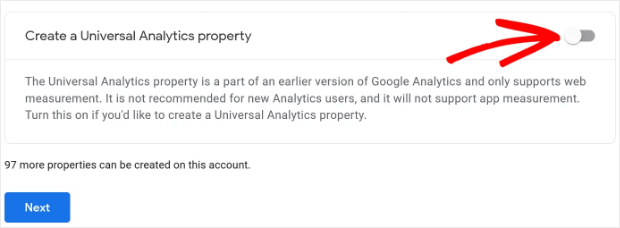
Once you fill this out, click Show advanced options.
Now you need to enable the Create a Universal Analytics property option.
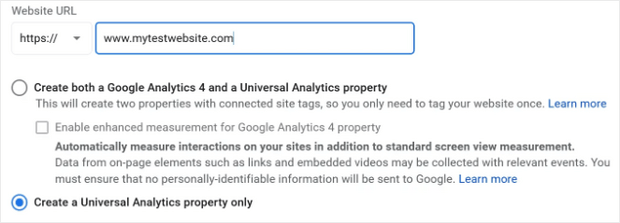
After that, enter the URL of your website and make sure to select the Create a Universal Analytics property only option. This ensures you won’t have any issues connecting to MonsterInsights or other tracking platforms.
Click Next when you’re done.
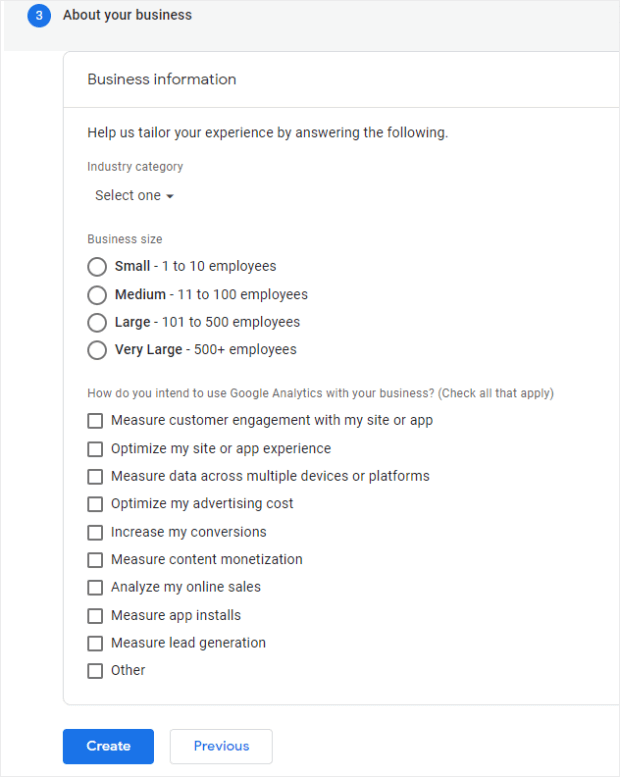
Finally, you will be filling out some information about your business. This helps Google Analytics tailor the data to your specific business and goals.
When finished, click Create.
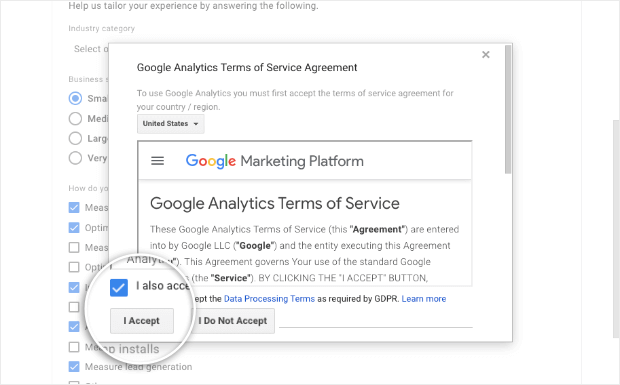
Now, you’ll need to accept Google’s terms of the agreement. Click the checkboxes and then scroll to the bottom to find the I Accept button.
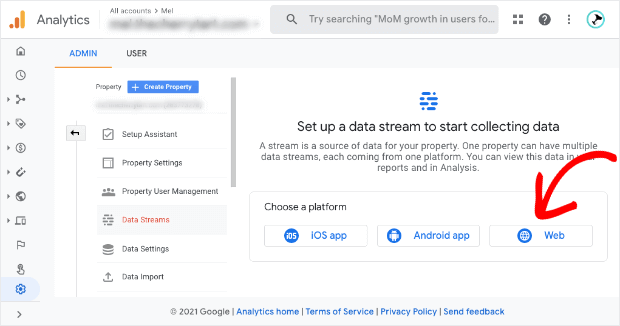
Once done, the Google Analytics dashboard will open. Here, you’ll see 3 data stream options. For this, you’ll need to select the Web button.
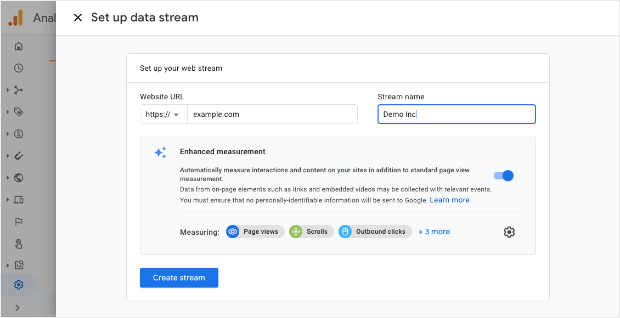
Next, enter your website’s URL and a stream name. Then, click on the Create Stream button.
Google will then create a measurement ID and stream ID, along with a tracking code.
You can find this tracking code under the Tagging instructions section. Open the Global Site Tag tab and copy this tracking code.

Now, you’ll need to add this tracking code on your WordPress site to connect Google Analytics to your website.
Depending on how you go about adding Google Analytics to your site, it can be pretty tricky. However, we will be showing you an easier alternative that requires zero coding or technical knowledge.
We recommend going with method 1, which adds Google Analytics to WordPress by using a plugin. That’s because it’s the easiest way, and you won’t have to worry about editing any codes within your WordPress theme.
Method 1: Installing Google Analytics Plugin on WordPress
We’ll start with the simplest method for adding Google Analytics to WordPress.
For that, we’ll use the MonsterInsights WordPress plugin.

MonsterInsights is the best Google Analytics WordPress plugin on the market. Not only does it let you add Google Analytics to your WordPress site, but it also makes accessing your data significantly easier.
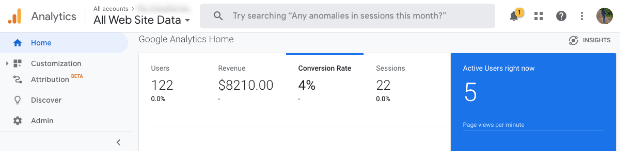
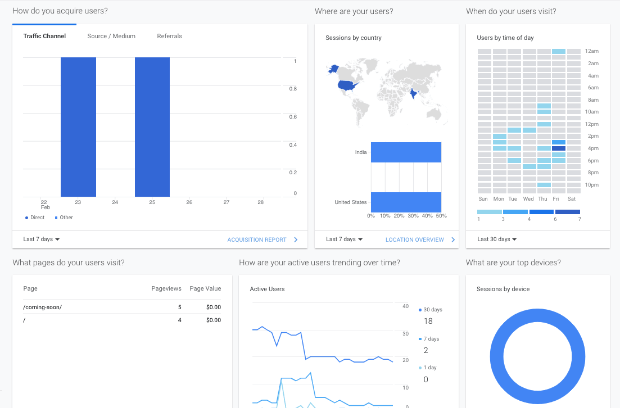
Now, we know Google Analytics offers a lot of data. That’s a good thing. But, it can be overwhelming to sort through endless reports to find the exact data you need. With MonsterInsights, you can view the information you need right from your WordPress dashboard.
All you need to do is simply download and install the plugin.

With MonsterInsights, you also get:
- Custom reports
- Real-time analytics
- Enhanced eCommerce tracking
- Automatic EU Compliance (GDPR friendly)
- And more…
This is why MonsterInsights has more than 3 million active installs and is the most popular Google Analytics plugin for WordPress.
Plus, MonsterInsights seamlessly integrates with both Universal Analytics and Google Analytics 4 (GA4). You can track whichever version you’re using or track both at the same time with the Dual Tracking feature.
Now, let’s dive right into how to add it to your site.
MonsterInsights is simple to add, and you’ll start by downloading the plugin.
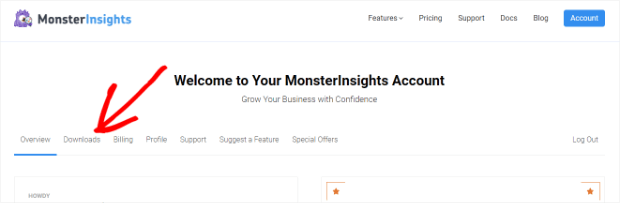
First, you will need to either create or log in to your MonsterInsights account on the MonsterInsights website.

Then, click on the MonsterInsights Downloads tab.
Now, you’ll need to download MonsterInsights. So, click on the large blue Download MonsterInsights button next.

Next, we’ll add it to your WordPress site. But first, you’ll need to remove any tracking codes or Google Analytics plugins that may already be installed on your WordPress site.
Go ahead and log in to WordPress and make sure you are on the admin dashboard.
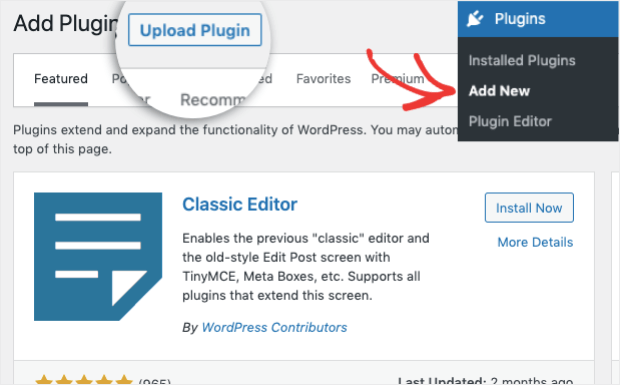
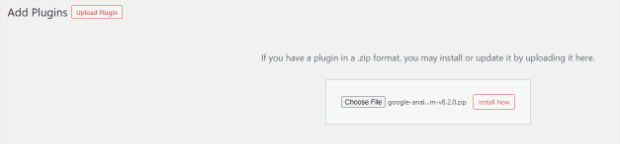
Navigate to Plugins > Add New and click on Upload Plugin at the top of the screen.
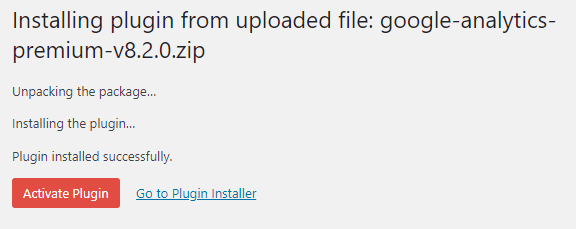
Now, you’ll click on Choose File to select the zip file you downloaded from the MonsterInsights site. Then, click on Install Now to both upload and install MonsterInsights.
Once the MonsterInsights plugin is installed, you’ll need to activate it on your site. So, go ahead and click on Activate Plugin.
Finally, you’ll need to enter your license key from the MonsterInsights My Account page. Once you find it, copy the key.
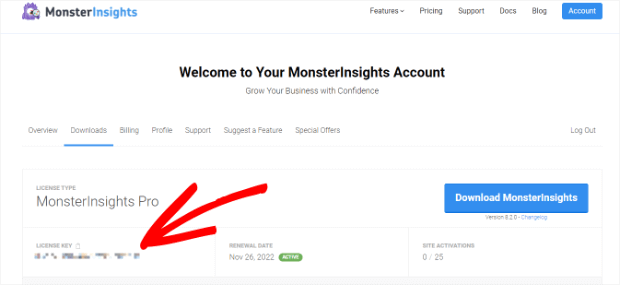
Moving back to your WordPress dashboard, navigate to Insights > Settings and paste your key in the License Key. Finally, click on the Verify Key button.
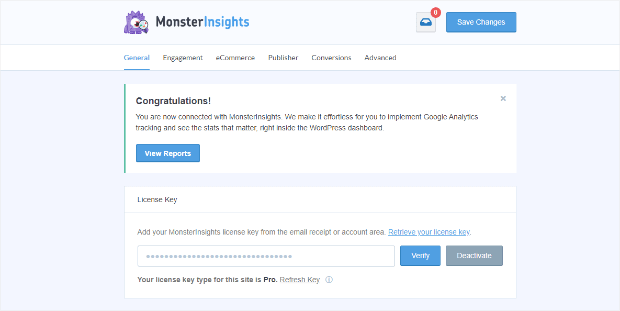
We’re now ready to connect Google Analytics to WordPress.
After activating the plugin, you’ll see the Insights tab in your dashboard.
Select it to open up the MonsterInsights dashboard, and inside, you’ll see the option to Launch Setup Wizard.

MonsterInsights will now guide you through the process to connect Google Analytics.
You’ll be asked which category best describes your site on the next screen. Once you select a button, click on Save and Continue.

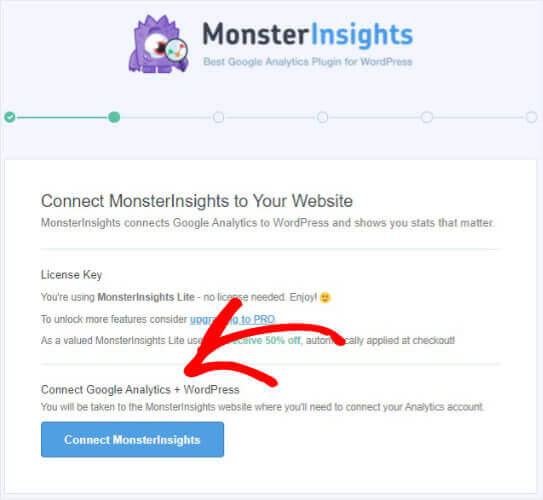
Now, you’ll have a prompt to connect MonsterInsights, Google Analytics, and WordPress. Click on the blue button to proceed.
A Google sign-in screen will pop up. Be sure you sign in to the same Google account you used to sign up for Google Analytics earlier in the tutorial. Click Allow to continue.
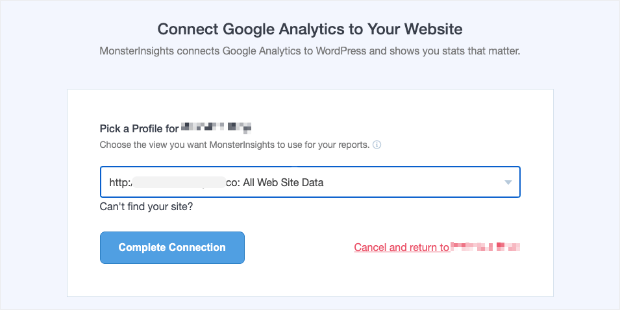
All that’s left to do is select your website from the next screen’s drop-down menu and click Complete Connection.
And that’s all there is to it. Google Analytics is now running on your website.
If you have both a Universal Analytics property and a Google Analytics 4 property, you can also set up dual tracking with MonsterInsights. This will let you bring in all of your historical data and the familiar reports from Universal Analytics while giving you the benefits of GA4.
To set up dual tracking, go to the man Settings page. Scroll down to the Google Authentication section and find the Dual Tracking Profile box.
![]()
Simply enter in either your Universal Analytics Tracking ID or your GA4 Measurement ID, whichever one you didn’t authenticate in the setup wizard.
Ready to start tracking your site’s data and get a better understanding of how it’s performing? Get started with MonsterInsights today!
Method 2: Adding Google Analytics to WordPress Without a Plugin
You can also add Google Analytics to WordPress without a plugin if you’d like. However, proceed carefully with this step, especially if you are unfamiliar with website coding. You’ll be editing your website theme, which could break your website.
You’ll also need to reenter the code any time you switch WordPress themes.
Any misstep here could lead to a blank or malfunctioning site. So before adding the Google Analytics code to your site, we highly suggest that you backup your site.
First, make sure you’ve copied the tracking code in your Google Analytics account.
![]()
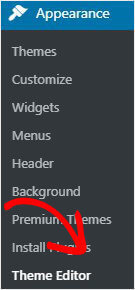
Now, head over to your WordPress dashboard.
From the dashboard, click Appearance. Next, click Theme Editor. If you don’t see this option, your security plugin or developer may have disabled it for you to secure your site from hackers. You’ll need to contact them to enable it.
Inside the Theme Editor, from the left-hand menu, select Theme Header.
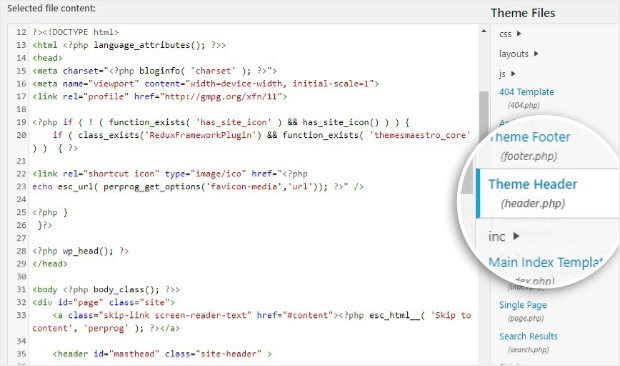
Now, just before the closing head tag, paste the tracking code. Make sure you leave everything else as is.
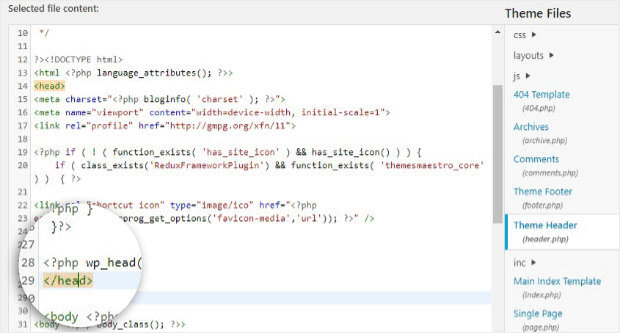
Exit the editor, and that’s it. You’ve added Google Analytics to your site.
Now, you’ll be able to track your site visitors and how they engage with your WordPress site.
And that’s all we have for you in this tutorial. We hope you’ve found this article helpful.
If you’d like even more resources to help you grow your business using your website, check out these articles:
