Do you want to add FOMO notifications to your Kajabi site to increase sales?
Kajabi can be an excellent resource for online entrepreneurs. It’s a one-stop-shop that makes it easy to sell your physical products, digital services, online courses, and much more.
But no matter which platform you use to build your site, you’ll likely run up against the following question: how can I get even more sales from my online store?
That’s why, today, we’re going to teach you one of the most effective and affordable ways to instantly boost your sales by up to 15% using FOMO notifications.
Before we dive in, though, let’s clarify what FOMO notifications are and why they’re such a valuable tool.
What Are FOMO Notifications?
FOMO notifications are small messages that display how real users engage with your website, often in real-time. There are many things that you can show in FOMO notifications, such as when a user:
- Signs up to your email list
- Joins a webinar
- Enrolls in your online course
- Leaves a positive review
- Buys a product from your store
And much more. You’ve probably seen these before. Here’s the one we’ll build for today’s tutorial:

Why Do You Need FOMO Notifications on Kajabi?
FOMO notifications are an incredibly powerful tool for getting more people to take action on your site. But what makes them so effective?
As you may have guessed, FOMO notifications get their name from the consumer behavior known as FOMO (fear of missing out).
FOMO occurs when we see someone getting benefits from a product or service that we are afraid to miss out on.
Remember the last time someone recommended a good movie, a restaurant, or a new cafe? Once they asked if you’d been there and told you how great the experience was, you were probably mentally figuring out how you could try it, too.
That’s FOMO in action.
And now, you can tap into the same consumer behavior for your website to get your site’s traffic to engage with your call to action (CTA) and, in turn, boosts your overall profits.
In fact, with TrustPulse users, we’ve seen FOMO notifications give an instant boost to sales by up to 15%.
So let’s take a look at how you can create a FOMO notification for your Kajabi storefront.
Add FOMO Notifications to Kajabi
For this tutorial, we’ll be adding FOMO notifications to our Kajabi site with TrustPulse:
TrustPulse is hands down your best bet for quickly and easily adding powerful FOMO notifications to your Kajabi site. You don’t even need to know any coding!
With TrustPulse, you’ll create professional FOMO notifications in a matter of minutes. You’ll have 100% control over the look, design, and messaging of your notifications, and everything can be configured with simple text input or drop-down menus.
From there, you’ll target specific notifications for certain portions of your audience who’ll find the message the most relevant.
By personalizing when, where, and to whom your FOMO notifications appear, you’ll drastically boost conversions across your site.
Finally, TrustPulse can be hooked up to Kajabi in just a few clicks by injecting a small piece of code in your store theme’s template.
Want to see it in action for yourself? Sign up for your risk-free TrustPulse account today!
Now that we have the right tools to work with, let’s add a FOMO notification to your Kajabi store.
Step 1: Embed TrustPulse on Your Kajabi Site
The first step is to sign up for TrustPulse and log into your user dashboard. You should also have access to your Kajabi account.
From the TrustPulse dashboard, click on the User Icon. Then click My Account from the dropdown menu.
![]()
Next, scroll down until you reach the section labeled Account-Wide Embed Code. Copy the TrustPulse embed code to your clipboard.

After that, log into Kajabi if you haven’t already. From the Kajabi dashboard, click Settings » Checkout Settings
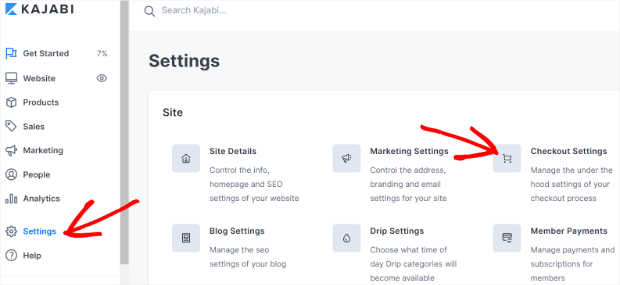
Find the section labeled Checkout Tracking Code and paste your TrustPulse embed code into the Footer Tracking Code field.
![]()
When you’re finished, click Save.
Before we move on, let’s add your Kajabi site to TrustPulse.
Go back to your TrustPulse dashboard and click on the User Icon again.
![]()
Click on Sites from the dropdown menu. From there, click the Add Site button.
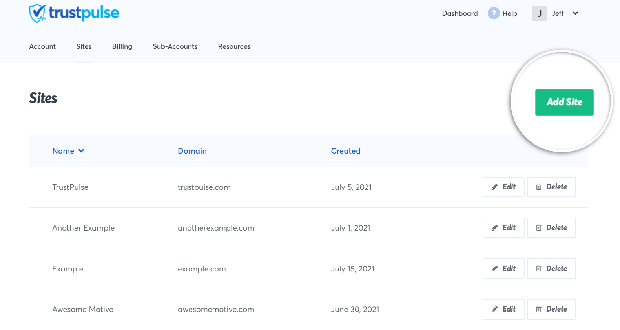
On the next screen, enter the name and domain of your Kajabi site. Depending on how you set up Kajabi, this could be a custom domain like mywebsite.com or a Kajabi subdomain like mywebsite.mykajabi.com.
Now you’re ready to create your Kajabi purchase notifications!
Step 2: Create a TrustPulse Campaign
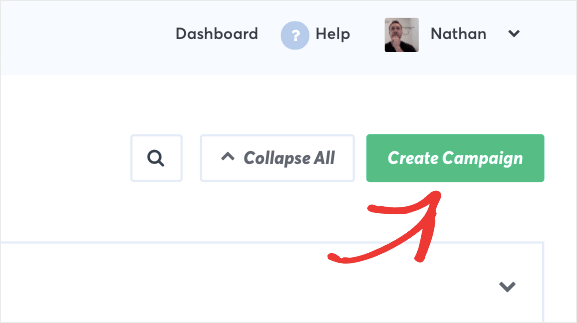
Click Create Campaign in the upper right-hand corner:
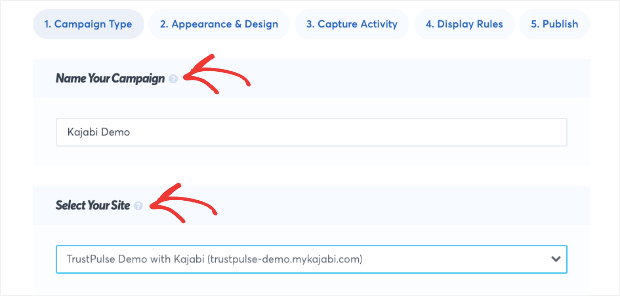
First, you’ll need to give your campaign a name and select your Kajabi site that you added in the previous step:
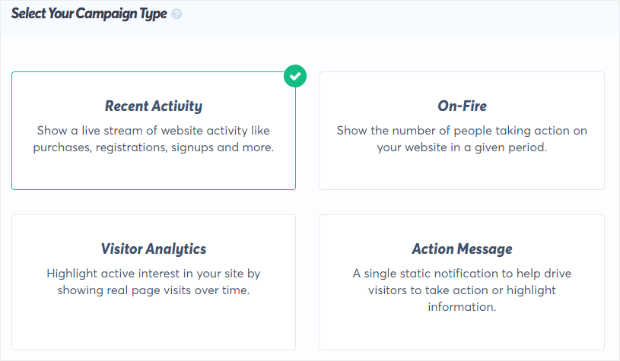
Then you’ll need to select your campaign type. You have 4 options here:
- Recent Activity
- On-Fire
- Visitor Analytics
- Action Message
Recent Activity campaigns display when an individual engages with your website. When the information is available, they’ll display the first and last name of the actual user:
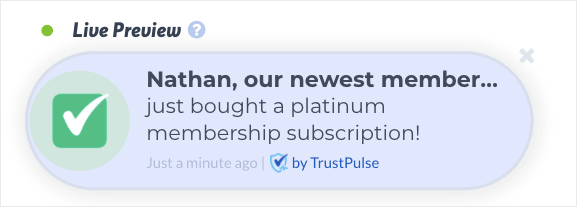
This humanizes the FOMO notifications and makes them more credible for your site’s other users. This type of campaign has the potential to show lots of different notifications if you have lots of course signups.
On-Fire campaigns function in a similar way but focus on the number in a larger group, rather than an individual:
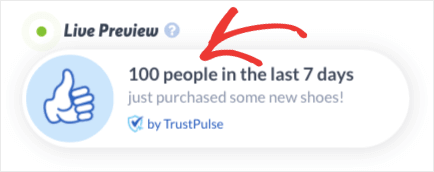
These are great for popular sales or activities on your website. This would be for things like:
- Flash sales
- Popular sign-up forms
- Webinars that attract loads of people
- Free course downloads
- And much more
Visitor Analytics campaigns show real page visits over time, highlighting active interest in your site.
Finally, Action Messages are a single static notification that encourages your visitors to take action.
For today, we’re going to create a Kajabi purchase notification to capture when people sign up for your online course.
For that, we’ll use a Recent Activity campaign:
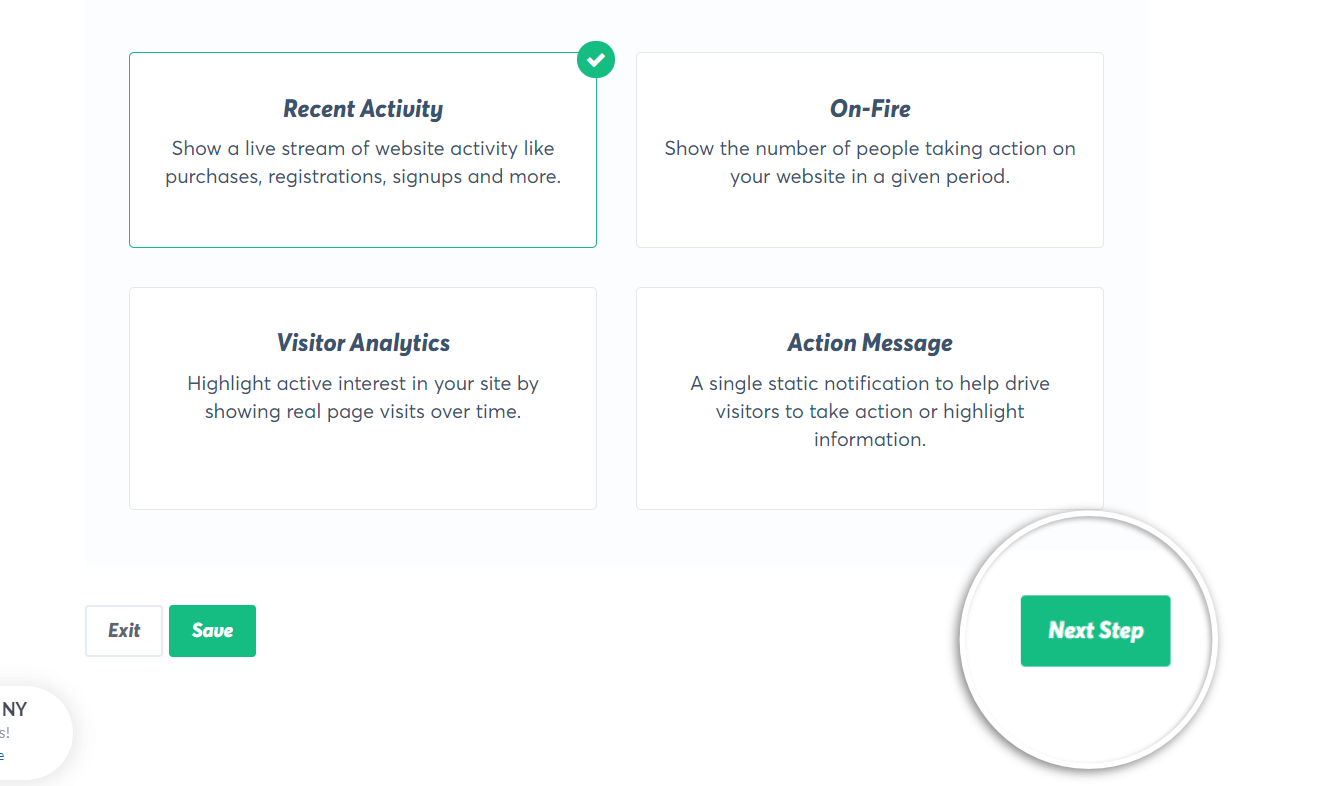
Now, click on Next Step to modify your campaign’s design.
Step 3: Customize Your Campaign’s Design
As we said earlier, TrustPulse gives you 100% control over your campaign’s look, design, and messaging. Plus, everything can be done without any coding experience at all.
The first thing you’ll notice is a toggle switch that lets you activate a welcome notification:
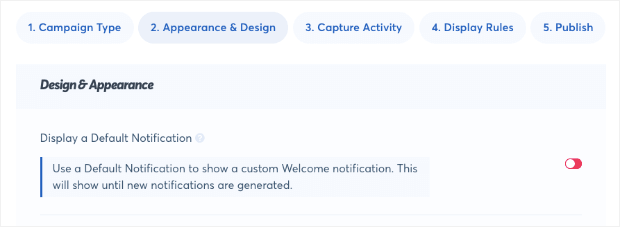
By default, this is turned Off, and we’ll leave it off for today’s tutorial, too. But you should be aware that this option exists to use FOMO notifications before you have any sales.
You’ll be able to instantly greet users with a custom message and redirect them to popular pages or content on your site:
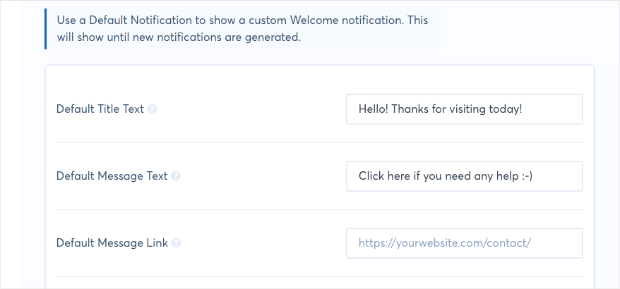
But, as we said before, we’ll leave this feature off today and assume you have a course or product ready to sell.
When you’re in the Appearance & Design tab, you can modify nearly everything about how your campaign looks, what it says, and how it functions. You can customize your campaign’s:
- Language your message appears
- Visitor alias that is used when the visitor’s name isn’t available
- Message text describing the action taken
- Message link that can be clicked on
- Image
- And so much more…
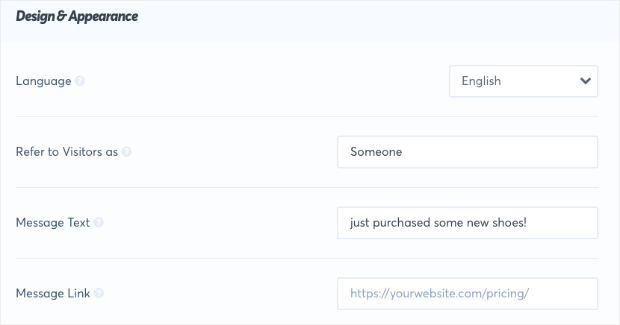
In this case, your Message Text should be related to your online course. It’s a great place to briefly mention the benefits of your course. We also recommend using words that emphasize how recently the action took place, such “just” or “today.” Some example purchase notification messages for Kajabi include:
- Someone just signed up for [YOUR COURSE NAME]
- Someone enrolled in [YOUR COURSE NAME] today
- Someone is about to improve their [THING YOU TEACH] with [YOUR COURSE NAME]
- Someone just joined [YOUR MEMBERSHIP COURSE]
It’s also very important to add a message link to your campaign. Not only does this drastically increase user experience (UX) across your site, but it also boosts sales.
If a visitor sees a purchase notification for your Kajabi products, services, or online courses, they’ll be able to click on the notification itself to be redirected to a landing page. This gives them faster access to the products they want and generates warmer leads for your landing page to convert traffic into customers.
And from there, if you go to Advanced Settings, you’ll be able to fully customize other aspects of your campaign’s look, such as:
- Title text color, font-family, font-size, and more
- Regular text color, font-family, font-size, and more
- Background color
- Border
- And more…
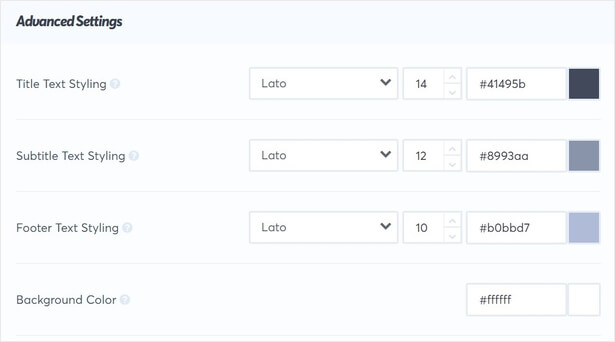
Once you’ve modified your campaign’s look and style to your brand, you’re ready for the next step: capturing activities on your Kajabi site.
Step 4: Capture Sales Activity
At this point, you’ve selected your campaign type and designed it to match the style of your brand. Now, you’ll want to select which activity will trigger your FOMO notification.
You have 3 options for this:
- AutoMagic captures activity that happens on your actual site, such as form submissions, webinar registrations, or purchases
- WooCommerce Orders capture order notifications from the WooCommerce Rest API
- Zapier captures activity from 3rd-party sites like social media accounts or review sites
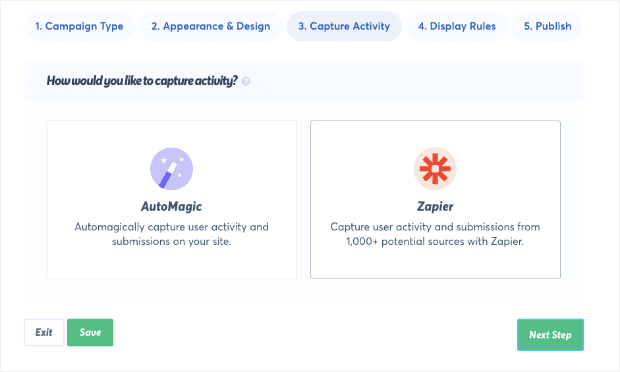
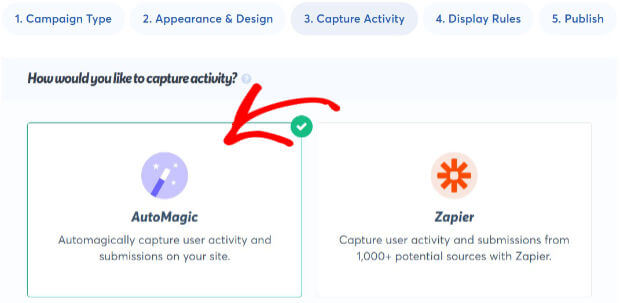
For our FOMO notification for when someone enrolls in your online Kajabi course, we’ll use AutoMagic:
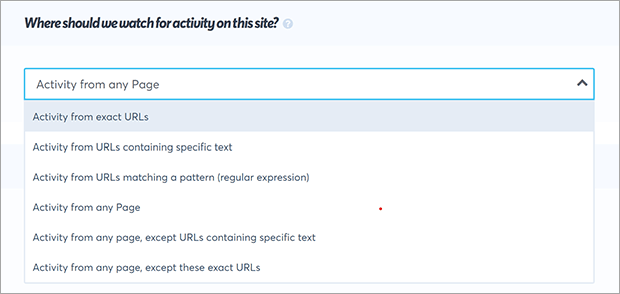
Next, you’ll have a drop-down menu after the question, “Where should we watch for this activity?”
Select Activities from Exact URLs:
This will prompt you to create a new page rule. You’ll need to add the URL slug for your online course’s product page:
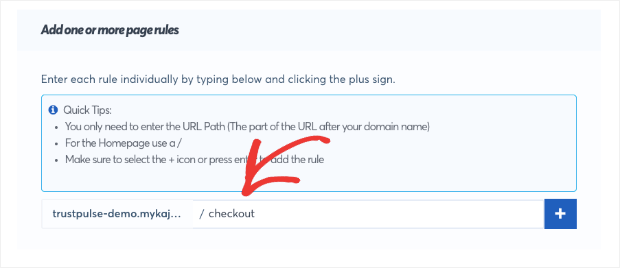
This will capture when someone successfully goes through your checkout process (or, in other words, when you get a sale).
Then, below that, you have two options:
- Form Activity is when someone fills out a web form on your site, such as a checkout form
- User Click tracks button clicks on your site

In this tutorial, we’ll choose the default Form Activity. If you’re launching a new course or product and haven’t made many sales yet, you might consider choosing User Click instead. Instead of a message about buying your course, you can display something like, “500 people are interested in my online course.” You could even modify the form to track waitlist signups if you’re in the prelaunch phase.
Now we’re ready for the next step: setting up your FOMO notification’s display rules. Click Next Step in TrustPulse to continue.
Step 5: Configuring Your Display Rules
Creating your campaign and capturing specific actions are a great start. To really get the biggest marketing boost from your FOMO notifications, you need to set up the right display rules to determine where the campaign will appear across your site.
Under the Display Rules tab, you’ll first see a drop-down menu under the question, “Where should we display your notifications?” followed by many options, such as:
- Any page
- Exact URLs
- URLs with specific text
- URLs matching a pattern
- And much more…
Today, we’ll select Display on any page:
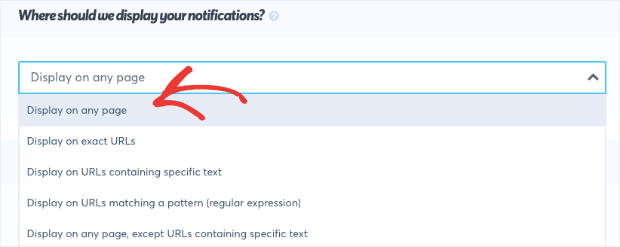
This means that your FOMO notification, when triggered by a sale, will appear on every page of your site. That will cast the broadest net for encouraging all of your site’s traffic to go to the landing page and sign up, too.
But you should know that the other options available from the drop-down menu help you personalize and target FOMO notifications at a deeper level.
This can be great if you have multiple products or courses to sell.
You can customize notifications to appear on related pages of your site that would be a better fit for some portions of your audience than for others.
Once you’ve set the display pages, you’ll reach Notification Settings, where you can modify your campaign’s:
- Delay
- Display duration
- Delay between notifications
- And much more…
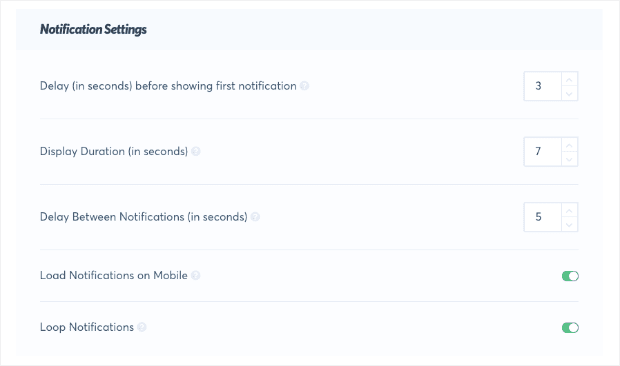
Then you can check out the Advanced Settings, which let you:
- Hide anonymous notifications
- Show notifications as anonymous
- Permanently hide when closed
- And more…
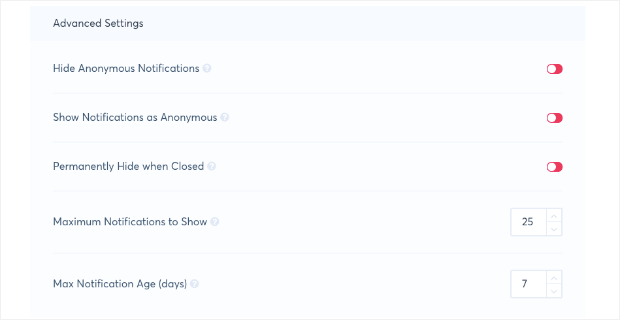
These give you another level of customization that you can use to make your FOMO notifications more effective.
Finally, you’re ready for the last step: publishing your campaign.
Step 6: Preview and Publish
Now you’ll be able to get a preview of the campaign you created:

Once you like what you see, you can Publish your campaign by clicking Launch Your TrustPulse Campaign:
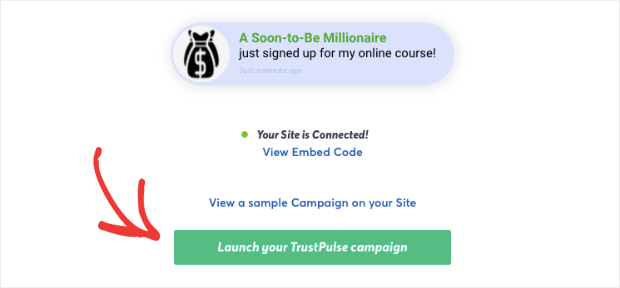
And that’s it! Your FOMO notification will now be live on your Kajabi website.
We hope you found this article helpful. If you did, you might want to check out our favorite FOMO marketing examples to boost your conversions.
If you like this article, please follow us on Facebook and Twitter for more free articles.

