Are you looking for the easiest ways to customize headers in WordPress?
Headers play a pivotal role in how customers interact with your website. They also are a constant part of your site since they show on the top of every page.
To get all of the benefits out of your headers, you need a way to edit them. Unfortunately, not all WordPress themes offer this function.
In this article, we’ll show you how to edit the header in WordPress using several easy methods.
What is The Site Header in WordPress?
The header is a constant part of your WordPress site that appears at the top of every post and page.
For example, here’s the header here on our TrustPulse website.

Most headers typically have two main features: a logo and site navigation.
Though, there are plenty of other things you can add to your header like:
- Calls to Action (CTA)
- Search box
- Buttons
- And more.
The header is an often overlooked area when building a website. But, this area is actually vital and could make or break your site for users.
Why Should You Edit Your WordPress Header?
We’re sure you’ve heard the saying, “You only have one first chance to make a first impression.”
For many potential customers, the first impression they have of your brand is your website. And their first impression of your website is the header.
Your WordPress header can make or break the user experience of your site. So, you’ll want to find a balance in your header being visually pleasing while also including all of the critical information for your site.
Your header can also serve as a valuable marketing tool. On our header here at TrustPulse, we have a prominent green Get Started button. That way, no matter where visitors go on our site, they’ll easily be able to find this link.
Also, the site’s menu follows the visitors as they navigate around. They don’t need to dig for the information since it’s all included right there at the top of their screen. Having everything so accessible reduces stress and gives a positive impression of your brand.
Let’s jump right in and learn how you can edit your own header.
How to Edit the Header on WordPress Sites
Now that you know the where and why about headers, let’s look at the how.
If you’re looking for a specific method, we’ve included a table of contents to help you easily find it.
Table Of Contents
- Method 1: Edit the Header in the WordPress Theme
- Method 2: Editing the WordPress Header with a Website Builder
Method 1: Editing the Header in the WordPress Theme
WordPress has a built-in function that lets you edit the header. Though, depending on your theme, the customization options can greatly vary.
You’ll want to choose a theme that gives you the options that you need in your specific header.
First, you’ll want to go to your WordPress admin dashboard. Then, go to Appearance » Customize.
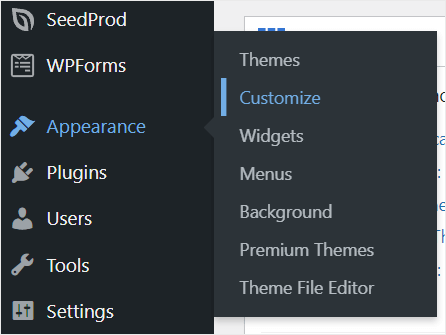
Then, you’ll be taken to the theme customizer. You’re probably familiar with this screen if you’ve done any sort of design in WordPress.
And if you haven’t, don’t worry. It’s simple to use.
On the left side of your screen, click on the Header & Navigation tab.
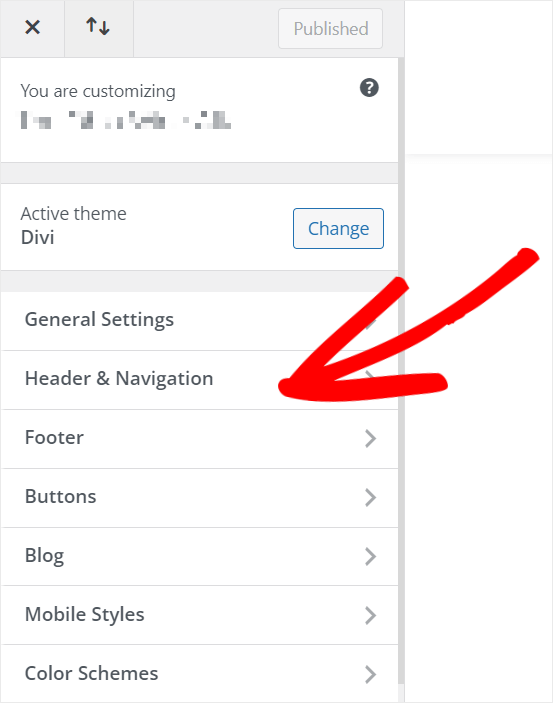
Here, you’ll find all of the theme’s options for editing the WordPress header.
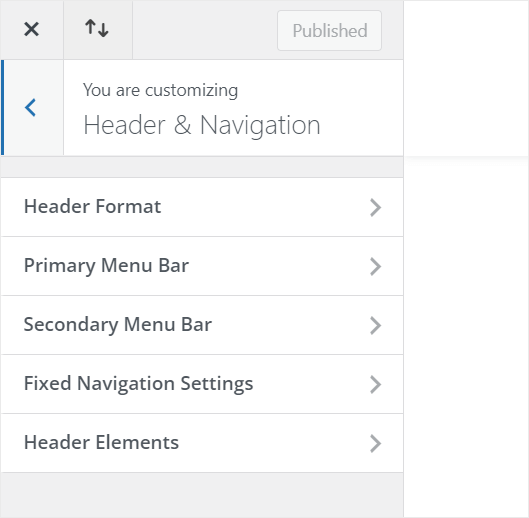
Within these menus, you will find options to change the header’s layout, display, fonts, colors, logos, and more.
Again, these options can vary greatly based on the theme you use.
Method 2: Customize Headers in WordPress with a Website Builder
While the previous method works, what if your theme’s header options don’t meet your needs? What if you want to make your header stand out?
In that case, your best option for customizing your WordPress header is by using a WordPress site builder.
We highly recommend SeedProd for this.
SeedProd is a WordPress page builder that lets you easily create your own pages and themes without needing a professional coder or developer.
In addition, SeedProd also includes everything you need to add both custom headers and footers to your WordPress site.
Let’s walk through how to customize a header with SeedProd. Step by step.
Step 1: Install and Activate SeedProd
To get started, install and activate SeedProd on your site. For complete instructions, check out this great post from WPBeginner on how to install a WordPress plugin.
Once SeedProd is activated, you’ll need to enter your license key. You can find the license key in your account on the SeedProd website.

Copy this license key and go back to your WordPress dashboard.
Then, open the SeedProd » Settings page and paste the key in the License Key box.
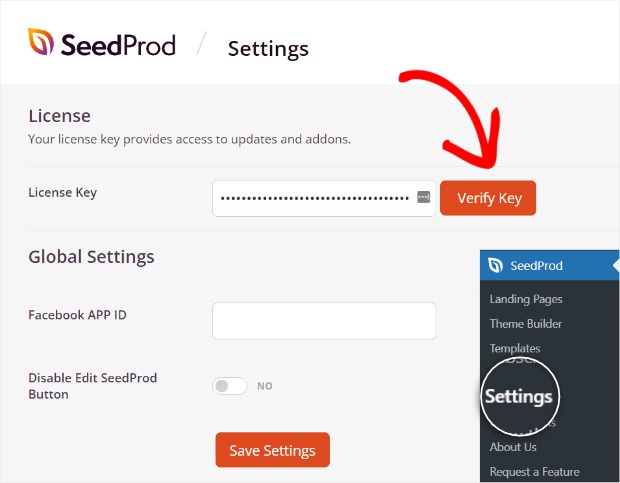
Then, click on the Verify Key button to activate your license.
Step 2: Create the Header
Now, it’s time to customize the WordPress header.
Navigate to SeedProd » Theme Builder and click on Add New Theme Template.
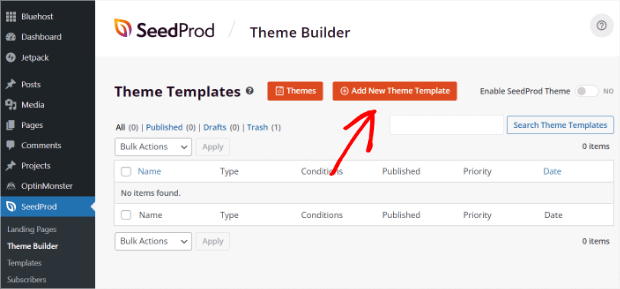
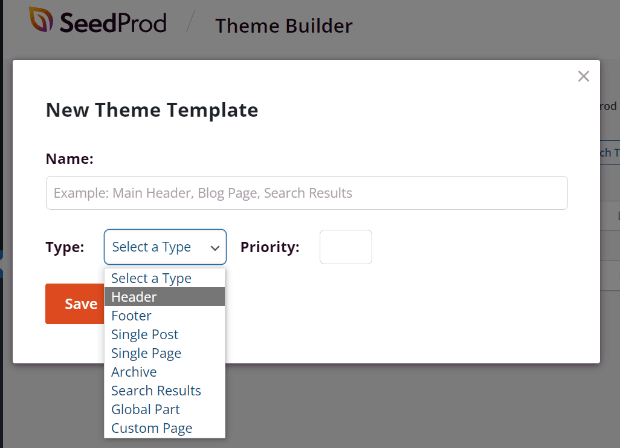
A new screen will pop up. Here, you’ll name your theme template and select the type. Be sure to select Header. Then, click Save.
This will bring up a conditions menu. In this menu, you can choose specific pages to either include or exclude from your header.
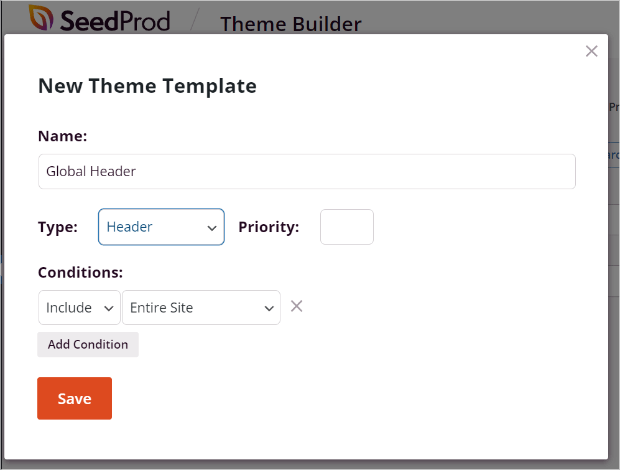
If you want it to be a global header, then leave the default options. Click Save when you are finished.
Step 3: Customize the Header
You should now see SeedProd’s drag and drop visual builder. At first, it will be blank, with a settings menu on the left.
To get started, go to the light purple bar and click on the Add Columns icon. For this tutorial, we chose a three-column layout.
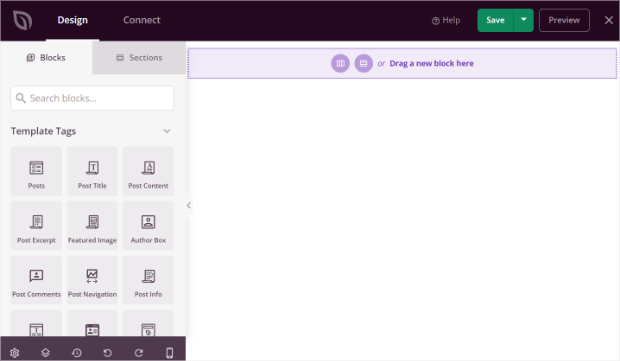
This will add the columns to your builder and will also pull up the section settings. This panel of the left will let you customize the background style and image, as well as the header width, spacing, and more.
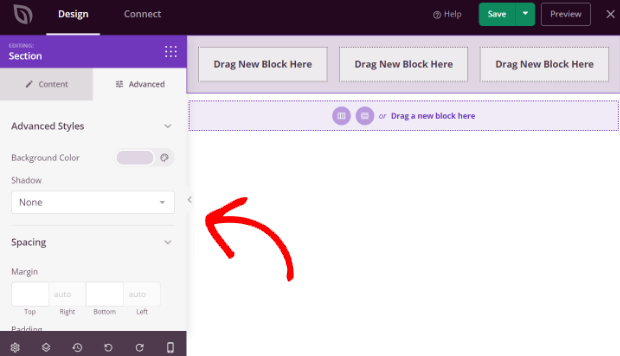
Now, we can start adding content to the header.
Step 4: Add Content to the Header
Adding content to your header with SeedProd is as easy as point, click, and drag.
Click on any of the header blocks to bring up the content block options on the left side menu.
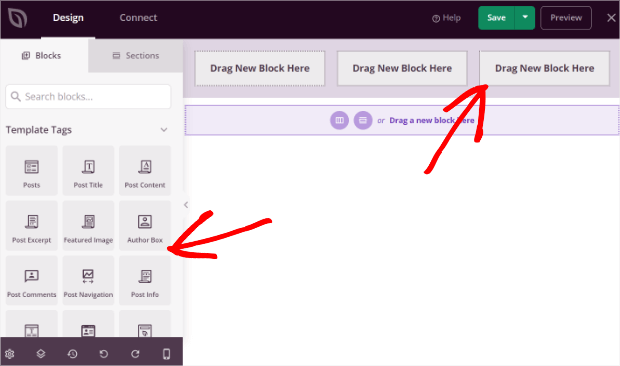
Then, scroll through the list, find the block you want to add and drag it to where you want it to be in the header.

Continue to customize the rest of your header by dragging the boxes into the columns.
Then, when you are happy with how the header looks, click the drop-down arrow next to Save and click Publish.
In order for your SeedProd header to appear on your site, you’ll need to create the rest of your theme with SeedProd.
For a complete guide on this, check out their tutorial on how to create a custom WordPress theme.
And that’s it! You now have two easy ways to customize your WordPress header.
We hope this tutorial has helped you create a header that not only looks stunning but also gives off the perfect first impression
If you liked this post, then you may also want to check out:
- How to Create a Coming Soon Page That Drives Excitement
- How to Write a Killer Call to Action (With 20 Perfect Examples)
- How to Add Google Analytics to WordPress (Step by Step)
These articles will help you learn more about your WordPress site’s audience, get higher conversions, and drive excitement.
And if you’re interested in boosting your conversions and sales quickly and effectively, you should check out TrustPulse! It’s proven to increase conversions by up to 15% instantly.

