Do you want to learn how to create an Esty sales notification for your site, but you’re not sure where to start?
Etsy has become a popular choice for people who want to crack into eCommerce. It’s an intuitive platform that’s fast to set up and easy to use.
But as a new or small business, there are some challenges that you can’t avoid.
And one of the main challenges is building enough trust with your site’s visitors that they confidently pull out a credit card and make a purchase.
That’s why, today, we’re going to teach you how to create an Etsy sales notification to increase your credibility and drive more revenue from your online store.
But first, let’s get clear on what a sales notification is and why it’s such a powerful tool for eCommerce.
What Is an Etsy Sales Notification?
A sales notification is a small message that appears on your site. Its job is to let your visitors know when someone has made a purchase from your online store.
You’ve likely seen these kinds of notifications before. They look something like this:

These non-intrusive (but powerful) messages have been shown to increase sales instantly by up to 15%.
Which begs the question, “Why do they work so well?”
Sales notifications leverage a basic consumer behavior known as “FOMO” (fear of missing out).
This feeling occurs when people see that other consumers are getting positive benefits from a product or service.
As a result, it makes your site’s visitors feel like they may be missing out on those benefits, and it motivates them to take action.
Sales notifications also have a few other advantages, including:
- Build Trust With Your Site’s Visitors: When people see that other consumers are buying your products, they’re more likely to trust your brand.
- Improve User Experience (UX): Since you can add links to these notifications, it’s an easy way to help users find your site’s most popular products.
- Increase Revenue: All of these benefits lead to more people making purchases across your site.
At the end of the day, creating an Etsy sales notification can be one of the easiest ways to drive more sales from your online store.
And now that we know why you should create these types of messages for your site, let’s look at how to build one.
Ready to get started? Let’s dive in.
How to Create an Etsy Sales Notification
For today’s tutorial, we’ll be using TrustPulse:
TrustPulse is hands down the best social proof software on the market. As you’ll see throughout the tutorial, it’s easy to use and doesn’t require any coding skills.
Plus, TrustPulse gives you total control over how your notification looks, where you place it on your site, and what will “trigger” your notification to appear.
And not only is TrustPulse the most powerful social proof software available, but it’s also one of the most affordable options out there.
That’s because TrustPulse starts at only $5/month. That means you can potentially boost sales by up to 15% on your site for about the same price as a cup of coffee.
Ready to see it in action for yourself?
Sign up for your 100% risk-free TrustPulse account today!
Once you’ve signed up and connected TrustPulse to your Etsy account, you’ll be ready to follow along with this tutorial.
Step 1) Connect TrustPulse to Etsy
Using Etsy as your online storefront is great because the platform is so easy to set up.
But there’s one major problem: the website still belongs to Etsy and isn’t yours.
That means you can’t use 3rd-party marketing tools on your Etsy eCommerce site.
Fortunately, there are 2 options you can use to make your Etsy store 100% your own:
- You can use Pattern, Etsy’s website building platform that allows you to create a site and integrate Etsy with it.
- You can integrate Etsy with WordPress.
We highly recommend adding Etsy to a WordPress site.
That’s because WordPress is the easiest way to manage all of your 3rd-party marketing tools. There are tons of useful plugins that anyone can use to create professional eCommerce websites in minutes.
Plus, it’s easy to add Etsy to your WordPress store. For a full tutorial, check out this helpful resource: How to Add Your Etsy Store in WordPress.
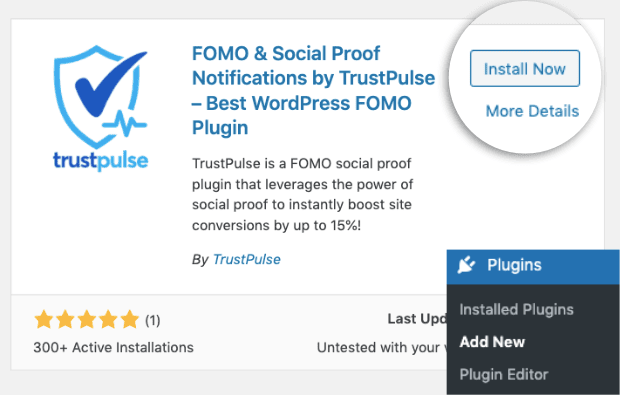
Once you’re all set up, you’ll simply need to install and activate the TrustPulse plugin. Doing so is easy.
From your WordPress admin menu, go to Plugins » Add New. Then search for TrusPulse.
When you’ve found it, click Install Now:
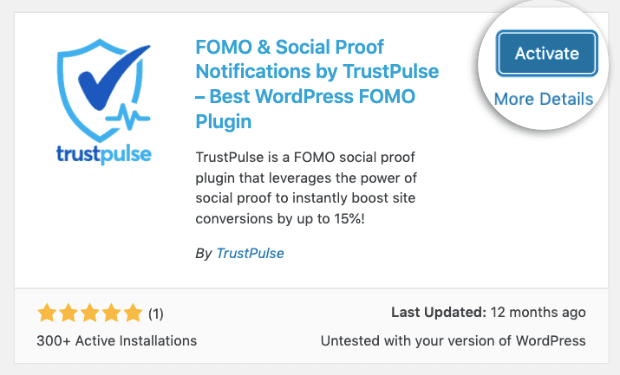
Once the plugin has successfully been installed, click Activate:
You’ll be redirected to another page that will allow you to connect your TrustPulse account.
Click Connect Your Existing Account if you’ve already signed up for TrustPulse:
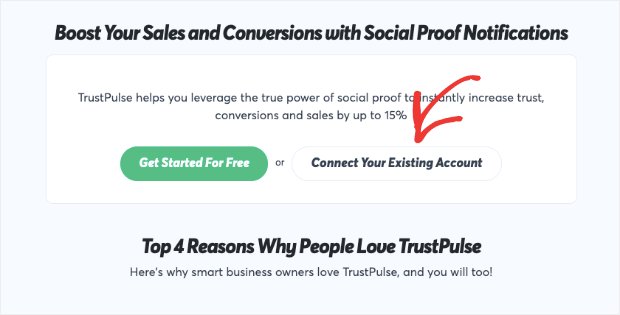
This will automatically connect your TrustPulse account with your WordPress website.
If you need more help, check out this article: How to Integrate TrustPulse With WordPress.
Once you’ve connected both Etsy and TrustPulse to your WordPress site, you’ll be ready to create your sales notification.
For the rest of this tutorial, we’ll work directly through your TrustPulse dashboard.
Let’s get started.
Step 2) Create and Choose Your Campaign
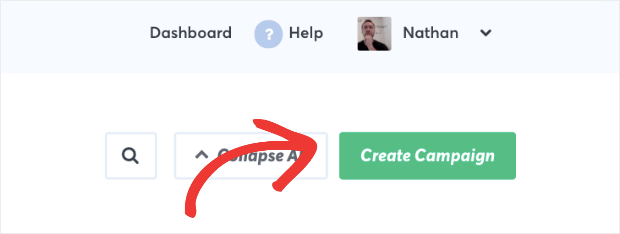
The first thing you’ll need to do is click Create New Campaign in the upper left-hand corner of your TrustPulse dashboard:
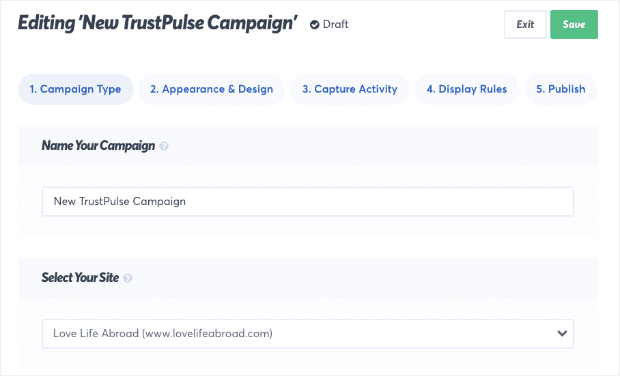
Then you’ll want to name your campaign (to stay organized) and select the website you want these sales notifications to appear on:
Next, select the type of campaign you want for your Etsy sales notification. You have 4 types of campaigns to choose from:
- Recent Activity: Show a live stream of website activity like purchases, registrations, signups, and more.
- On-Fire: Show the number of people taking action on your website in a given period.
- Visitor Analytics: Highlight active interest in your site by showing real page visits over time.
- Action Message: Display a single static notification to help drive visitors to take action or highlight information.
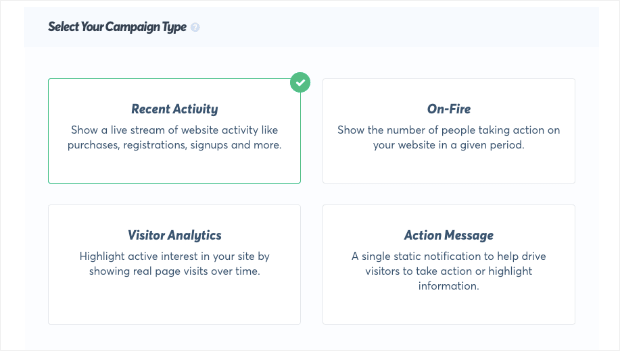
For today’s tutorial, we’ll stick with Recent Activity. But you should know the other campaigns are great options for getting started with social proof, even before you’ve made any sales.
Visitor Analytics, for example, will show popular landing pages across your site and how many people have viewed that page.
This allows you to rely on genuine social proof in an ethical way rather than using fake social proof that could harm your brand for years to come.
Action Messages are another great way to leverage social proof early in your business.
These let you create static messages for your audience to inform them about special promotions, provide them with discount codes, keep them up-to-date, and more.
Today, we’ll keep things simple with a Recent Activity campaign.
Then you’ll be ready for the next step.
Step 3) Style Your Etsy Sales Notification
One of the best parts about TrustPulse is that you have 100% control over how your notification looks and what it says.
This is true even if you’re not a coder or professional designer.
That’s because everything about your Etsy sales notification can be modified with drop-down menus, basic field text input, or choosing colors from a color wheel.
You can also modify aspects of your campaign, like:
- Language
- Visitor reference
- Message text
- Message link
- Notification image
- And much more…
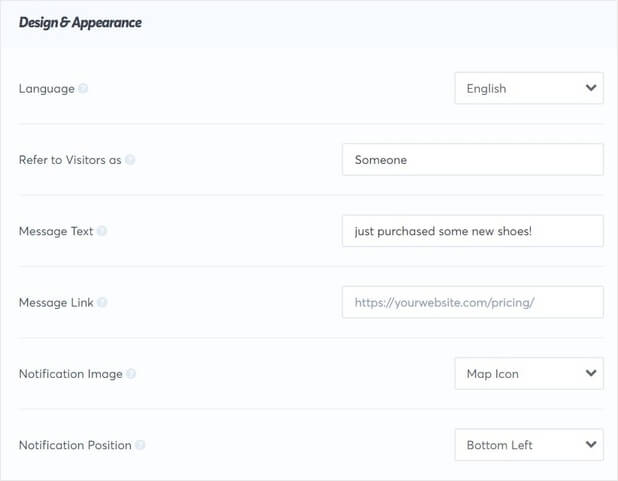
One thing we highly recommend is changing your notification image:
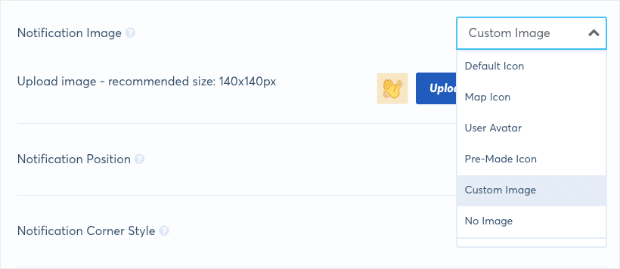
This will allow you to add an image of the products your Etsy visitors are purchasing.
As a result, you can showcase the products in a more appealing way to encourage users to click the notification and get redirected to the landing page.
Finally, you have plenty of Advanced Settings that allow you to modify things like:
- Font families
- Font size
- Text color
- Background color
- And more…
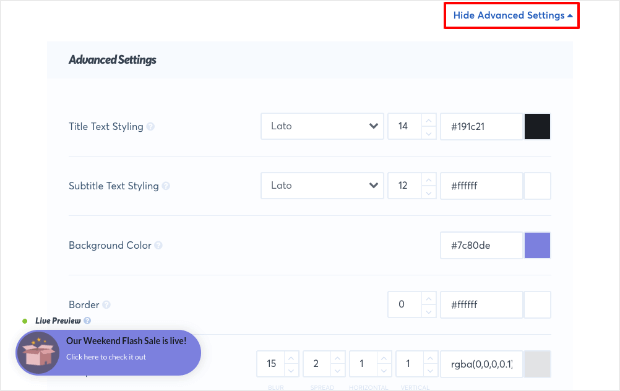
Again, you have full control over the look, design, and messaging of your notifications.
Once your message has been tailored to match your Etsy store, you’ll need to configure the action that “triggers” the notification to appear.
Step 4) Capture Your Notification’s Trigger
There are 2 ways you can capture activity on your site to trigger your Etsy sales notification:
- Automagic: Capture activities taken directly on your website.
- Zapier: Use the Zapier integration to connect with thousands of 3rd-party tools.
For today’s tutorial, we’ll need to use Automagic:
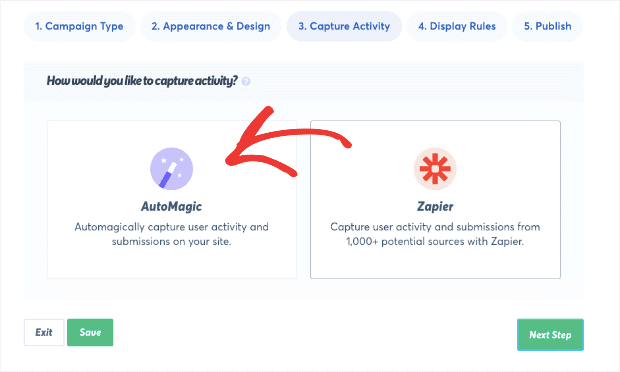
That’s because we’ll capture activity that’s taken directly on your website and don’t need TrustPulse to connect with any other 3rd-party tools.
Next, scroll down to the question, “Where should we watch for activity on this site?”
From the drop-down menu, select Activity from exact URLs:
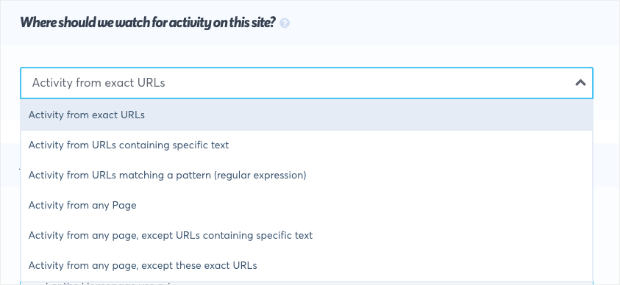
Then add the URL slug from your confirmation page under Add one or more page rules:
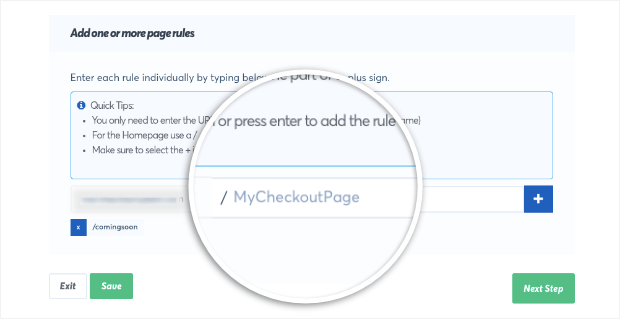
This means that when people reach the confirmation page of their purchase, it will create and display the sales notification in your Etsy store.
You can ignore the other configurations on the page for now, as those are used to create other kinds of social proof messages for your site.
At this point, we’re ready to move on to the next step: configuring your display rules.
Step 5) Configure Your Display Rules
In this section, you’re able to determine where your Etsy sales notification should appear across your site.
Again, TrustPulse gives you total control over the entire process.
You can display your notifications on:
- Any page
- Exact URLs
- URLs containing specific text
- URLs matching a pattern
- And more…
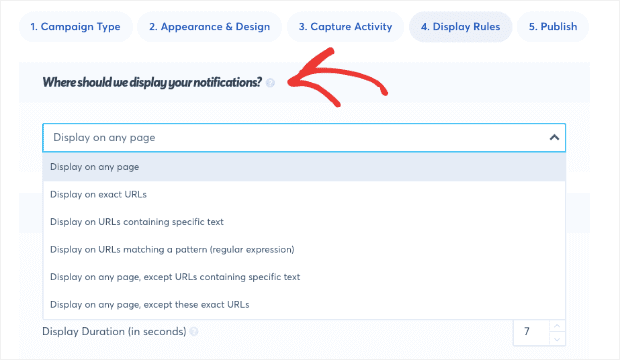
This helps you personalize your sales notifications to pages where they’ll get you the highest conversions possible.
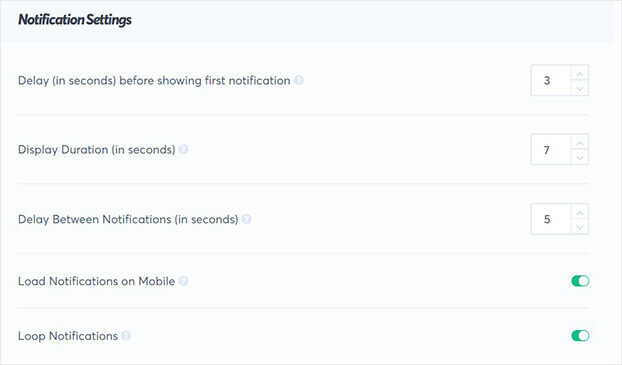
Next, you have other notifications to consider, including:
- Delay (in seconds) before showing the first campaign
- Display duration
- Delay between notifications
- And more…
And, finally, you have a few other Advanced Settings that give you more customization options.
These allow you to:
- Hide anonymous notifications (where the buyer’s name isn’t provided)
- Show all notifications as anonymous
- Set a maximum age for your notification (in days)
- Configure the order in which your campaign should appear (in days)
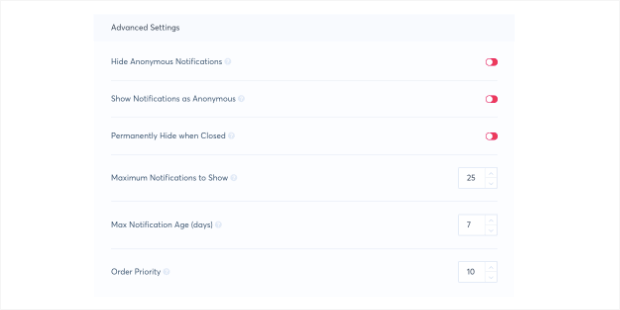
That last one is important.
It’s a feature called Order Priority, and it allows you to prioritize certain notifications over others.
This really allows you to get the most out of your social proof notifications as you can determine which ones drive the most sales.
Then you can be sure to schedule those notifications earlier so more people get the opportunity to see them.
Once you’ve configured your display settings, you’ve only got one last step: publishing your campaign.
Step 6) Publish Your Campaign
Before you publish, you’ll see a small preview of your campaign to make sure it’s the right fit for your brand:

If everything looks correct, all you need to do is click Launch Your TrustPulse Campaign:
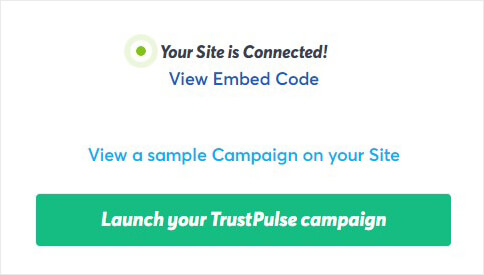
And that’s it! You now have an Etsy sales notification running on your WordPress site.
Again, while Etsy doesn’t natively allow you to add 3rd-party marketing tools, you can easily integrate your online store with WordPress or other website building platforms.
This will unlock an infinite number of possibilities for increasing conversions on your site and driving more conversions.
We hope you enjoyed this tutorial. If you did, you might also be interested in the following posts:
- 7 Best Sales Notification Plugins for WordPress to Increase Profits
- 19 Best Lead Generation Tools to Get More Targeted Leads
- 6 Proof Alternatives to Boost Your Credibility (and Your ROI)
These articles will have even more tools that you can use to generate more trust and sales from your online store.
