
Do you want to create a membership site in WordPress?
With a membership site, your visitors can sign up as members to get access to gated content and premium features. In turn, you can charge a membership fee or offer a subscription plan to make money from the site.
Now, creating such a site can be a challenge, but with the right tools and guidance, you can have your membership site up and ready in no time.
In this post, we’ll show you how to easily create a membership site in WordPress.
What Is a WordPress Membership Site?
A membership site lets you give visitors an option to sign up as members of your site. In doing so, they get benefits like access to restricted content, free downloads, and premium support.

Here are some of the most popular offerings on membership sites:
- Blog posts and news articles
- Books and eBooks
- Digital downloads like PDFs, templates, and checklists
- Video tutorials
- Case studies
- Online courses
- Professional advice and training
- Webinars and chats
- Premium support and community forums
- Affiliate programs
- Management and reporting
You could have free memberships, monthly subscription plans, or a one-time joining fee. You can even add different levels of membership access.
So, for example, you can offer bronze, silver, and gold memberships where every tier grants the member more privileges.
A membership site can create a steady stream of income that grows as more members join.
At the same time, it lets you establish authority. Users will know that your site is restricted because you have something good to offer.
Added to all the above, when users sign up as members, you can grow your email subscriber list. Members have a sense of belonging and are more likely to engage with your emails and interact with your brand.
What Do You Need to Create a WordPress Membership Website
To create a membership site from scratch, you’ll need the following:
- 1. Domain name – This is your website’s address such as trustpulse.com.
- 2. Web hosting account – This gives you access to a server where your website’s files will be stored.
- 3. An SSL certificate – This ensures any data sent from and to your site is secure and encrypted. So, any transactions will be safe on your site.
You can buy these things individually but it may cost you quite a bit and can become difficult to manage if you buy them from different providers.
Luckily, BlueHost offers an exclusive deal where you can buy a hosting plan, and get a free domain name and SSL certificate along with it.

Plus, it has a one-click WordPress installation process. So, Bluehost lets you skip all the challenges and makes it really easy to get started.
Once you have these three things in place, you can start building your membership site.
Creating a WordPress Membership Website
There are plenty of tools available to set up a membership site. If you want to create simple user registration on your site, WPForms is a great option.

You can create login and registration forms and even allow members to submit articles to your site.
If you’re looking to create a more complex membership site to sell content, subscriptions, and digital downloads, then you’ll need a dedicated membership plugin.
Bonus Content: Best WordPress Membership Plugins (Review)
One of the best and most popular ones is MemberPress.
MemberPress makes it easy to create a membership site. Plus, you get advanced features like payment integrations, membership levels, restricted access levels, and a whole lot more.
It also works well with other third-party software that you’ll need to run a successful membership site.
So, for this tutorial, we’ll be using the MemberPress plugin. Here are the steps you’ll need to take to create your membership site with MemberPress:
- Install the MemberPress Plugin
- Set Up Payment Methods
- Create Membership Levels
- Set Up Access Rules
- Create Members Only Content
- Create a Pricing Page
- Add Sign Up and Login Forms
Step 1: Install the MemberPress Plugin
First, you’ll need to install and activate the MemberPress plugin.
Once the plugin is activated, you need to visit the MemberPress » Settings page. Then, open the ‘Pages’ tab to configure the plugin settings.
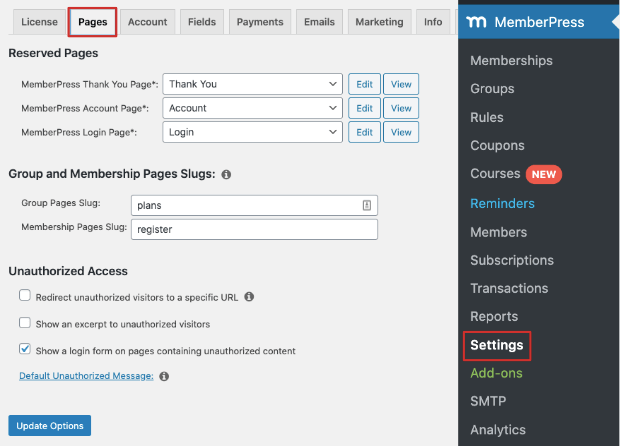
Here, you can change the default settings to your preferred configurations.
Step 2: Adding Payment Methods
To monetize your membership site, you’ll need to provide payment options to users who want to become members.
On the same MemberPress » Settings page, open the ‘Payments’ tab. On this page, you’ll see payment gateway options for your membership website.

You can accept payments using PayPal, Stripe, and Authorize.net as your payment gateway. You can choose one or multiple payment options to give your users more choices.
Step 3: Adding Membership Levels
Now, you may want to create different levels of memberships for your site. This allows you to offer affordable plans as well as premium-level subscriptions.
When you create multiple levels, you can set the price and benefits of each level. And MemberPress lets you create unlimited membership levels, though you’ll only need a handful in most cases.
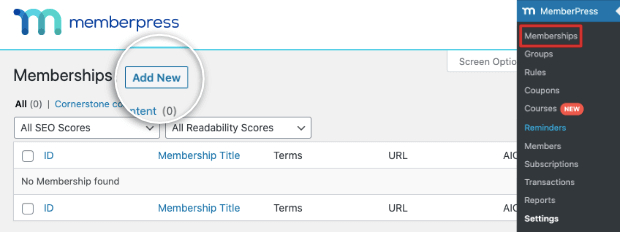
To set up different levels, go to the MemberPress » Memberships page from your dashboard menu and click the ‘Add New’ button.
Next, you need to add a title and description for your membership level. Then, from the ‘Membership Terms’ section on the right, you can decide the price and billing type.
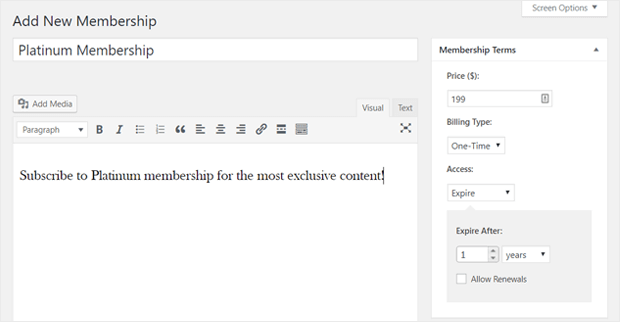
You can also set the access time to expire after a period of time such as 1 year and allow renewals of the membership plan.
Once you’re done with that, scroll down to the ‘Membership Options’ section. You’ll see options to configure the registration, permissions, price box, and more.
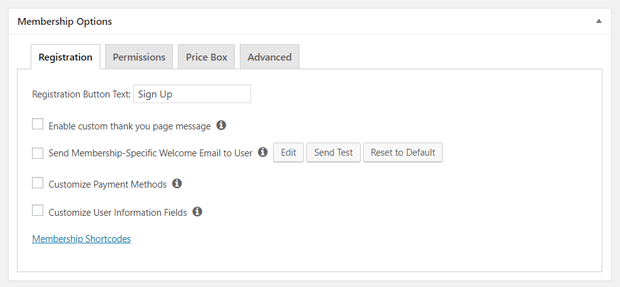
When you’re happy with the settings, you can publish your membership level.
Like this, you can add more levels to your membership site.
Step 4: Setting Up Access Rules for Your Membership Plans
You’ll need to define what content can be accessed at which membership levels. To do this, navigate to MemberPress » Rules and select the ‘Add New’ button.
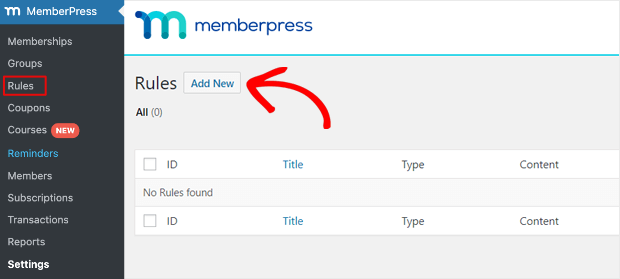
This will open up an editor where you can add rules and link them to the membership levels.
In the example below, we are granting access to all content that falls under the ‘Advanced WordPress Guide’ category to Platinum and Gold members.
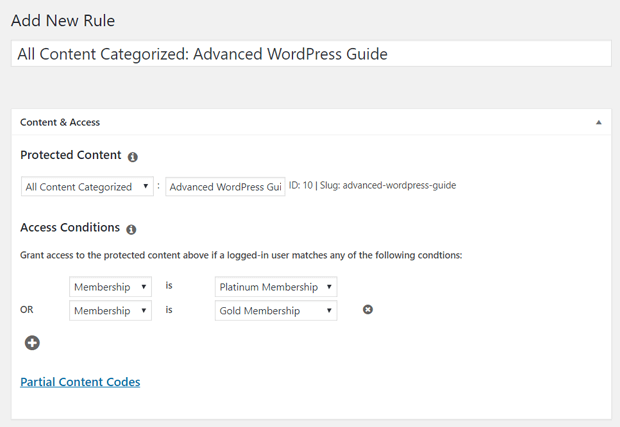
MemberPress gives you options to create member-only categories, tags, posts, pages, products, videos, and more.
After this, you’ll see the ‘Drip/Expiration’ box.
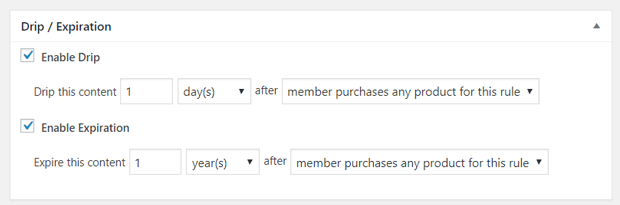
The drip option lets you release content gradually to your members. The expiration option will let you set a time period after which the members won’t be able to access the content.
When you’re done, don’t forget to save your rule to store your changes.
So, following the same steps, you can add more rules to determine who can access your content.
Step 5: Creating Members-Only Content
When a user becomes a member, you’ll want them to have access to pages and posts that are meant only for members.
You will also most likely release new content for members regularly.
Now, with MemberPress, you won’t have to go back each time and set a rule as we did in the previous step. Instead, you can link pages and posts to existing rules directly from the WordPress editor.
We’ll show you how to do this by creating a new post. Next, we’ve added some content to it and now we want to make it accessible to only Gold and Platinum members.
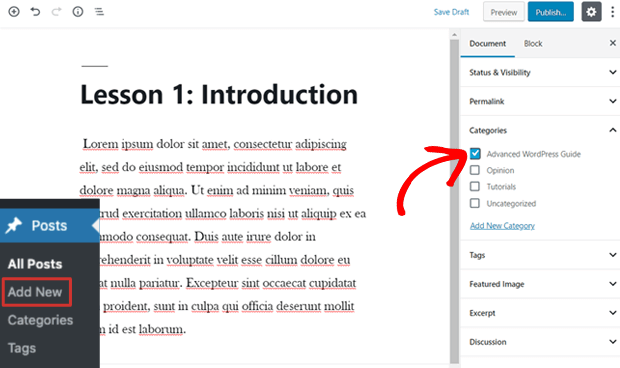
From the right-hand settings panel, select the category you created the rule for. In the previous step, we created a rule for ‘Advanced WordPress Guide’, so we’ve selected that one.
By selecting the category, it will automatically be made available only to Gold and Platinum members as there’s an existing rule for it.
Next, you need to scroll down to the ‘MemberPress Unauthorized Access’ section. This lets you choose what non-members will see when they try to access this content.
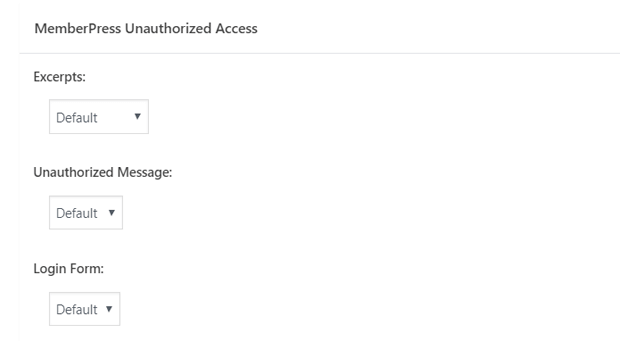
You can prompt your users to become members to access the content.
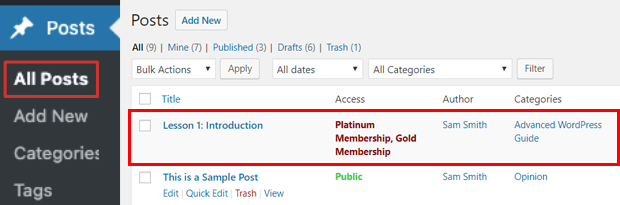
After this, you can simply publish your post. When you visit Posts » All Posts, you’ll see the access granted for each post.
Step 6: Creating a Pricing Page
Now, you’ve successfully created a membership site with multiple levels and membership rules.
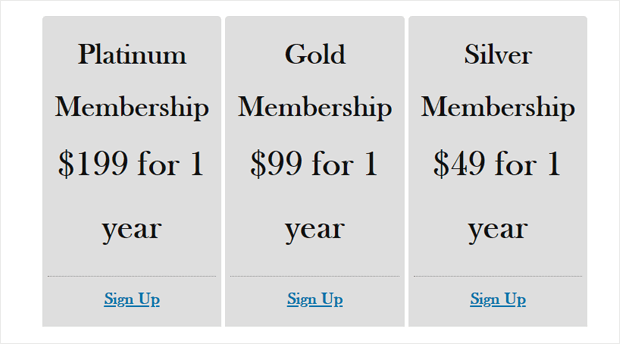
Next, you may want to create a pricing page where your visitors can view the price of your membership plans and what benefits they will get.
Your visitors can select a plan and sign up directly from the same page.
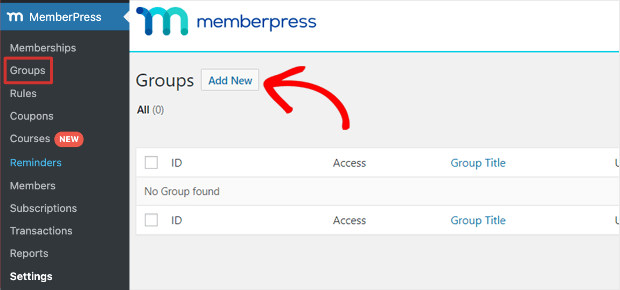
To create this page, visit the MemberPress » Groups page on your WordPress dashboard. Then, click on the ‘Add New’ button to create a group.
You’ll need to enter a title for the group. Select something like ‘Premium Plans’ or ‘Membership Plans’ as this title will also be seen by your visitors.
Next, scroll down to the ‘Group Options’ section and select the memberships you want to show.
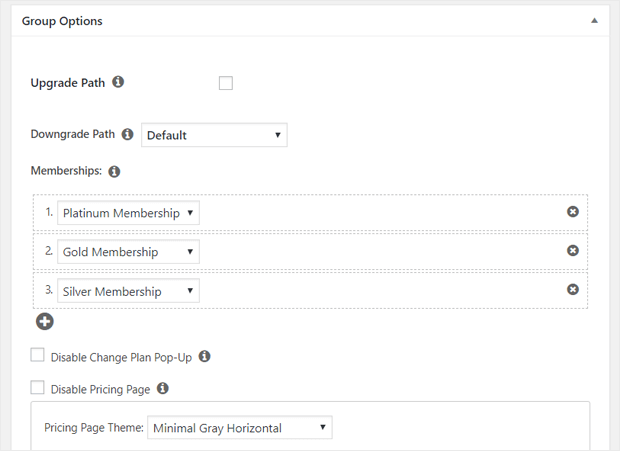
MemberPress also lets you choose a Pricing Page Theme so you can select one that matches your website.
Once you’ve done that, click the ‘Publish’ button. You can preview your page using the ‘View Group’ link.
Redirecting Non-members to the Pricing Page
When non-members try to access a page that is for members only, you should ideally redirect them to this pricing page you just set up.
This will increase your chances of converting visitors into members.
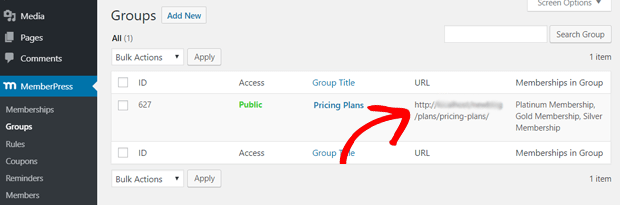
For this, visit MemberPress » Groups page and copy the URL of the group you created before.
Head over to the MemberPress » Settings » Pages tab. Under the ‘Unauthorized Access’ section, check the box that says ‘Redirect unauthorized visitors to a specific URL’.
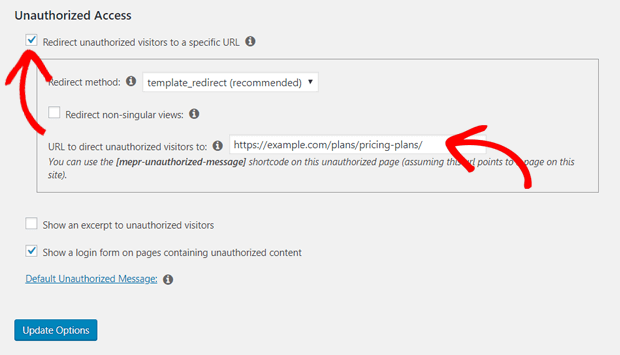
This will open up a new field where you can paste the group URL you copied. Then, click on the ‘Update Options’ button to save your changes.
Now non-members will be redirected to the pricing page where they can sign up to access the restricted content.
Step 7: Adding Sign Up and Login Forms
The final step to creating your membership site is to add sign up and login forms. This allows members to use their login credentials to enter their membership account.
And MemberPress makes it really easy to add user accounts and profiles.
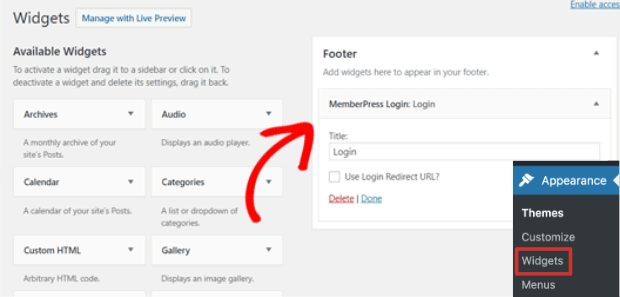
First, go to Appearance » Widgets on your WordPress dashboard. Here, you can add the ‘MemberPress Login’ widget to your sidebar, header, footer, or any widget-ready area.
Next, you’ll need to add the URL of your pricing page to your navigation menu. Go to Appearance » Menus page from your dashboard.
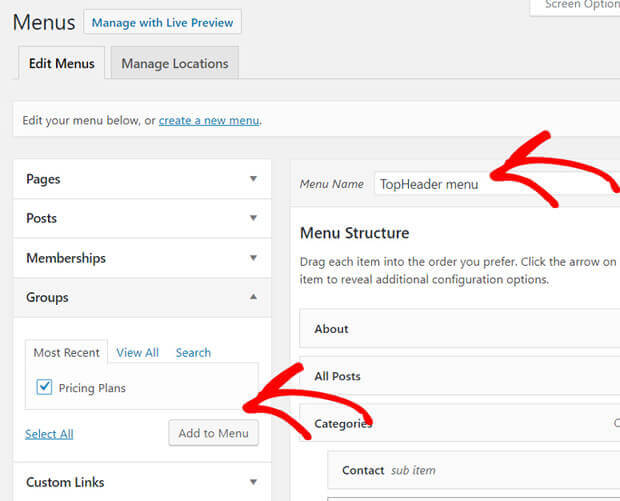
Choose your site’s existing menu or you can create a new menu here.
After that, under the Groups tab, select ‘Pricing Plans’ and click on the ‘Add to Menu’ button.
Now, your pricing page will appear in the menu on the right. You can rearrange its position by dragging and dropping it to where you want it to appear.
Don’t forget to save your menu to store the changes you’ve made.
And that’s it! You’ve successfully created a membership site. You can visit your site and check out how your membership site looks and works now.
How to Optimize Your Membership Site
Setting up a Membership site is no easy task, but luckily, MemberPress makes it easy to do so! Now, the challenge is getting visitors to sign up in order to grow your site.
These four tools can help you skyrocket your conversions and grow your members list exponentially.
- OptinMonster: This is the most powerful lead generation tool that can help you get more members and email subscribers. Check out how Expat.com gets 30,000 members every month using OptinMonster.
- MonsterInsights: This is the best Google Analytics plugin for WordPress. It helps you track your site’s performance and get insights into your users.
- TrustPulse: This is the best social proof app that helps you instantly boost conversions. You can display small popups that notify visitors when someone becomes a member of your site. This will encourage them to also sign up for your membership plans.
- Uncanny Automator: Automate your membership site and improve user experience by connecting your WordPress plugins together. For example, when a user submits a form with a special code, Uncanny Automator will automatically add them to a membership.
With that, you should have everything you need to create and run a membership site in WordPress.
We hope you liked this article. You may also want to check out the Best FOMO Popup Examples to Boost Your Conversions and the Best Landing Page Builders for WordPress to Increase Sales.
Both these posts can help improve your site and build your membership list.
If you’re looking to instantly increase conversions with social proof, sign up for TrustPulse now!
