
Do you want to learn how to create a landing page in WordPress?
In eCommerce, a well-designed landing page is a powerful tool for lead generation, driving conversions, and achieving marketing goals.
But hiring a developer to create your landing pages can be expensive. And building one from scratch can be a long, tedious process, especially if you’re working with limited tech skills.
If you use a WordPress website, you’re in luck! WordPress offers a range of features and plugins that make creating effective landing pages a breeze.
In this step-by-step guide, we’ll explore what a landing page is, discuss the key elements of a high-converting landing page, and teach you how to create a landing page in WordPress.
- What Is a Landing Page?
- What Makes a Good Landing Page?
- How To Create a Landing Page in WordPress
- Creating a Landing Page in WordPress Using Block Editor
- Creating a Landing Page in WordPress Using WordPress Plugins
- Optimizing Your Landing Page With Social Proof
What Is a Landing Page?
A landing page is a standalone web page designed with a specific goal in mind, such as promoting a product, generating leads, or encouraging sign-ups. Unlike regular web pages, landing pages are optimized for conversion and focus on a single call to action (CTA). They are created to provide a seamless user experience and guide visitors toward taking the desired action.
You can build a landing page for:
- Newsletter (email list) signups
- Webinar registrations
- Product launches
- Product demos
- Sales
- And much more…
The advantage is that you’re getting your traffic to focus on one thing (your CTA), which limits distractions. This gives you the chance to showcase your offer and increase conversions.
Note: Many people confuse a homepage with a landing page, but they are clearly two different things. The main difference between a homepage and a landing page lies in their purpose and functionality.
A homepage is the main entry point to a website and serves as a central hub for visitors to explore different sections, learn about the brand, and navigate to various pages. It typically provides an overview of the website’s content and aims to provide a comprehensive experience for users.
In summary, a homepage serves as a central hub for a website, offering an overview of the brand and its content. At the same time, a landing page is a targeted page designed to achieve a specific goal or conversion.
Now let’s find out what are the qualities of a good landing page.
What Makes a Good Landing Page?
A good landing page effectively communicates its purpose, captures visitors’ attention, and encourages them to take action. Here are some key elements to consider when creating a landing page:
Clear and Compelling Headline: A strong headline grabs attention and communicates the value proposition of your offer.
Concise and Persuasive Content: Keep your page content focused, concise, and persuasive. Highlight the benefits and features of your offer to entice visitors.
Engaging Visuals: Use high-quality images, videos, and graphics to enhance the visual appeal of your landing page and convey your message effectively.
Call to Action (CTA): Include a clear and prominent call-to-action button (CTA) that tells visitors exactly what action to take. Make sure it stands out and is easily clickable.
Trust Elements: Build trust with your visitors by incorporating social proof, testimonials, client logos, or security badges.
How To Create a Landing Page in WordPress
There is more than one way to create a landing page in WordPress. This guide will cover the two most easy and effective ones.
- Using the WordPress block editor
- Using a WordPress landing page builder
Creating a Landing Page in WordPress Using Block Editor
Let’s walk through the process step by step.
Step 1: Logging In to the WordPress Dashboard
To access the WordPress Dashboard, add “/wp-admin” at the end of your website’s URL. Enter your login credentials to log in successfully.
Step 2: Creating a New Page
In the WordPress Dashboard, navigate to “Pages” and click “Add New” to create a new page.
Step 3: Switching to the Block Editor
WordPress uses the block editor by default. If you’re not already in the block editor, click the “Block Editor” button at the top-right corner to switch to it.
Step 4: Adding a Page Header
To add a header to your landing page, click on the “+” button in the top-left corner or press the slash (“/”) key to search for the “Heading” block. Select the appropriate heading level (e.g., H1, H2) and enter your desired text for the header.
Step 5: Adding Content Sections
Click the “+” button again to create content sections. Search for and select the desired block type for each section, such as paragraphs, images, videos, testimonials, or calls to action. Customize each block by adding content and adjusting settings in the right sidebar.
Step 6: Customizing and Rearranging Sections
Click on each block to customize its content, style, and layout further. Use the block settings in the sidebar to adjust font styles, colors, spacing, and more. To rearrange the sections, click and drag a block to the desired location on the page.
Step 7: Previewing and Publishing the Landing Page
Once you’ve finished creating and customizing your landing page, click the “Preview” button to see how it looks. If you’re satisfied with the custom landing page, click on the “Publish” button to make your landing page live on your website.
Creating a Landing Page in WordPress Using WordPress Plugins
There are a variety of WordPress plugins that simplify the creation of landing pages.
Popular WordPress landing page plugins include Elementor, Beaver Builder, Divi, and Thrive Architect.
Choose a WordPress plugin that aligns with your requirements and install it on your WordPress website. For today’s tutorial, we’ll use SeedProd to build our landing page, the best WordPress page builder for small businesses.
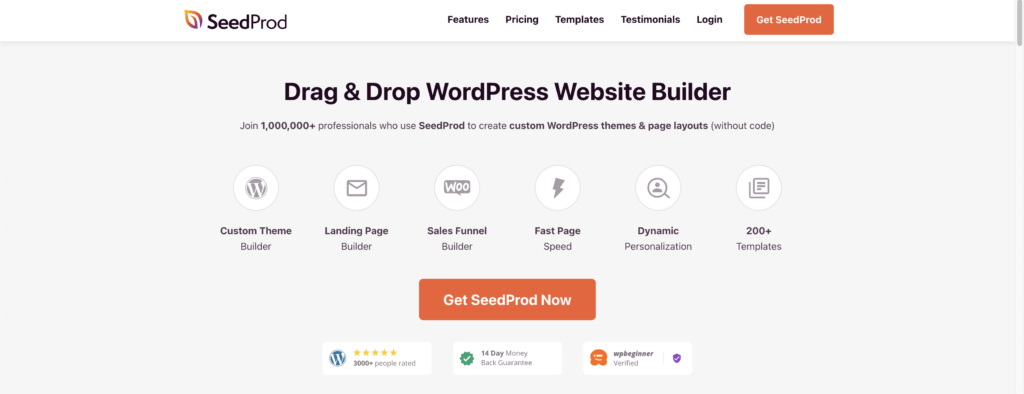
SeedProd is the world’s #1 landing page builder plugin for WordPress. As you’ll see, it allows you to create stunning landing pages in a matter of minutes, even if you have no technical skills or coding knowledge.
With SeedProd’s helpful templates, anyone can build landing pages that include powerful features like:
- Email signup optin forms
- Contact forms
- Images
- Video
- Compelling copy
- Countdown timer
- And much more…
Moreover, SeedProd offers special WooCommerce blocks, including add to cart, checkout, recent products, and more, allowing you to create custom WooCommerce checkout pages, custom cart pages, and more.
And with SeedProd’s intuitive design editor, all of these functions can be added with a simple drag-and-drop builder. Sound too good to be true? Why not see it in action yourself?
Get started with SeedProd today!
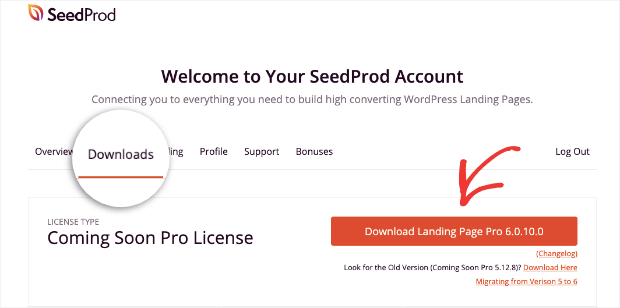
Step 1: Install and Activate the SeedProd Plugin
First, you’ll need to sign up for your risk-free SeedProd account. Once you’ve signed up, navigate to the Downloads tab in your user dashboard and click Download Landing Page Pro:
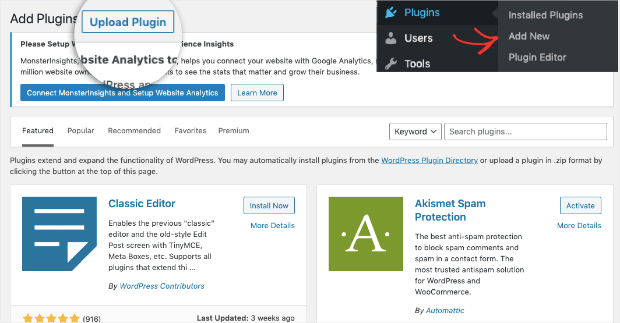
When the file has been downloaded, head over to your WordPress dashboard. From the left-hand side menu, click Plugins » Add New.
Then click Upload Plugins:
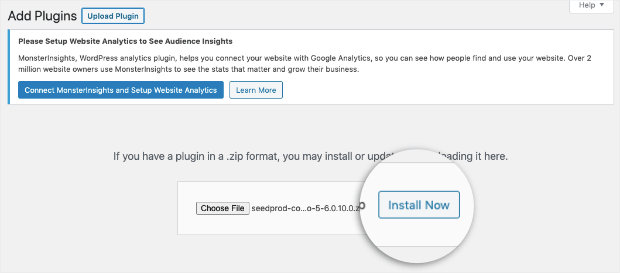
Next, you need to add the SeedProd plugin file you just downloaded. You can either click Choose File or drag and drop the file onto the page.
After that, click Install Now:
When you see that the plugin has been successfully installed, click Activate Plugin:

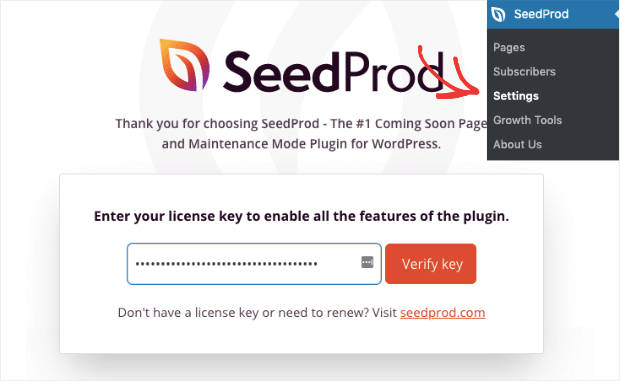
From there, you’ll need to enter your license key to get started. In the left-hand side menu, click SeedProd » Settings. You’ll see a field box where you can enter your license key and click Verify Key:
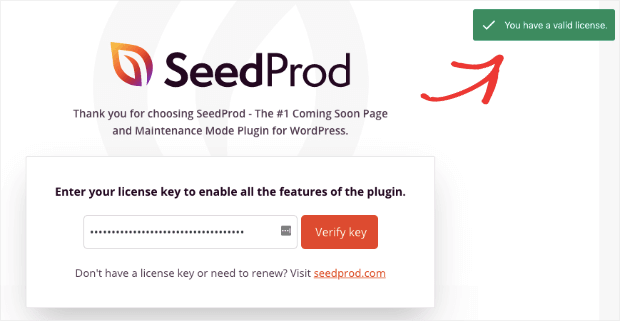
If the license key is verified, you’ll see a green notification to let you know that you have a valid license:
And now you’re ready to build your landing page.
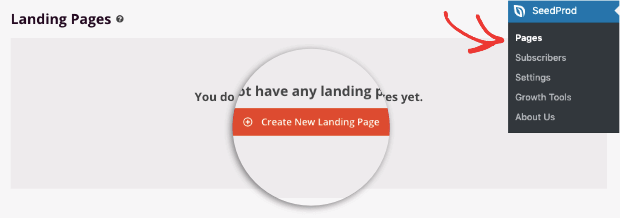
Step 2: Select Your Landing Page Template
From your WordPress dashboard’s left-hand menu, select SeedProd » Pages. Scroll down and locate the section called Landing Pages. Then click Create New Landing Page:
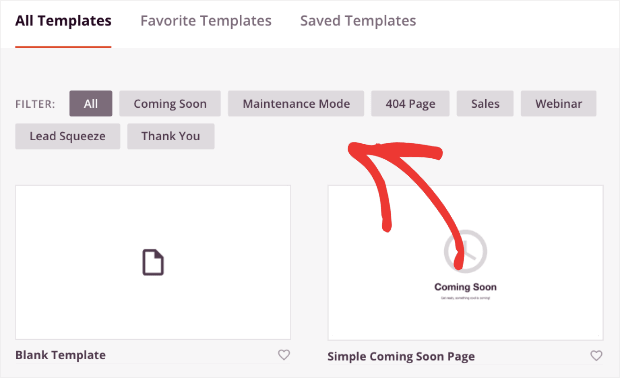
From here, you can choose from any of SeedProd’s pre-built templates:

These templates will save you hours of time and headaches in the landing page design process.
Plus, you can filter these templates based on the objective of your landing page:
You can build the most major types of landing pages, such as:
- Coming soon
- Maintenance mode
- Sales
- Squeeze page
- And more…
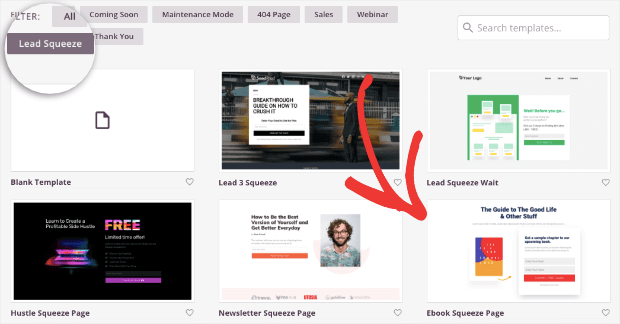
Today, we’ll select Ebook Squeeze Page from the squeeze page filter:
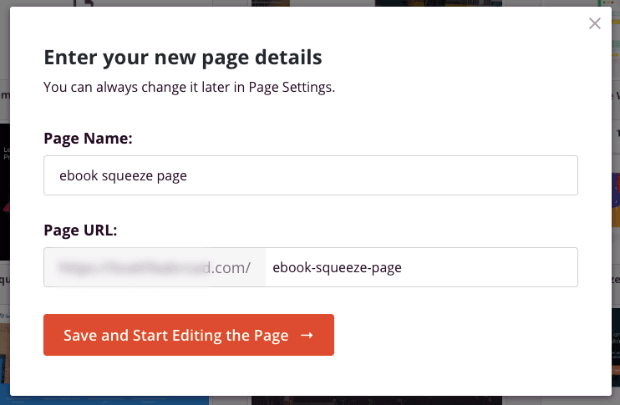
A new window will appear, asking you to give your page a name. It will also generate a new URL. Make sure your URL is SEO optimized. When you’ve named your page, click Save and Start Editing the Page:
And now, your new page will show up directly in your WordPress dashboard.
Step 3: Edit Your Landing Page in WordPress
When your new page opens up in your SeedProd editor, you’ll notice the editing tools on the left-hand side:
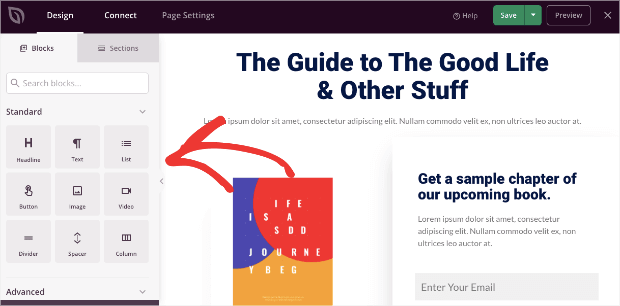
These let you add powerful features to your landing page, like:
- Headlines
- Text
- List
- Button
- Images
- Video
And much more. Whenever you want to add any of these features to your page, all you need to do is drag-and-drop them into place:

This allows you to quickly and easily create professional landing pages even if you have zero tech skills.
If you want to change any element on the page, you just need to click on it. Then the editing tools will appear on the left-hand side:

With SeedProd’s landing page builder, you can literally change every aspect of your page this easily. You can modify your page’s:
- Text
- Background color
- Images
- Videos
As we said earlier, literally anyone can create a stunning and highly-effective landing page with SeedProd. There’s zero coding or technical knowledge necessary, and the learning curve is super low.
If you can point, click, and type, you can build a landing page with SeedProd.
But now, let’s look at another important factor of your landing page: integrating your favorite marketing tools like email service providers.
Step 4: Integrate With Other Marketing Tools
Your landing page will often need to connect with other marketing tools. The most common use case is connecting your landing page to your email service provider (ESP).
That’s what we’ll be doing today.
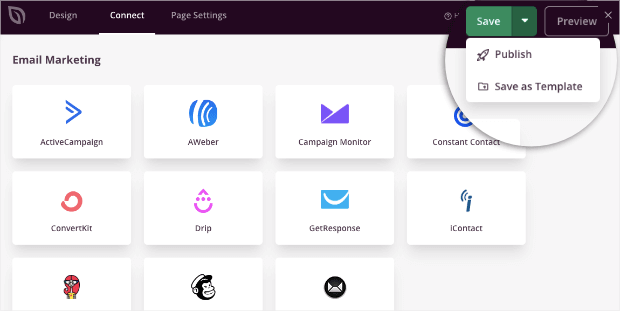
To connect your new WordPress landing page to other marketing tools, click Connect at the top of your SeedProd editor:
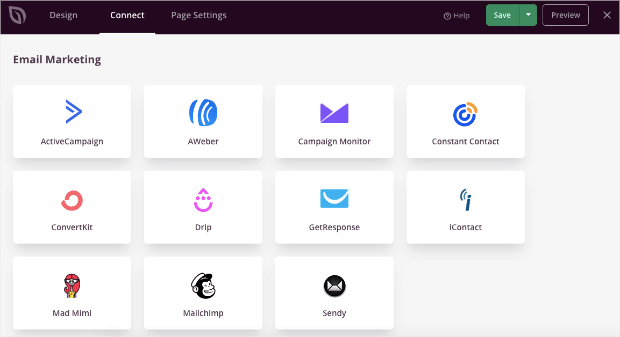
SeedProd integrates with popular email marketing providers like Constant Contact, Mailchimp, and more. This allows you to sync your landing page seamlessly with your email marketing service provider and kick your email marketing campaign into overdrive.
Once your user signs up on your landing page, you can send automated email campaigns to drive more revenue.
And when you’ve configured these messages with your ESP, everything can be turned on autopilot.
That means you can continue optimizing your landing page until you get the highest conversion rates possible.
But you can also go beyond integrating your email service provider. With SeedProd, you can also integrate:
- Zapier
- Google Analytics
- ReCAPTCHA

With these integrations, you can go far and beyond capturing emails. The Zapier integration alone lets you connect with thousands of other apps to help you take orders, collect payments, and much more.
And with Google Analytics, you’ll be able to track the success of your new landing page. If you’re serious about getting higher conversions, then you’ll likely want to check out MonsterInsights:

MonsterInsights is hands down the best Google Analytics plugin on the market. With MonsterInsights, you can track your pages’ success, see where your traffic is coming from, gather valuable insight into your audience’s demographics, and much more.
Plus, everything can be seen directly in your WordPress dashboard in an easily-digestible format.
You can integrate SeedProd into your current marketing flow to get as many conversions as possible.
All that’s left once you’ve finished designing your page is to click the Save button and Publish:
And that’s it! You’ve now built a landing page for your WordPress site in a matter of minutes. Let’s quickly look at how you can get even more conversions by adding social proof to that page.
Optimizing Your Landing Page With Social Proof
Creating your landing page for WordPress is a great first step toward reaching your marketing goals. You should consider going a step further by adding social proof.
Social proof is one of the strongest tools in any marketer’s tool belt. And one of the best forms of this is using social proof notifications like this one:
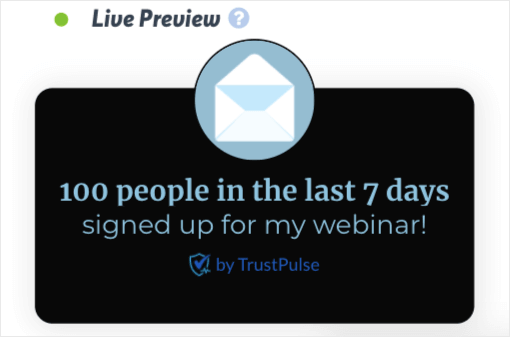
You can put these small notification popups over your landing page to boost conversions. Social proof notifications work for a few reasons.
1) Leverage FOMO
Social proof notifications use a psychological hack called FOMO (“fear of missing out”). This works because most online consumers don’t want to miss out on the benefits they see other people enjoy.
So when someone sees your landing page and sees that other consumers have taken you up on your offer, they’ll be more motivated to do the same.
In fact, at TrustPulse, we’ve seen sales instantly rise by 15% just by adding these small social proof messages.
2) Build Trust
The other benefit of social proof notifications is that they can build trust in your website. That’s because they show how popular your brand is and how other users are actively engaging with you online.
As a result of gaining your users’ trust, you’ll get more sales and conversions.
3) Boost Landing Page Views
Another way you can use social proof notifications is to redirect traffic to your landing page. Since you can add links to these small notifications, your user can click them and be taken to the page you want them to see.
That means you can rely on the traffic you already have to boost how many people go to your landing page.
This is a great way to catch low-hanging fruit since people on your site are likely very warm leads.
Social proof notifications are an excellent way to boost your new WordPress landing page page views. And, again, this all leads to more sales and conversion for you!
But how do you add social proof notifications to your landing page if you don’t know how to code? That’s easy: you can use TrustPulse:

TrustPulse is the world’s best social proof software. With TrustPulse, you can add many types of social proof notifications to your website in just a few minutes.
TrustPulse makes it easy to modify your social proof notifications regardless of your technical background. You can change the:
- Design
- Text
- Font family, color, and more
- Background colors
- Links
- Campaign type
- And much more…
Plus, TrustPulse can be quickly embedded on any site, including WordPress. In fact, TrustPulse comes as a social proof plugin that can be installed and activated like any other plugin you’ve used (like SeedProd, for example).
Want to try it for yourself? Sign up for your risk-free TrustPulse account today!
And that’s it! We hope you enjoyed this tutorial. If you did, you might want to check out the following resources:
- What is a Squeeze Page (+ 6 Examples of High-Converting Squeeze Pages)
- What is a Splash Page (+ 7 Excellent Splash Page Examples)
- How to Add Social Proof Notifications to WordPress
- Social Proof: What It Is & How to Get Started
- 11 Best WordPress Theme Builders in 2023 (Compared)
These posts have everything you need to optimize your website, get more conversions, and drive more sales with social proof.
Ready to get started? Sign up for TrustPulse today!
