Do you want to learn how to create push notifications to drive more traffic to your site?
Push notifications are an excellent resource for any marketer who wants to increase engagement with their brand. They’re non-intrusive, easy to set up, and can bring instant traffic to posts, landing pages, product launches, and more.
But how do you set up push notifications if you don’t know how to code and don’t have the budget to hire a developer?
Today, we’re going to tackle just that. We’ll teach you exactly how to create push notifications that drive traffic, boost your SEO, and bring leads back to your site.
Then we’ll show you how to optimize your website to get more conversions with social proof.
Before we do any of that, though, let’s clarify what push notifications are and why they’re such a powerful marketing tool.
What Are Push Notifications?
Push notifications are small informational messages that appear on a person’s mobile device or desktop. They can notify or update customers about many different things and don’t require the user to be on your website to receive them.
Push notifications can also be shown while someone is actively using your app. These are called “in-app” notifications, and while they’re definitely valuable, they’re not our focus here.
Today, we want to use push notifications to connect with your customers, specifically via mobile and desktop.
That’s because one of the major advantages to push notifications is that you can connect with users even when they’ve disconnected from you.
Imagine writing the perfect blog post that you know your audience will love. And you also optimized it for SEO, so you’re sure it has a good shot at ranking.
You release the post, send off a push notification to all your subscribers, and within minutes you have hundreds (if not thousands) of page views on your blog.
This sends strong signals to search algorithms like Google which reinforces your chances of ranking even higher.
But how is this kind of engagement possible?
Because push notifications will be sent to your users’ mobile or desktop devices even if they weren’t actively engaged with your website at the time. You’ve probably seen some bigger brands like Google, Facebook, Reddit, and others do this in the past.
Here’s an example of what a push notification looks like:
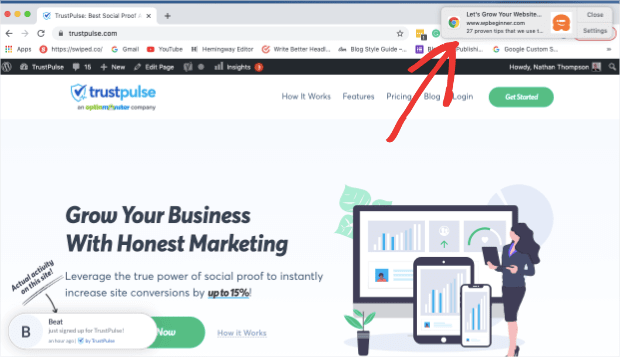
That’s an example of a push notification from WPBeginner while browsing the TrustPulse homepage. You’ll notice that the notification is small, so it’s not intrusive. But it rests on the user’s screen until it’s either clicked or closed.
So why are all these tech giants using push notifications? Probably because they work so well.
Push notifications have a few major advantages for driving traffic to your site:
- Less friction at signup: Users don’t need to add their personal information to allow push notifications. They just need to click “Allow.” As a result, there’s less friction to subscribe, which leads to more subscribers.
- Instant results: Push notifications are sent to a user’s mobile or desktop in real-time. That means anyone using their device will see the notification and are more likely to click on the link to your page.
- Constant connection: As we already mentioned, push notifications don’t require users to be actively engaged with your brand to see your messages. That means you can refocus your audience’s attention to your website whenever you want.
With all of these advantages, it’s easy to see why push notifications are such a valuable marketing tool.
But now that we know the “why,” we need to turn our attention to the “how.” Let’s learn how to create push notifications to drive more traffic to your site.
How to Create Push Notifications
For today’s tutorial, we’re going to build push notifications with PushEngage:
PushEngage is the best push notification software on the market. With PushEngage, you can quickly create push notifications to engage your site’s traffic, even if you have no coding skills or tech experience.
These notifications serve many purposes, including:
- Reduce shopping cart abandonment
- Alert customers of price drops or inventory updates
- Provide clients with updates or companywide news
- Announce product or course launches
And, of course, driving more traffic to your site. These are just a few ways that PushEngage can be used to grow your business, though there are many others.
Want to see it in action for yourself? Sign up for your risk-free PushEngage account today!
Then follow along with our tutorial to set up your first push notification.
Step 1: Install PushEngage on Your Site
Once you’ve signed up for your PushEngage account, you’ll need to install PushEngage on your website.
Doing so is totally easy, though the exact steps change depending on the platform your site is built on. Today, we’ll be using WordPress, but there are many different options.
In fact, PushEngage has tons of integrations for popular platforms like:
- Shopify
- Magento
- Wix
- Squarespace
- ClickFunnels
And much more. So how can you know the best way to add PushEngage to your website?
Once you sign up, you’ll see a series of tasks in your PushEngage dashboard:
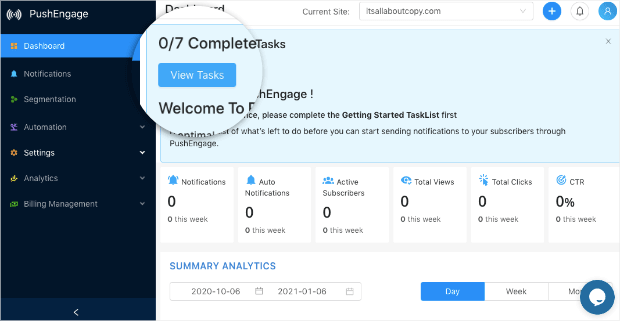
Click on Task #3, Install PushEngage JavaScript in Your Website:
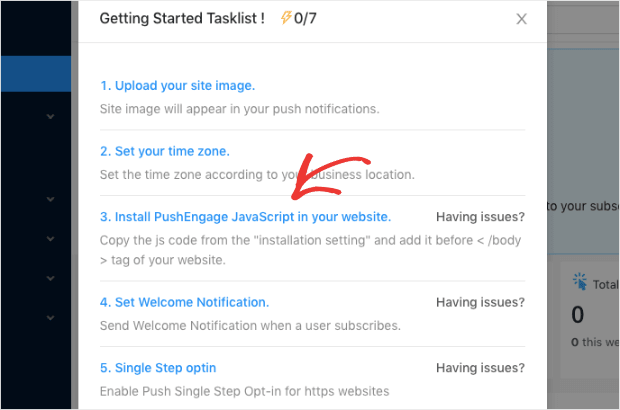
This will take you to a new section of the dashboard where you have different options for hooking up PushEngage to your site:
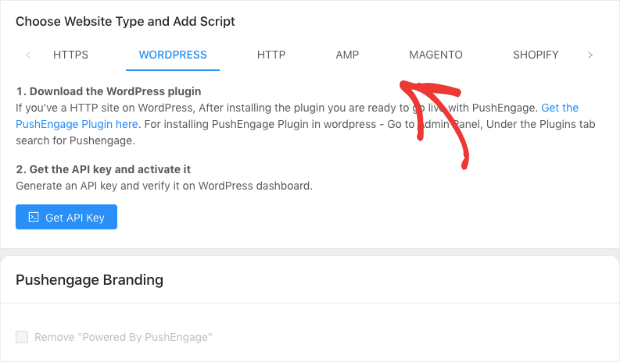
Once you’ve found your platform, you can follow the instructions that are clearly written out.
Again, today we’ll be using WordPress, which means we can download and install the PushEngage plugin just like any other plugin.
If you’ve never installed a plugin before, no worries. Check out this helpful post on 3 methods for installing a plugin.
Once you’ve got PushEngage installed on your website, then it’s time to set up the welcome notification.
Step 2: Set up Welcome Notifications
The next step here is to determine if you want to set up welcome notifications for your new subscribers.
You can do this from your PushEngage dashboard under the heading Setup Welcome Notification:
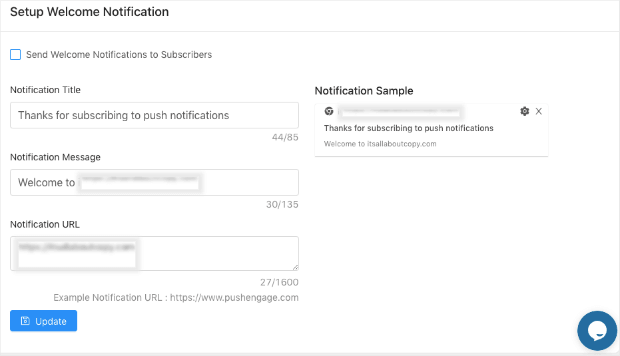
This is a small message that thanks your new subscribers for allowing push notifications. Keep in mind that this is optional. But if you choose to add this, you can change the notification’s:
- Title
- Message
- URL
Adding a welcome message is a great way to improve the user experience (UX) and start the first point of engagement with push notifications.
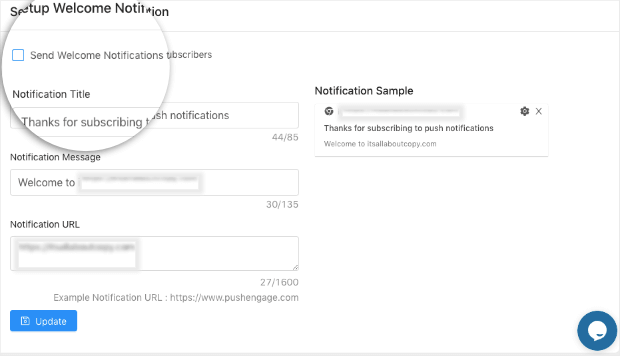
To activate this feature, simply check the box Send Welcome Notifications to Subscribers:
Next, you’ll need to create the single-step optin that your users will see to allow push notifications from your site.
Step 3: Configure Single Step Optin
One of the biggest advantages of push notifications is that they don’t require users to provide an email address or their name to sign up.
Instead, the user simply needs to click “Allow.”
But the way you present this optin message can have a drastic effect on your optin rates. From your tasks list, select option #5, Single Step Optin:
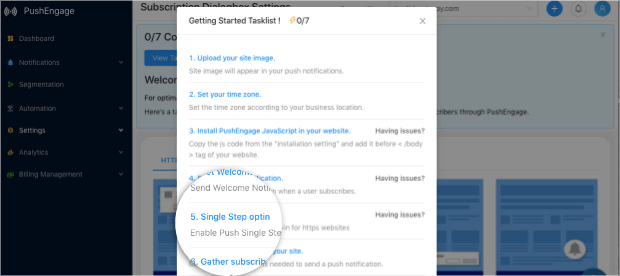
Then you’ll be able to choose the layout of your notification depending on whether your site is HTTPS or HTTP.
For HTTPS, you have 5 layout options:
- Push Single-Step Option
- Safari Style Box
- Floating Bar
- Bell Placed Bar
- Large Safari Style Box
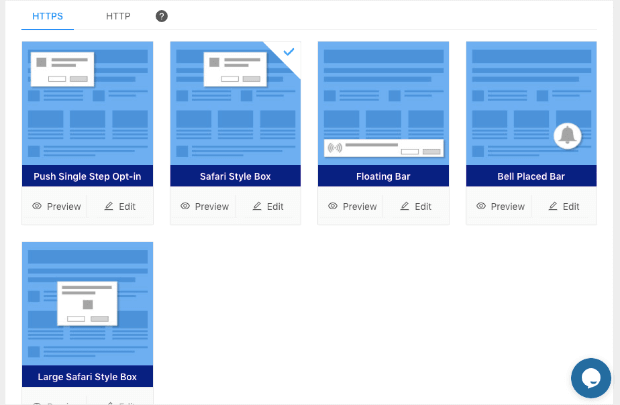
For sites without an SSL certificate (HTTP), you have all the same options except for Push Single Step Optin:
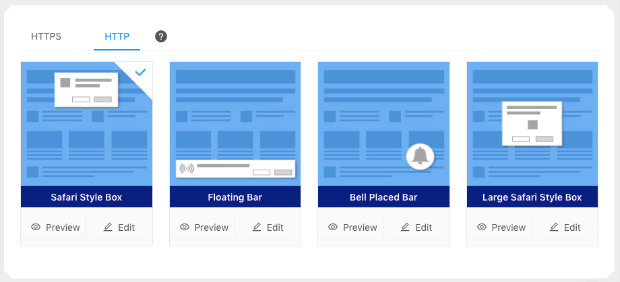
You can preview and edit all of these options to make sure it’s the right layout for your site, audience, and goals.
Once you’ve done this, you’re ready to send out your first notification.
Step 4: Send Notification
While there are other tasks you may want to complete in your PushEngage task manager, you’ve already done everything necessary to get your push notifications ready.
Now, you’re ready to send the first one. And doing so is easy.
First, you need to click the + icon in your dashboard’s top menu to add a new notification. Then you can change your notification’s:
- Title: The main heading that your users will see
- Message: A small sub-text to give users more info as to what to expect if they open your notification
- URL: Where you’ll redirect users when they click on your notification
- Icon: Your company’s logo so users can easily recognize that the notification is from you
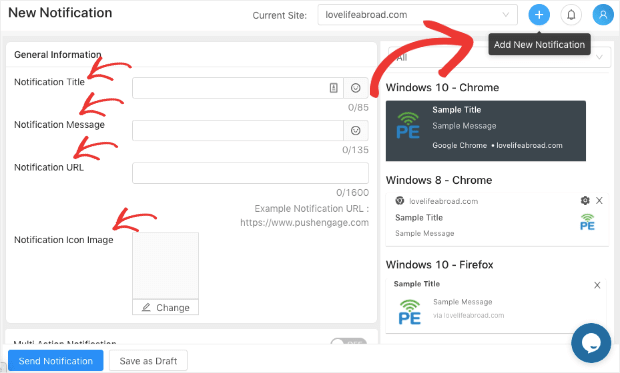
As you scroll down, you’ll see that you have other advanced options for your notification.
You can send notifications with multiple buttons or calls to action (CTAs). This is called Multi Action Notification:
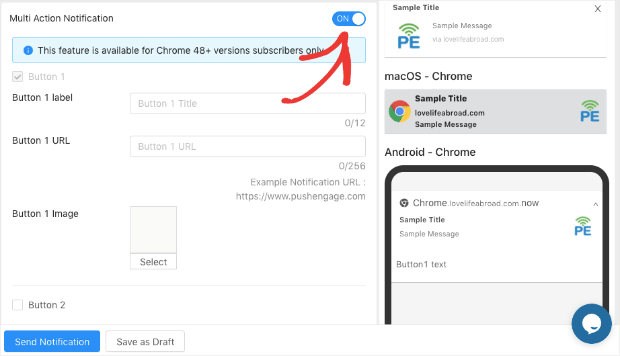
You should know that this feature is available for Chrome 48+ versions only.
You can also add a larger image to your notification if you enable Notification Large Image:
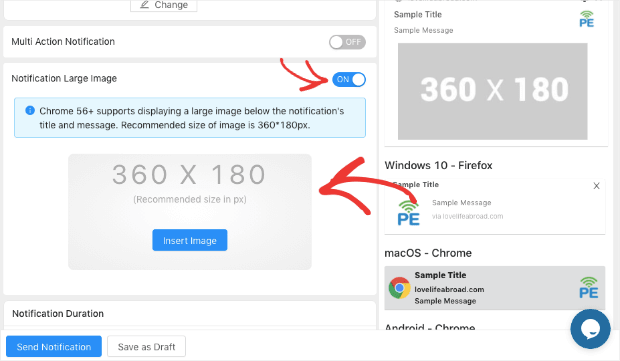
This can be a great way to grab your audience’s attention and increase engagement with your push notifications.
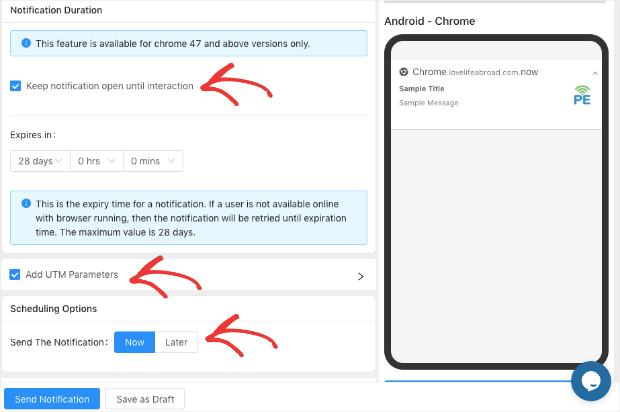
Finally, you can make custom edits to your notification’s duration, UTM parameters, and scheduling options:
And before you’re done, you can test the push notification to see what it will look like on your browser:
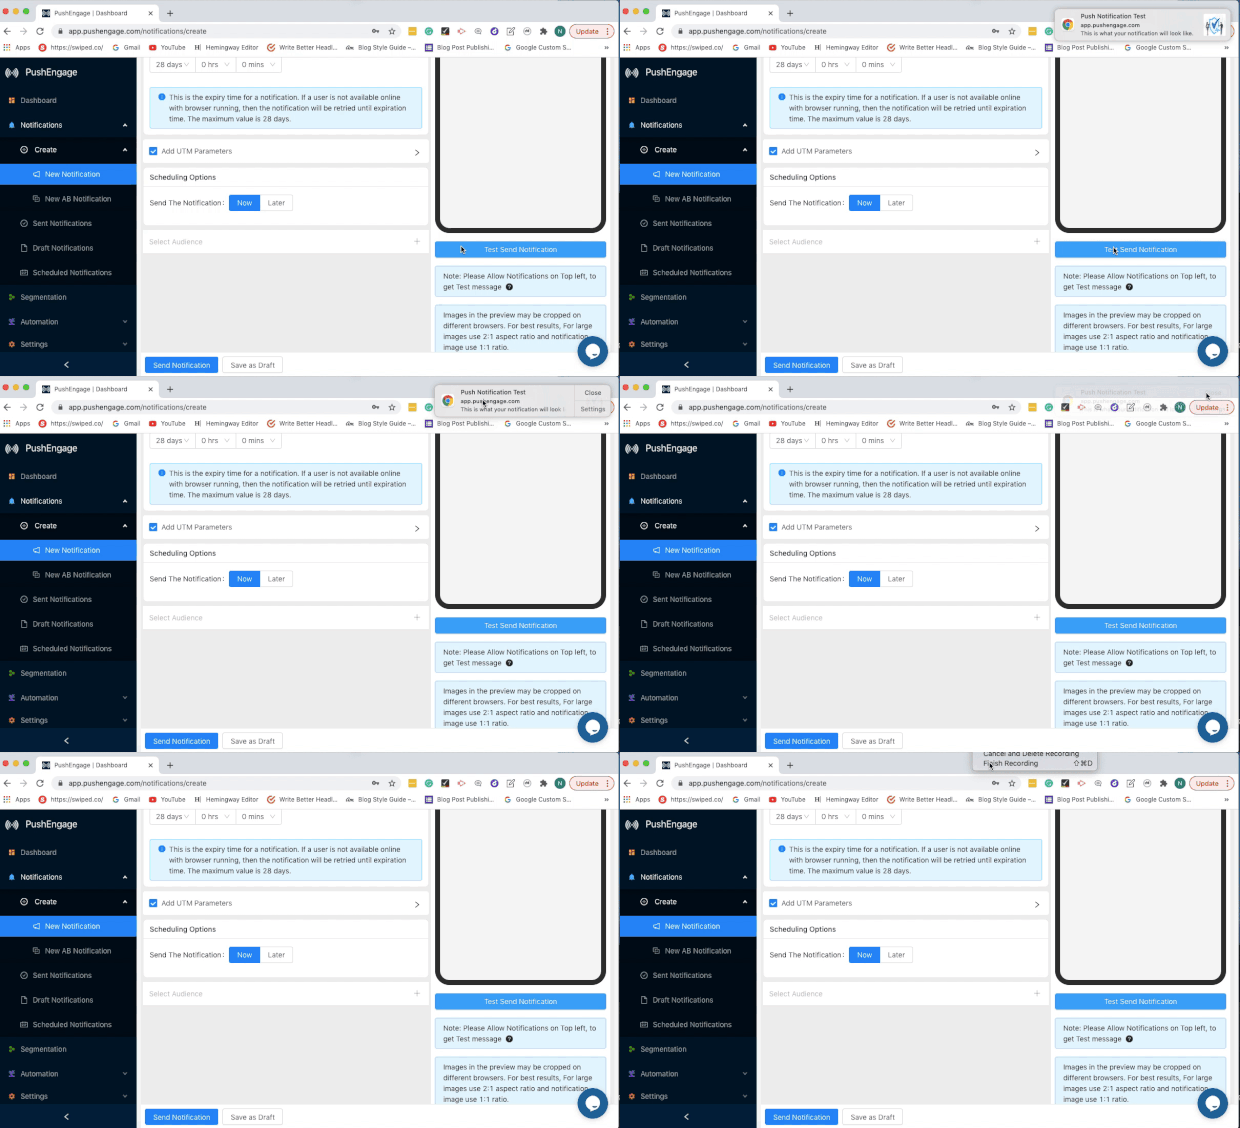
Once you’re ready, all you need to do is click Send Notification:

And that’s it! Now you’ve sent your first push notification with PushEngage.
Keep in mind that you have so much more you can do with PushEngage, too. For example, you can create A/B tests to get the highest conversion rates possible.
Or, depending on your plan, you can send different messages to different parts of your audience. This is called “audience segmentation” and is a great way to boost conversions by personalizing your messaging.
As more people allow your push notifications, you’ll be able to redirect users to your site on a regular basis. This will drive more traffic, boost your SEO, and give you more opportunities to convert traffic into customers.
But now that we know how to get people back to your site with push notifications, let’s quickly look at how you can optimize your site with social proof.
How to Get More Conversions from Social Proof
As we’ve already said, push notifications are an excellent tool for driving more traffic. But when that traffic actually reaches your site, they become yours to lose.
In other words, if our site isn’t set up for the most conversions possible, you’ll lose tons of new leads.
One way to prevent this is to use social proof notifications by TrustPulse:
TrustPulse is the world’s #1 social proof software that lets you quickly and easily create social proof notifications. These messages look something like this:

These small messages display user activity or click history throughout your site. As a result, you can leverage FOMO (“fear of missing out”) to inspire more of your users to take the actions you want them to.
When people see that others are actively engaging with your brand, they don’t want ot miss out on any benefits.
In fact, we’ve seen TrustPulse’s social proof notifications boost sales by up to 15%.
Plus, TrustPulse is literally a fraction of the cost when compared to other social proof software on the market.
For a breakdown of how TrustPulse’s features and pricing stack up, check out this helpful review: FOMO vs. UseProof vs. TrustPulse: Which Is the Best for Social Proof.
Ready to see how it works for yourself? Sign up for your risk-free TrustPulse account today!
And that’s it! We hope you found this post helpful. If so, you might want to check out these other resources:
- 9 Best Push Notification Apps You Can Start Using Today
- How to Create a Landing Page in WordPress (the Easy Way)
- 6 Proof Alternatives to Boost Your Credibility (and Your ROI)
These articles will have everything you need to optimize your site for more conversions. That way, when you drive more traffic with push notifications, your site will be ready to create new leads and customers.

Great tips for better Push Notifications. I just loved to read this blog. keep sharing such informative blogs in future also.
This page I’m quite happy to find. Thank you! Nice post. Something entirely new I learned.