Are you working with the popular page builder Elementor, and you want to make a popup open on a button click?
Elementor has become one of the most popular page builders on the market. It’s easy to install, intuitive, and doesn’t require any coding skills to work with.
It also comes with a popup builder that helps new marketers and business owners grow their email list.
And one of the most effective types of popups are the ones that open on a button click.
That’s why, in today’s tutorial, we’re going to walk you through 2 methods for creating a clickable popup in Elementor.
By the end of this article, you’ll have 2 actionable strategies for making a popup open on a button click in Elementor.
And as a bonus, we’ll share how you can INSTANTLY increase the number of people who take the time to click that button for MORE conversions.
If you’d like, you can skip directly to that section by clicking here.
Ready to get started? Let’s dive straight into the tutorial.
Method 1: Using Elementor’s Popup Builder
For the first method, we’ll use Elementor’s native popup builder to create the clickable popup.
You’ll need to have Elementor’s Pro plugin for this. Once that’s activated on your WordPress site, you’ll be ready to create your popup.
Step 1) Create Your Popup
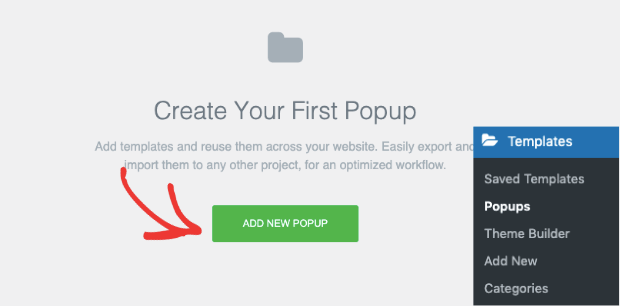
From your WordPress admin dashboard, go to Templates » Popups:
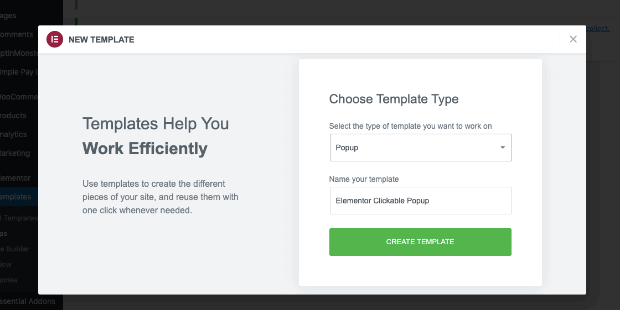
You’ll be prompted to name your popup template and click Create Template:
Next, you’ll select your popup’s template:
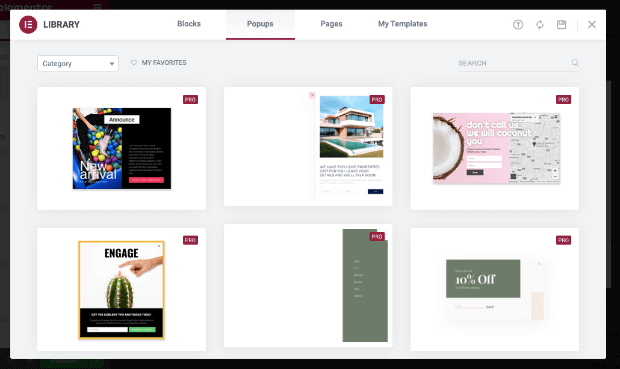
Elementor does come with tons of templates you can use with their Pro version.
You can select any of the popups that would work for your specific needs. Today, we’ll use one that offers our site’s visitors 10% off.
When you’ve selected the right template for you, click Insert from the upper right-hand corner to start building your popup:
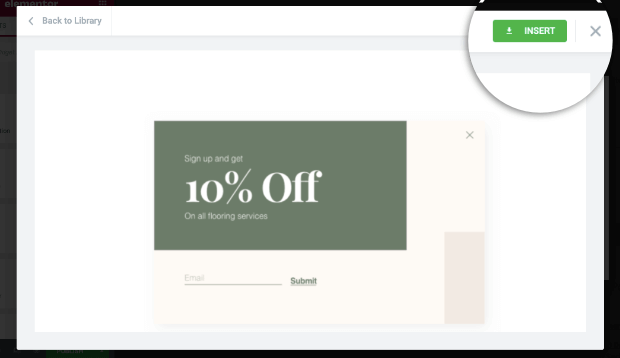
And your popup will now be in your Elementor editor:
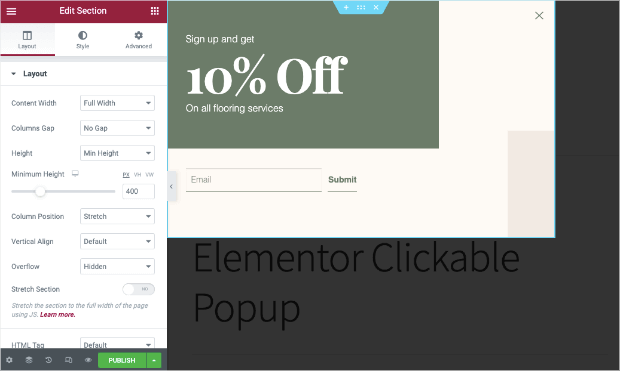
Step 2: Customize Your Popup
At this point, you can make modifications to your Elementor popup.
While Elementor’s page builder is incredibly intuitive and easy to use, the popup builder can feel more clunky if you’re just starting out.
You still have all the editing options on the left-hand side that you can pull up by clicking the element you want to modify:
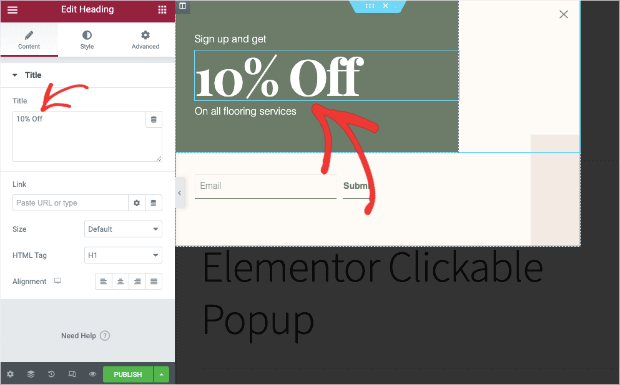
You can also add new functions with their drag and drop builder:
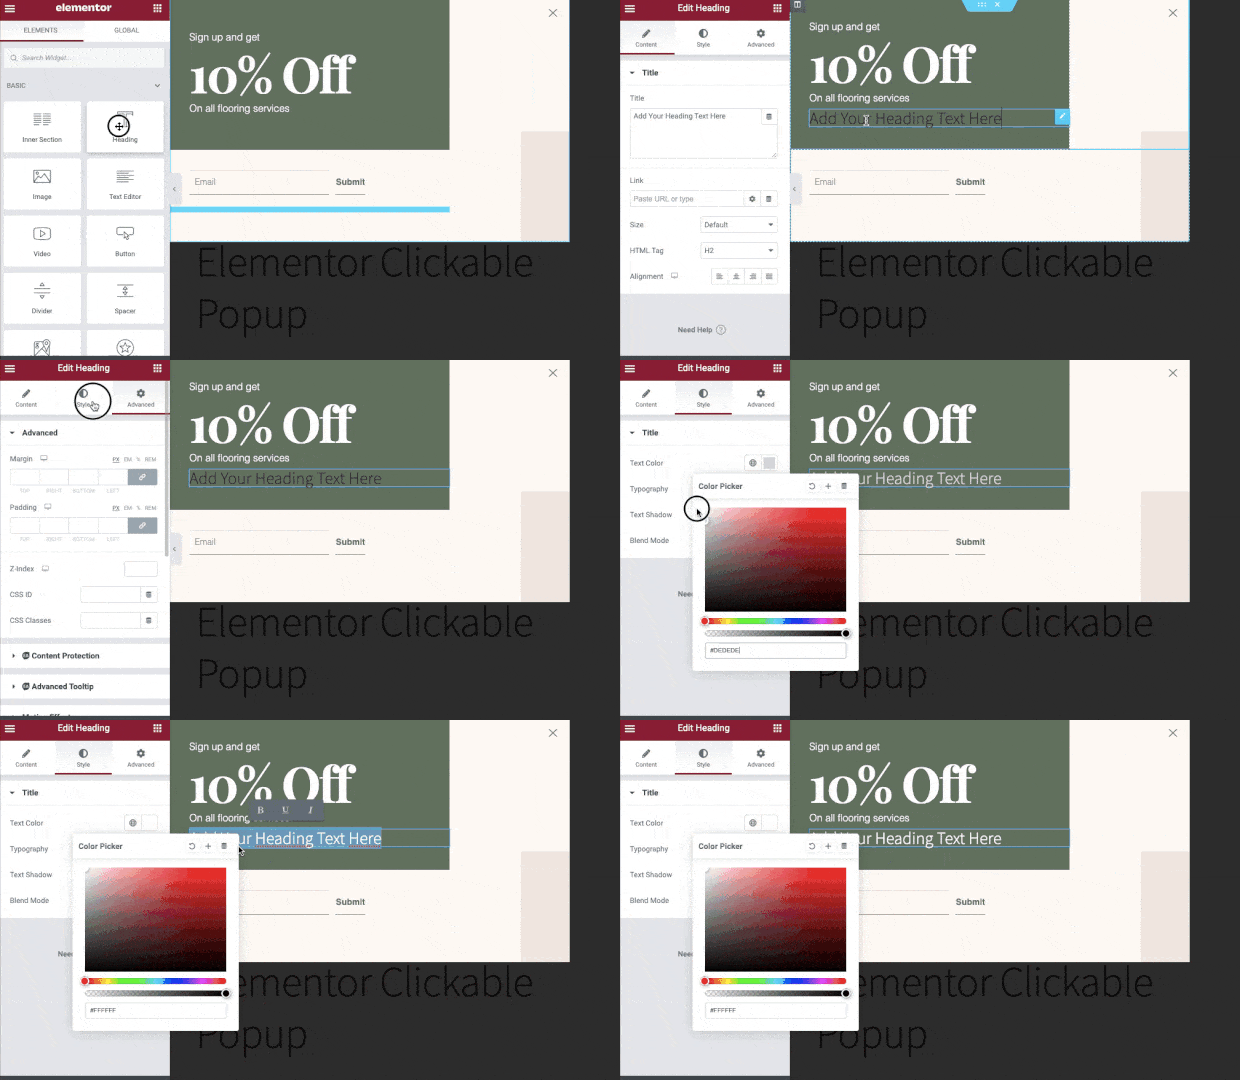
This allows you to add the same functions to your popups as you would to an Elementor page, such as:
- Headings
- Text
- Video
- Button
- Spacers
- And much more…
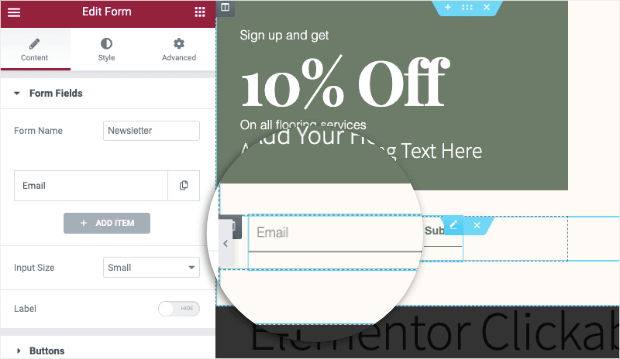
You’ll also want to click on the Email field to configure what happens when people add their email address:
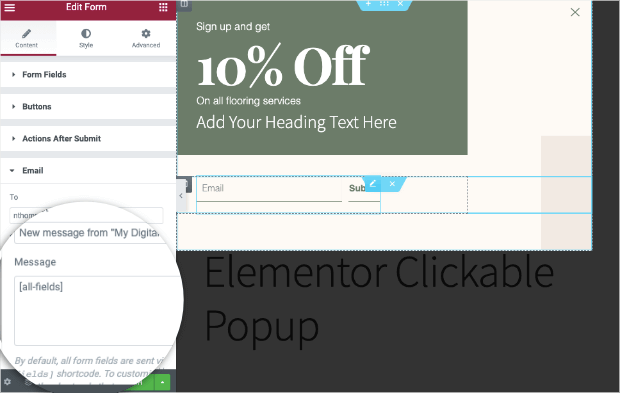
By default, you’ll automatically send an email to new subscribers. You can modify the message in the left-hand side menu under the Email tab:
You can also go to the Actions After Submit tab to define another action or sync your popup with a handful of email service providers (ESPs):
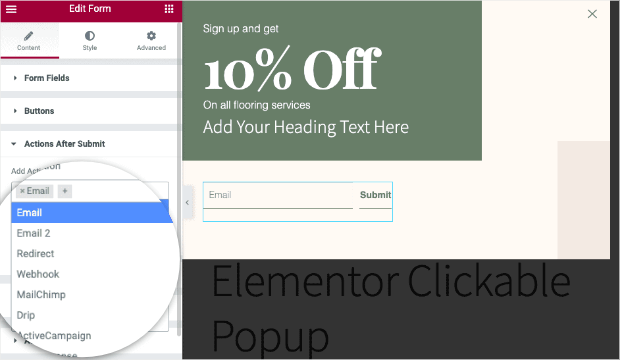
Elementor natively connects with a few popups ESPs such as:
- Mailchimp
- Sendinblue
- AWeber
- Drip
- And others…
You can also use webhooks to connect to any ESP if you don’t see yours on the list.
That said, their native integrations are more limited than other tools, including OptinMonster (which we’ll look at next).
For now, you can customize the style of your popup to suit your brand’s voice, style, and messaging.
When you’re done, click Publish in the bottom left-hand side menu:
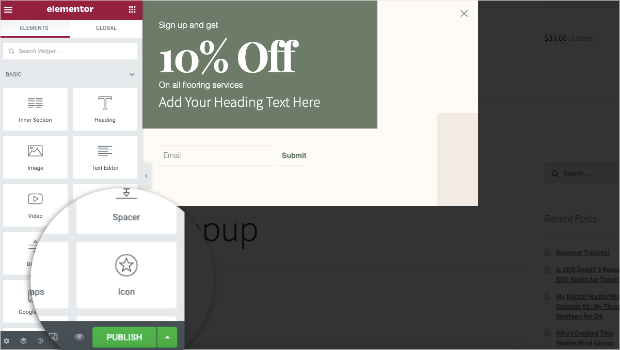
You’ll be prompted to select triggers and conditions for your popup. But since we’re making a popup that opens up on a button click in Elementor, you can skip through these options.
Now you’re ready to embed your popup onto a page you’ve built with Elementor.
Step 3) Embed Your Clickable Popup
When you open a page that you’ve built with Elementor, click on any button you want to trigger your popup to make the editing tools appear on the left-hand side.
By the Link field box, click the Dynamic tags icon:
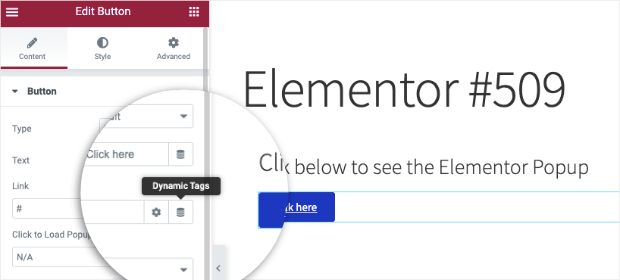
Then select Popups under the category labeled Actions:
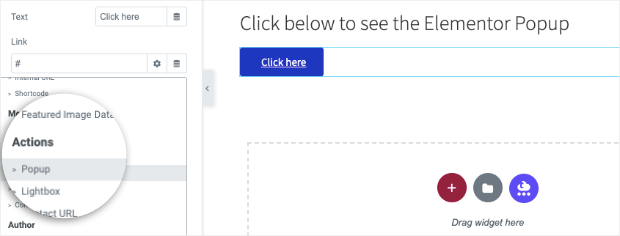
Click Popup and select your popup from the drop-down menu:
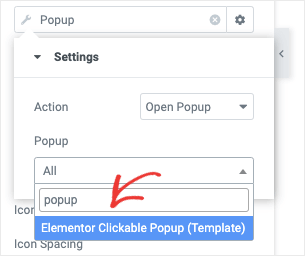
Click Publish in the lower left-hand side menu when you’re done editing the page:
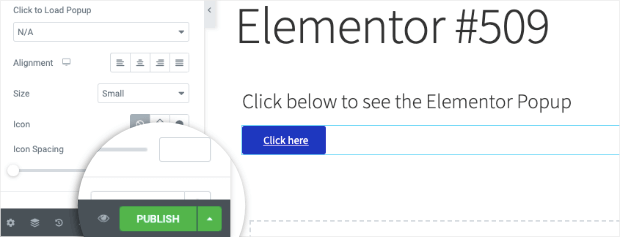
And that’s it! Your clickable Elementor popup will now appear when people click the button on your website’s page:
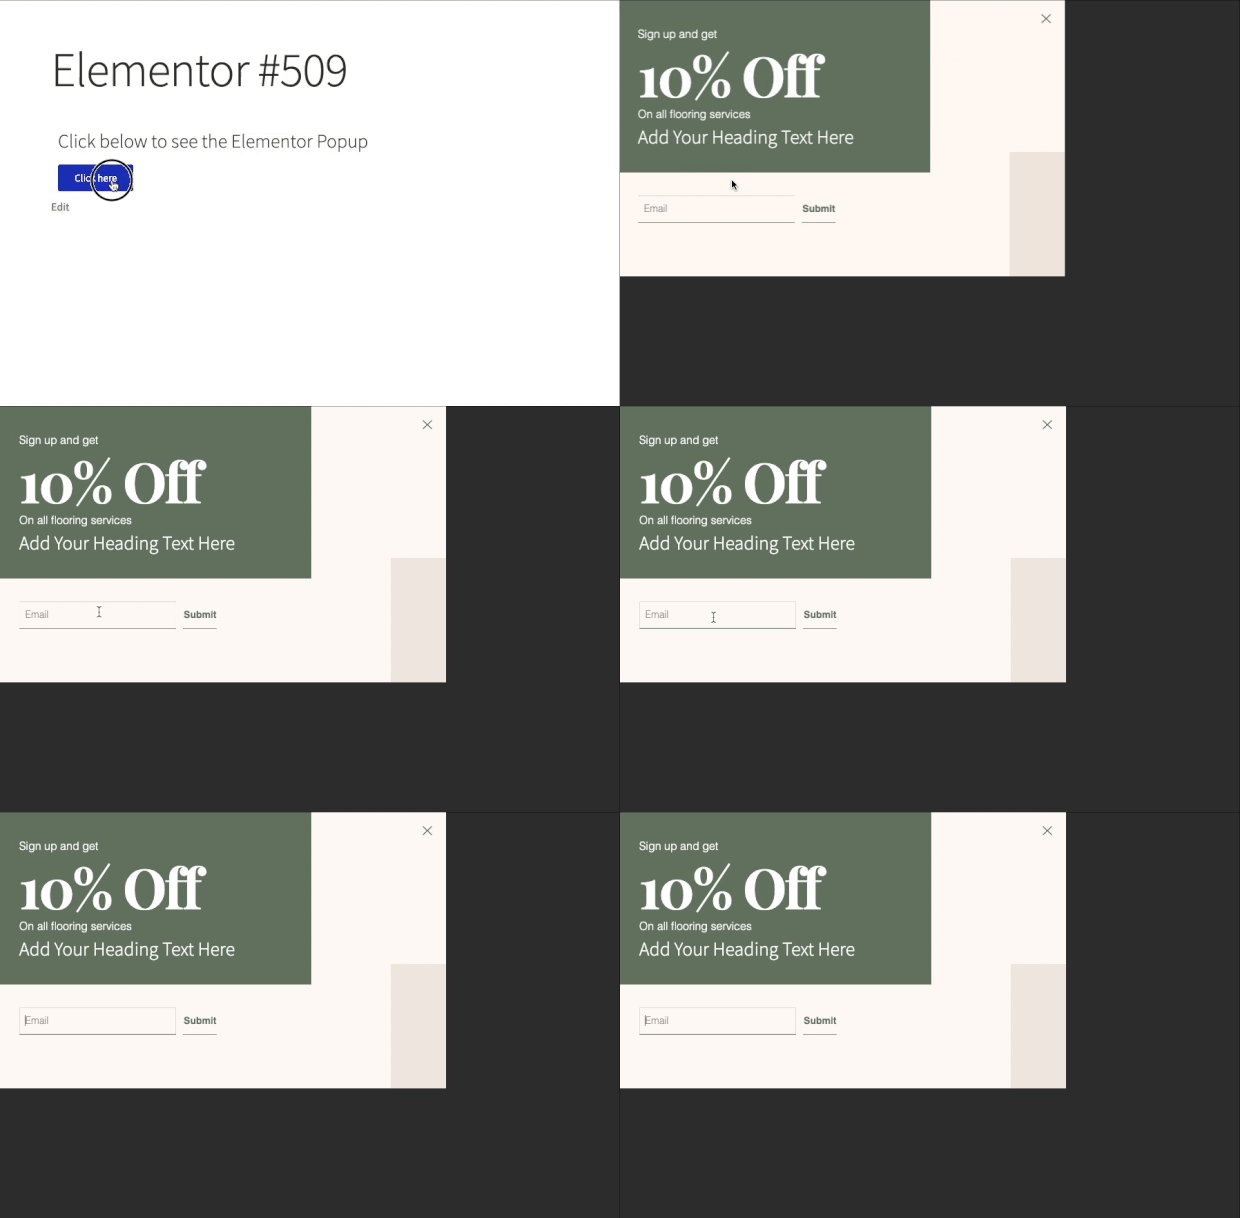
Again, Elementor has an easy-to-use popup builder that can be a good start for beginners.
But at the end of the day, it IS limited in terms of template options and functionality.
If you’re serious about growing your list FAST, then you’ll want to upgrade to a lead generation tool that gives you more control over your popups.
Let’s look at how you can make an even more effective Elementor popup with OptinMonster.
Method 2: Using OptinMonster
OptinMonster is the #1 lead generation software on the market, and the best plugin for creating popups with WordPress:
OptinMonster isn’t just the most powerful lead generation tool around, but it’s also one of the most user-friendly options available.
That’s because OptinMonster also comes with an intuitive drag and drop builder, so it doesn’t require any coding or “tech skills” to build professional popups in minutes.
Plus, with OptinMonster, you won’t be limited to just popups on your site. Instead, you’ll have full access to 9 different campaign types, including:
- Floating bars
- Fullscreen welcome mats
- Slide-in scroll boxes
- Gamified spin-to-win wheels
- Inline campaigns
- And much more…
This helps you approach customers in new ways to avoid something called “popup fatigue.” This occurs when visitors see the same generic popups appear over and over on your site.
In time, you train your visitors to stop engaging with your site’s optin forms, and you lose conversions.
While your Elementor clickable popups won’t be heavily affected (since the user behavior will trigger the popup to appear), your other lead generation efforts can suffer by sticking with one campaign type.
And with OptinMonster, you can further personalize your other optin campaigns with advanced targeting rules.
Some of the most popular rules include:
- Exit-Intent® Technology: Recover abandoning visitors as users are actively leaving your site.
- OnSite Retargeting®: Avoid “popup fatigue” by showing fresh offers to returning users.
- Geolocation: Personalize the user journey by showing campaigns to people based on their physical locations.
- MonsterLinks™: Boost engagement with clickable popups, like the ones we’re working on in today’s tutorial.
These are just a few examples of targeting rules you can use to grow your list and increase conversions, though there are many others.
And these are also the same strategies used by companies just like you with massive success.
For example, Fastrak recovers 53% of their abandoning visitors with a simple popup.
Or how Kinoby converts 73% of their site’s visitors with a clickable popup using MonsterLinks™.
Want to see it in action for yourself? Get started with your 100% risk-free OptinMonster account today!
Once you sign up, you’ll be ready to follow along with the tutorial.
Step 1) Download and Install OptinMonster
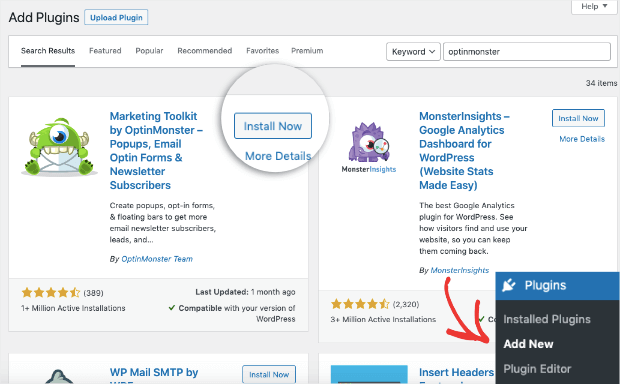
The first thing you’ll want to do is download the OptinMonster plugin. You can find that by searching through the plugins list from your WordPress dashboard.
When you find the plugin, click Install Now:
Then click Activate:
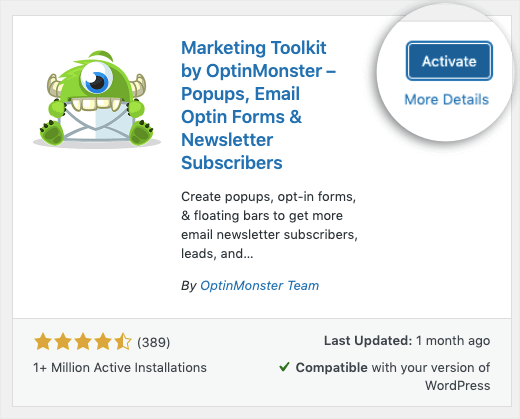
If you’ve already signed up for OptinMonster, make sure it’s open in another tab. Then when you active the OptinMonster plugin, you’ll be prompted to connect your account.
Click Connect to WordPress:
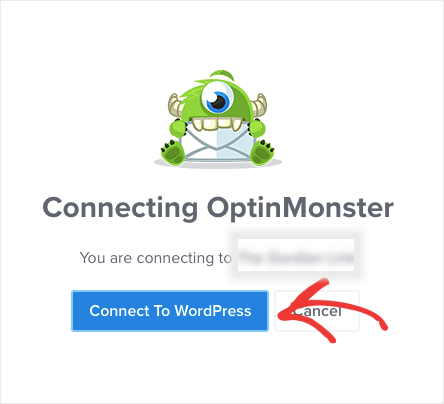
And just like that, your OptinMonster account will be connected to your WordPress site.
Need a little more help? Check out this detailed guide on how to integrate OptinMonster to WordPress.
Now you’re ready to create and design your popup.
Step 2) Create Your Popup
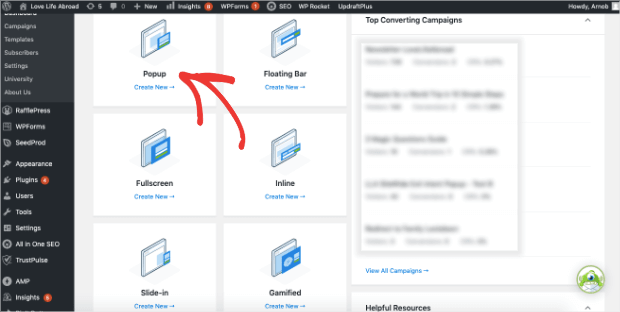
From your OptinMonster dashboard in WordPress, you’ll see a list of campaigns you can build.
For today’s tutorial, click Popup:
Then you’ll need to select one of OptinMonster’s 50+ pre-made templates to get started:
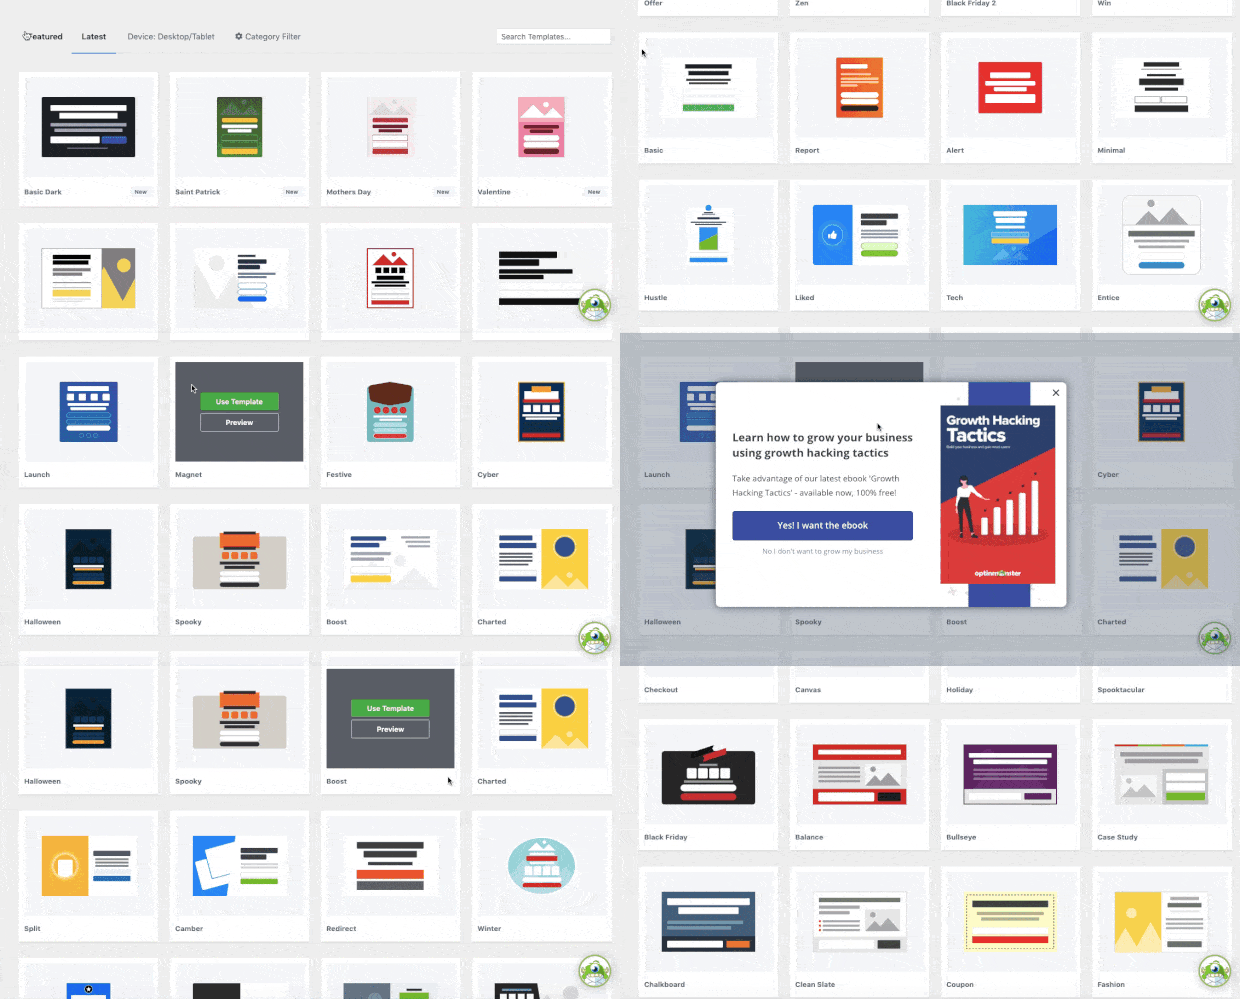
These templates are fully responsive and look great across devices, including mobile, tablet, and desktop.
Plus, as you’ll see, they’re incredibly easy to modify.
Select the template for your specific marketing goals. Then give your campaign a name and click Start Building:
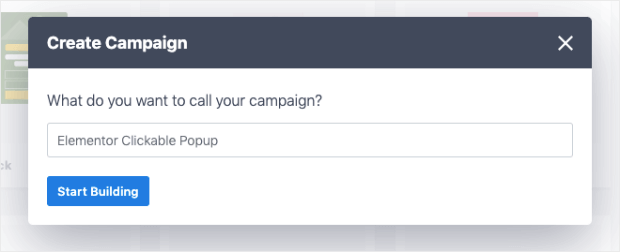
This will bring the template to the editor, where you can quickly customize your campaign.
Again, OptinMonster makes this step incredibly easy.
We won’t get into detail on everything you can modify in the OptinMonster editor in today’s tutorial.
But just know that you have total control over how your campaign looks, what it says, and where it appears on your site.
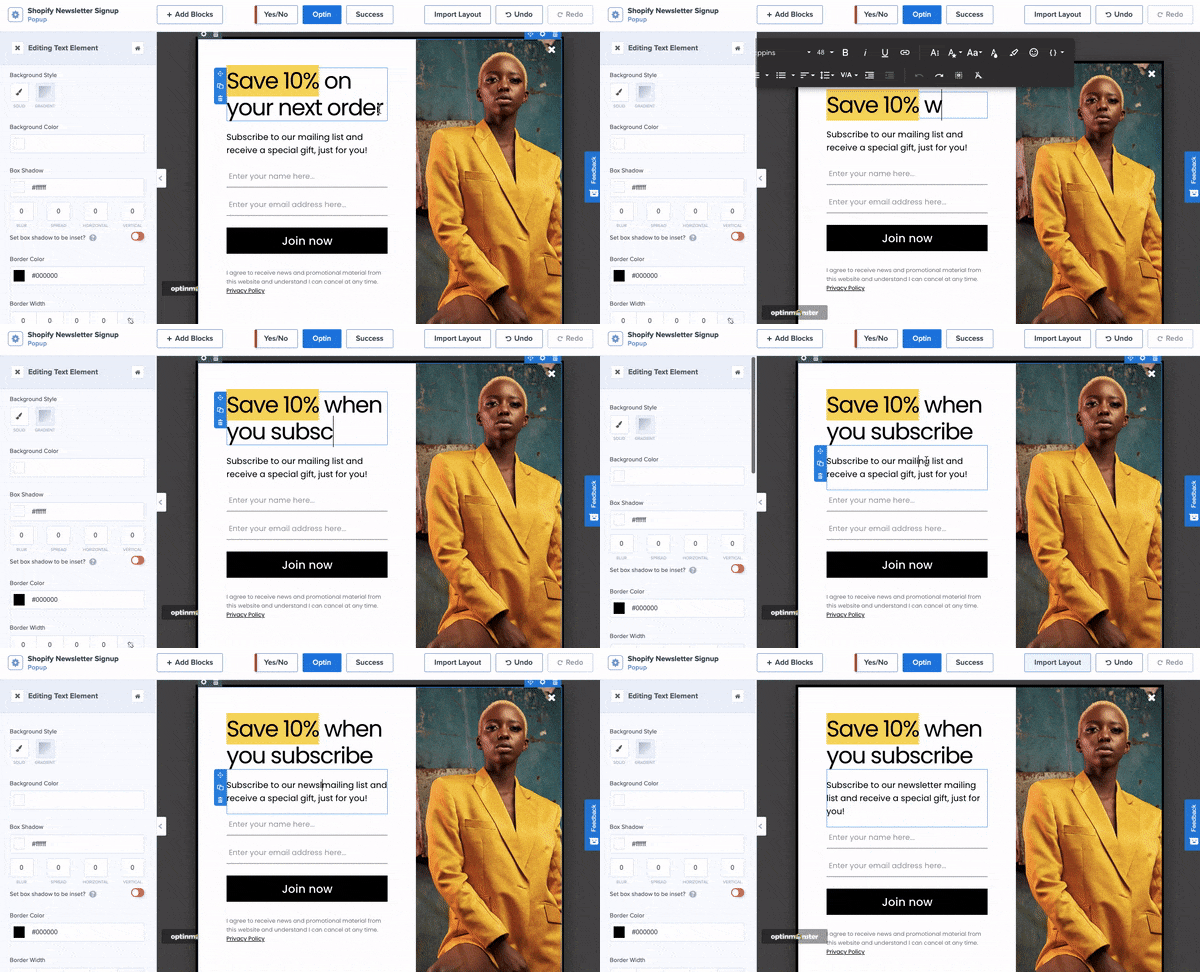
OptinMonster is so easy to use because it comes with an inline text editor that allows you to personalize your messaging in seconds:
It also has a drag and drop editor that allows you to add new functions, such as:
- Videos
- Images
- Text
- Chatbots
- Custom HTML
- Spacers
- And more…
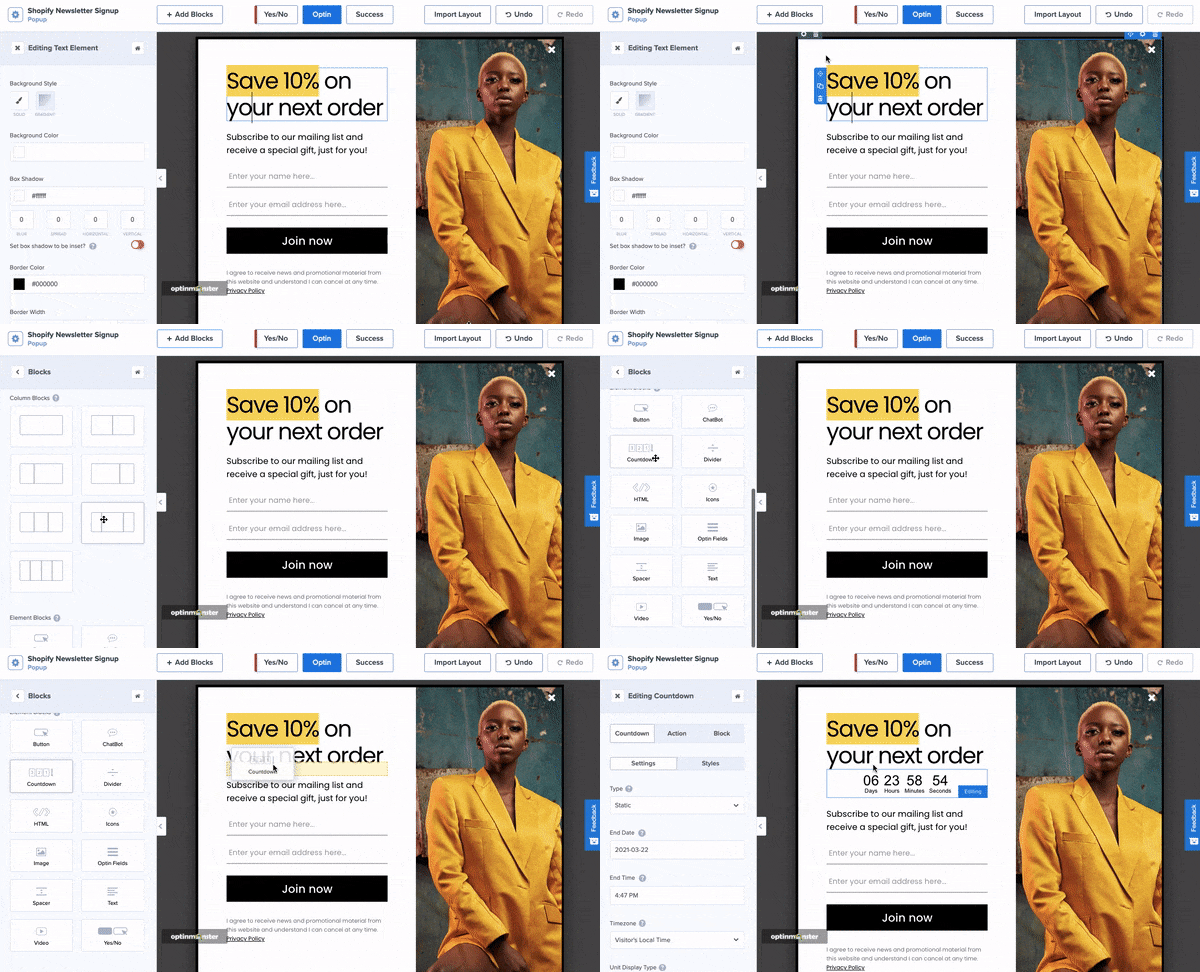
These customization options allow you to personalize your popups to better connect with your target audience.
And since everything can be done with the inline text editor or the drag and drop builder, you don’t need any coding experience to build high-converting campaigns in minutes.
When you’ve built the perfect popup for your offer, you’ll want to integrate OptinMonster with your email service provider (ESP).
Step 3) Integrate Your ESP
One of the best parts about OptinMonster is that it natively integrates with 30+ popular ESPs on the market.
This allows you to automate your email marketing strategy.
You can build organized contact lists in your ESP and create automated sequences to lead new subscribers down your sales funnel.
And with OptinMonster, you can add new leads to the right list to personalize the customer journey.
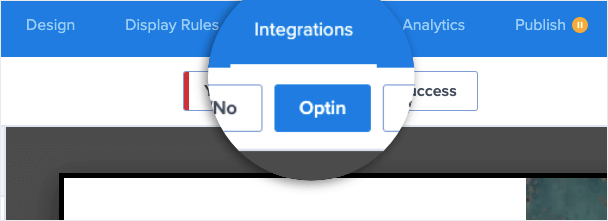
To connect OptinMonster with your ESP, click the Integrations tab at the top of the editor:
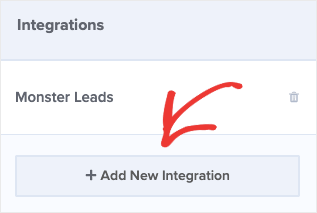
Then click Add New Integration in the left-hand side menu:
And select your ESP from the drop-down list:
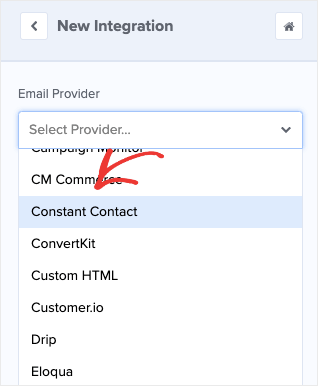
Follow the on-screen instructions for setting up the integration.
In most cases, this simply requires you to get the API key from your ESP’s account dashboard.
And with that, your new leads will go directly to your email provider.
Now it’s time to get your MonsterLink™ to embed your campaign on your Elementor page.
Step 4) Embed Your Popup With a MonsterLink™
First, you’ll need to head to the Display Rules tab at the top of your OptinMonster editor:
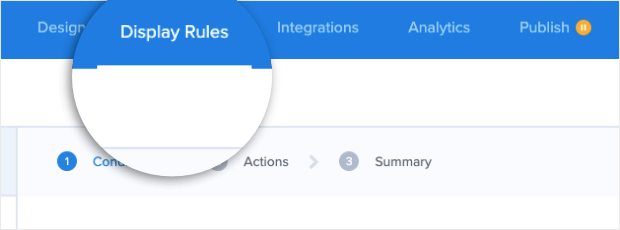
Click the first rule that’s set by default (time on page) to pull up your display rule options.
Type “MonsterLink” in the search bar and select MonsterLink™ from the options:
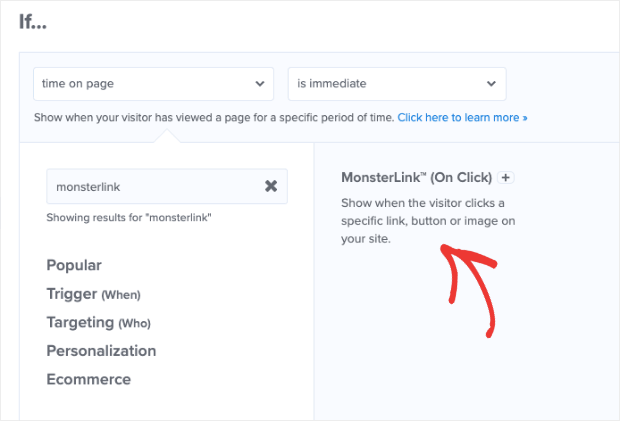
Click Copy MonsterLink™ Code:

This provides you with embeddable HTML that looks something like this:
<a href=”https://app.monstercampaigns.com/c/lxefnymh0ugfyvsxa8wu/” target=”_blank” rel=”noopener noreferrer”>Subscribe Now!</a>
But to make a clickable popup, you won’t need the HTML elements. Instead, you’ll simply need the link, which you can find after “a href=”.
From the example above, your popups link would be:
https://app.monstercampaigns.com/c/lxefnymh0ugfyvsxa8wu/
Copy the URL From your MonsterLink™ code.
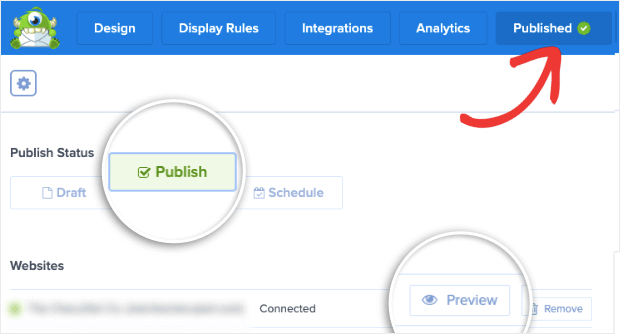
Make sure to Publish and Save your campaign before continuing. You can also preview the campaign from the publishing screen to make sure it looks exactly how you’d like:
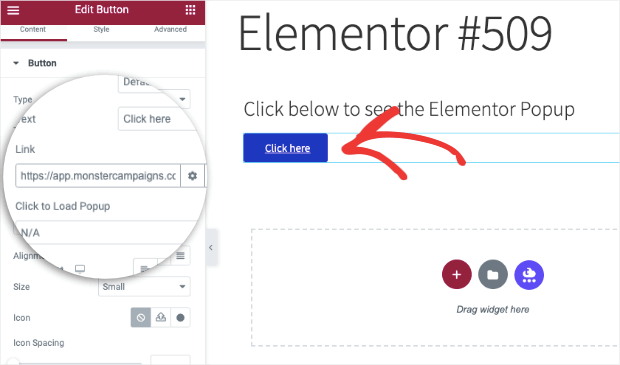
Click the button element to add the URL from your MonsterLink™:
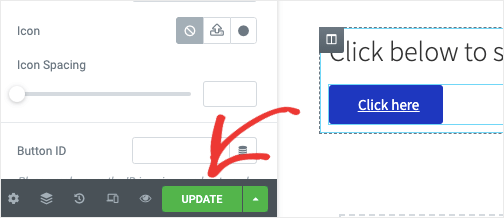
Then click Update in the bottom left-hand menu to make the change live on your site:
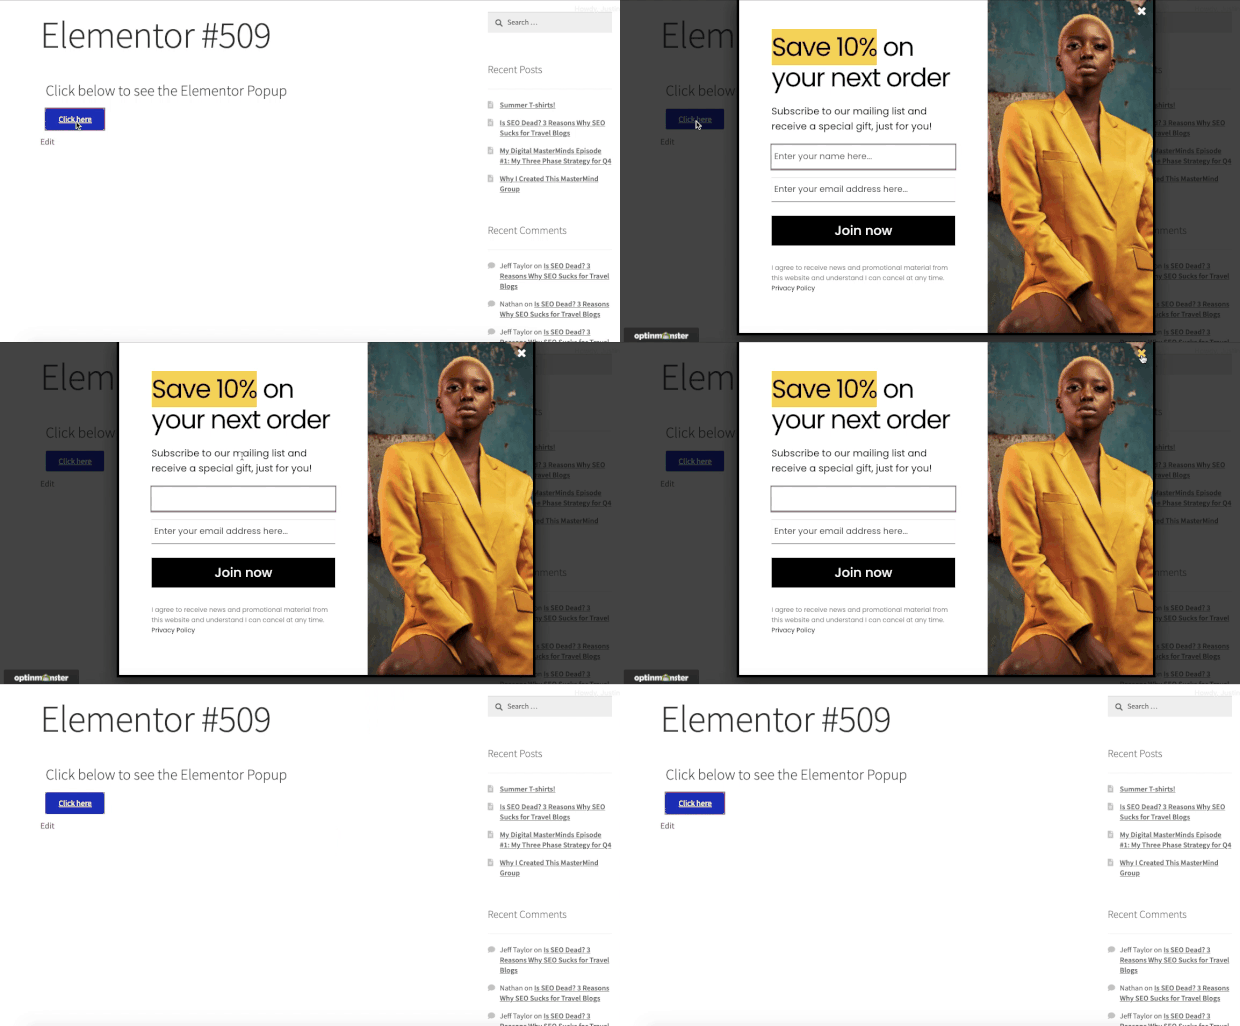
And your campaign will now be live on your Elementor page:
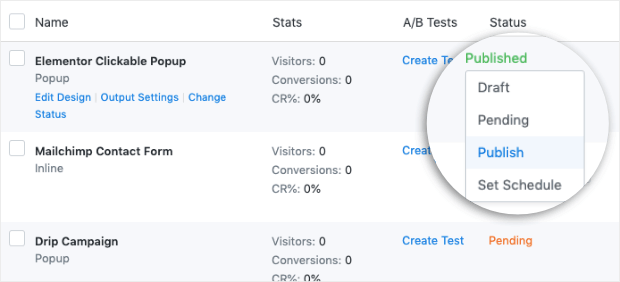
Not seeing your campaign?
Make sure that the status of your campaign is set to Published in your OptinMonster plugin’s dashboard in WordPress:
As you can see, OptinMonster makes it easy to create a clickable popup for your Elementor pages.
Plus, you’ll have more campaign types and triggers to personalize your user experience (UX), boost conversions, and increase sales.
But why not try it for yourself? Get started with a 100% risk-free OptinMonster subscription today!
But before we wrap up this tutorial, we wanted to teach you how to instantly optimize your pages so MORE people will click your CTA popup.
Instantly Boost Conversions With Social Proof
One of the biggest factors in getting people to engage with your site boils down to how well you use social proof.
“Social proof” is a general term that refers to different aspects of your site that build trust with your target audience.
These can be things like:
- Testimonials
- Reviews
- 5-star ratings
- Secure payment badges
- And more…
But the most effective kind comes in the form of a social proof notification.
These show real-time activity across your site. When someone takes the action you want them to, you can display that to your website’s visitors.
Here’s an example of what a social proof notification might look like for an eCommerce store:

This works because it causes an effect known as “FOMO” (fear of missing out).
FOMO occurs when online consumers see others experiencing benefits. They then get the urge to engage with your brand to get those positive benefits first-hand.
And more than any other factor on your website, FOMO has a big impact on conversions.
The best way to add social proof notifications to YOUR website is with a tool like TrustPulse:
TrustPulse makes it easy to add social proof in just a few clicks.
Plus, they aren’t just notifications for eCommerce, either. In fact, you can create many types of social proof notifications regardless of what stage your business is currently in.
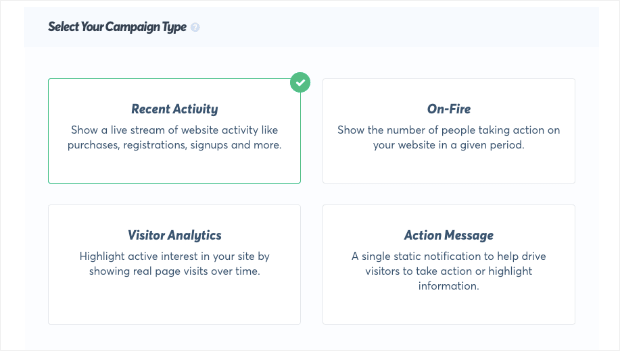
TrustPulse offers the following types of social proof campaigns:
- Recent Activity: Show a live stream of website activity like purchases, registrations, signups, and more.
- On-Fire: Show the number of people taking action on your website in a given period.
- Visitor Analytics: Highlight active interest in your site by showing real page visits over time.
- Action Messages: Display a single static notification to help drive visitors to take action or highlight information.
But you might be wondering, “How will this help get more people to click my Elementor popup?”
You could easily do this with a Visitor Analytics campaign.
This counts and shows the number of people who have visited one of your site’s posts or pages.
Let’s say, for example, that you’re running an online contest. And to sign up, people would need to click a button for your subscription popup to appear.
On your contest’s Elementor landing page, you could show a notification that looks like this:

By displaying the total number of visitors on that page, you’ll show how popular the offer is.
This will increase excitement around whatever you’re promoting and get more people to interact with your call-to-action button.
This is just one of the many ways you can use social proof to get more engagement from your clickable popup.
But the best part is that TrustPulse doesn’t require any technical skills to get started.
In fact, there’s ZERO coding required. And here are a few other features we know you’ll love about TrustPulse:
- 100% control over your campaign’s look and messaging
- Clickable notifications with your own custom links
- Targeting rules for more personalized customer journeys
- Social proof for ANY stage of business
- Accurate and reliable analytics tracking
- And much more…
Finally, TrustPulse works with any website builder, including WordPress.
That makes this one of the most powerful, flexible, and affordable tools on the market.
Get started with your 100% risk-free TrustPulse account today!
And that’s all for today!
We hope you enjoyed this tutorial. If you did, you definitely want to check out the following resources:
- How to Add Social Proof Notifications to Your Website
- 11 Conversion Rate Optimization Tools to Convert Leads Faster
- The Best Digital Marketing Plugins in 2021 (That Actually Work)
These articles will have even more tools and tricks to increase conversions and sales across your WordPress site.

