
Do you want to embed Capterra reviews on your site?
Capterra is a popular online marketplace for software that has legitimate and honest reviews. Online consumers trust Capterra reviews to know if your business is reputable.
If you have raving reviews on Capterra, you can showcase them as social proof on your site to boost conversions.
In this post, we’ll show you the best way to add Capterra reviews to your WordPress site.
But first, let’s get a bit more clarity on what Capterra is.
Capterra: A Quick Overview

Capterra was launched back in 1999 to help users find software and other resources easily. It lets you list your software service or product to get more exposure and leads.
In 2008, they launched reviews so users could make informed decisions about buying a software listed on Capterra.
Currently, they are one of the most trustworthy review sites in the world with over 5 million users every month. They also have over a million verified reviews with thousands more added each month.
Before diving into the tutorial, let’s make sure you understand how to get started with Capterra in the first place.
Getting Started With Capterra
To embed Capterra reviews on your site, you first need to set up your business profile on Capterra. (If you already have one, you can skip this step.)
To get started, you need to request a free basic listing by filling out a form on Capterra.
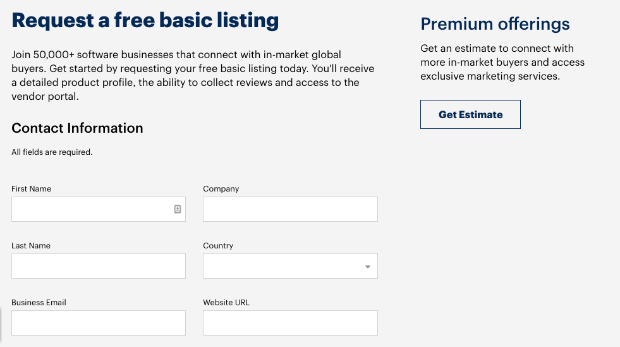
Once you submit your business details, Capterra will review your listing. If it’s approved, they will send you an email with your login details for your vendor profile.
You can then complete your product and company profile. When you’re profile is ready, you can either request users to leave reviews on Capterra, or wait for them to naturally review your software.
If you want to make sure your product listing gets approved, make sure you meet Capterra’s guidelines for product listings.
When you’re all set up, you’ll want to embed these revies as social proof for your site.
We’ll start by looking at the traditional method and explain why it may not be sufficient to boost conversions.
Then we’ll show you a sure-fire way of embedding Capterra reviews on your site to engage more visitors and drive more sales.
Let’s dive in.
Traditional Way of Embedding Capterra Reviews – What’s Wrong?
There are a lot of sites that have Capterra reviews embedded on their site and it usually looks like this:
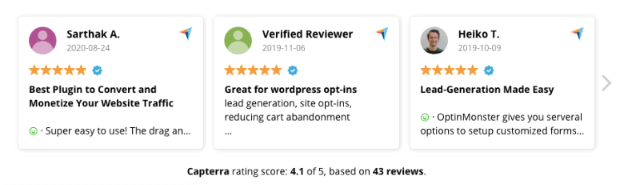
There are WordPress plugins that let you easily embed reviews with this format. But truth be told, people don’t 100% trust these reviews.
Why? Site owners selectively choose reviews and display only the best of the best. And users are well aware of this fact.
So while these reviews do serve as social proof, they’re not as effective as you likely want them to be.
In many cases, they just sit there on your site while visitors scroll past them.
But, today, we want to show you a different way to display Capterra reviews to build trust and confidence in your site’ss visitors.
This method will boost conversions, sales, and even encourage others to leave you positive reviews, too.
Displaying Capterra Reviews The Right Way
The best way to display Capterra reviews so that your visitors know it’s legitimate is in notification popups.

These popups are a better way to build trust and credibility because they feel more real. Here’s why they work so well:
First, visitors are more likely to trust your review because you’re showcasing them as customer activity.
Plus, the popups are small and non-intrusive so they don’t disturb the visitor’s browsing experience. At the same time, they’re hard to miss.
Finally, the popups are also clickable, which means you can direct the visitor to the Capterra review page. This lets users feel more confident in the authenticity of your reviews.
To create these Capterra review popups, we’ll be using TrustPulse.

TrustPulse is the best social proof tool on the market that has powerful features to boost conversions by up to 15%.
Here’s why TrustPulse is the best tool for social proof popups:
- It’s easy to set up and use
- You get full control over when, where, and to whom the popups are shown
- The popups are clickable and can direct visitors to your Capterra review page
- It’s the most fairly priced and affordable social proof app compared to the rest
Plus, TrustPulse is only a fraction of the cost when compared to other social proof software. In fact, you can get started with TrustPulse for about the same price as your morning cup of coffee.
To learn more about how TrustPulse stacks up to the competition, check out this post: FOMO vs UseProof vs TrustPulse: Which Is Best for Social Proof.
We should also mention that while TrustPulse works for ANY website builder, we’ll be using WordPress in this tutorial.
Ready to begin? Let’s start creating the Capterra review popups.
Step 1: Creating a New Campaign With TrustPulse
To get started, first, install and activate TrustPulse on your site.
You can then access the TrustPulse dashboard from your WordPress admin area. Here, you can set up your notifications by selecting the ‘Create Campaign’ button.
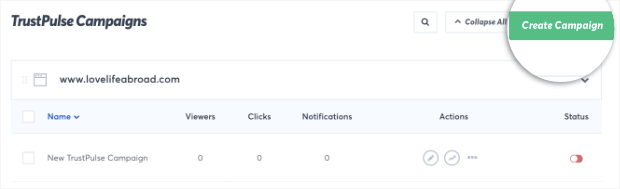
This will open up a campaign editor where you can give your campaign a name.
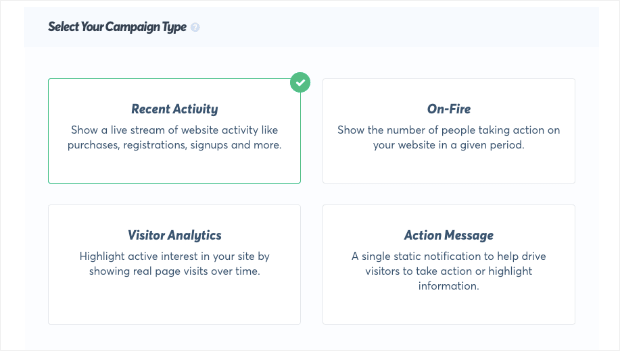
There are also 4 types of campaigns you can choose from:
- Recent Activity: Show a live stream of website activity like purchases, registrations, and more.
- On-Fire: Show the number of people taking action on your website in a given period.
- Visitor Analytics: Highlight active interest in your site by showing real page visits over time.
- Action Messages: Display a single static notification to help drive visitors to take action.
While each of these campaigns plays a specific role in using social proof to boost conversions, at this step we’ll stick with Recent Activity.
That’s because, in a moment, we’ll be changing to a Default notification, so there’s no need to spend time deciding which type of campaign you want to build.
Then you’re ready to create your Capterra review notification by clicking Next.
Step 2: Creating the Capterra Review Popup
By default, TrustPulse captures recent activity such as sales or signups and displays them as popups on your site. For the Capterra review popup, you don’t need recent activity.
Instead, you’ll create a default notification that will display preset messages.
At the top of the page, you’ll see the default notification option. You can use the toggle switch to turn it on.
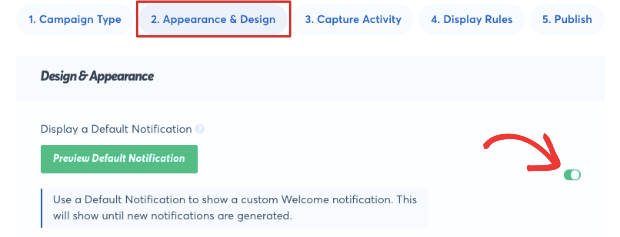
Next, enter the title and message to be displayed in your popup.
We’ve titled ours ‘Becky left us a 5-star Capterra review!’ and added a snippet from her Capterra review as the message text:
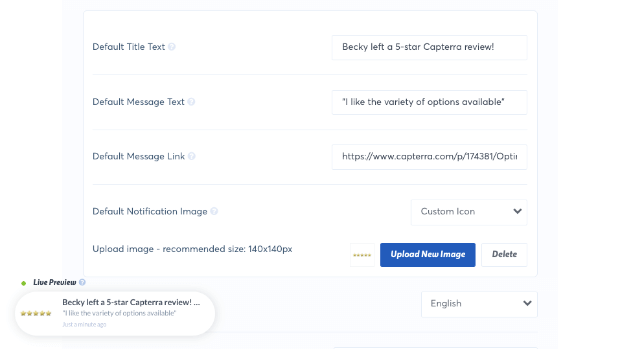
Now, in the ‘message link’ field, you can add a link to your Capterra review page.
That way when a user clicks on this popup, they’ll be taken to the Capterra review page where they can see all your reviews.
After this, you can select the image to be displayed in the popup. TrustPulse lets you pick one of the premade icons or upload a custom image.
For this tutorial, we simply created an image with 5 star emojis.
This is a recognizable symbol for a perfect review and is sure to grab your visitors’ attention.
In the next section, you’ll see the same options to create ‘recent activity’ popups. Since we’re creating a default notification popup, you won’t need to add new info here.
Instead, you’re ready to customize how your Capterra notification will look.
Step 3: Customizing Your Capterra Review Popup
TrustPulse lets you customize everything about the popup.
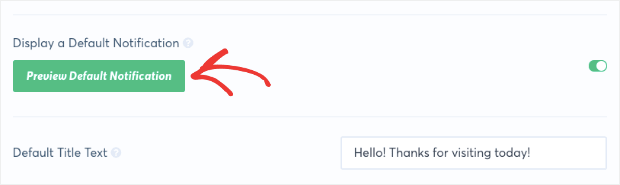
Before we get started, we’d like to point out that you can see a live preview at the bottom right corner of your page.
As you make changes here, you’ll see how the popup would look when it’s live on your site when you click Preview Default Notifications:
In the same ‘Appearance and Design’ tab, you can choose where you want the popup to appear on your site.
It can appear on the bottom left or right, or the top left or right.
You can also customize the look of your popup with options like rounded or sharp edges. Or whether you want the notification to be compact or expanded.
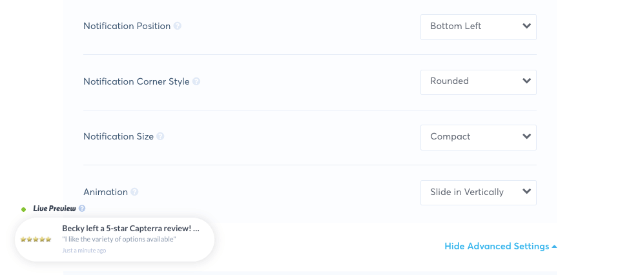
Finally, you can change the animation of the popup to fade in or slide in.
If you want to change the color and font, you can do this under the Advanced Settings menu.
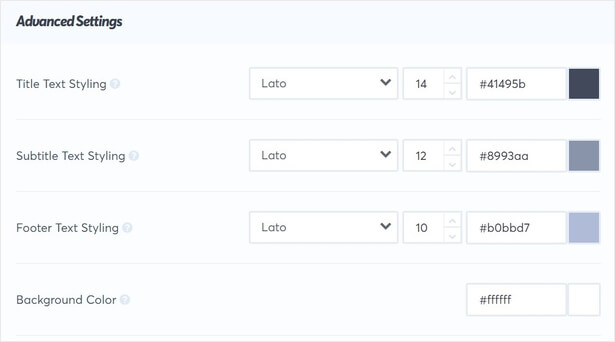
This lets you style the way your campaign looks, including things like:
- Font family
- Font size
- Text color
- Background color
- And much more…
In the end, TrustPulse gives you 100% control over how your campaign looks. That way, you can match the campaign with the voice, style, and messaging of your brand.
Once you’re happy with how your notification looks, ‘Save’ this page.
Step 4: Setting Up Display Rules
Display rules will control where and when the Capterra review notifications appear.
To set up your own display rules, switch to the ‘Display Rules’ tab.
Here you can decide where you want the popup notification to appear.
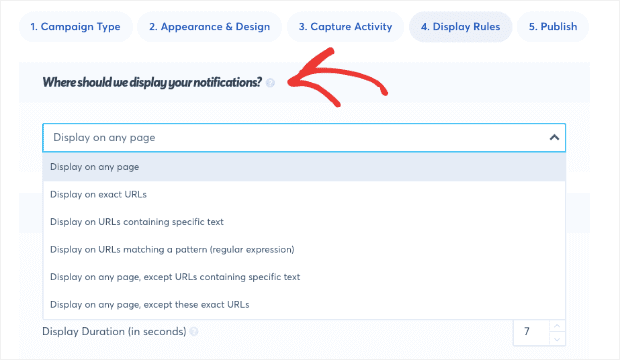
The popup can be displayed on any URL or specific URLs. Or you can filter by specific keywords or patterns.
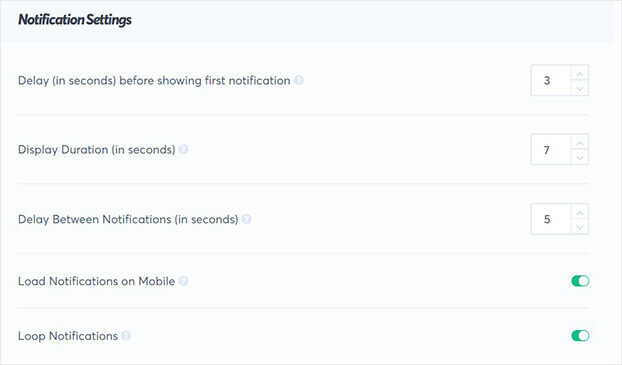
In the same tab, you can add a delay to the popup before it displays to a visitor. You can also choose how long the notification will remain visible.
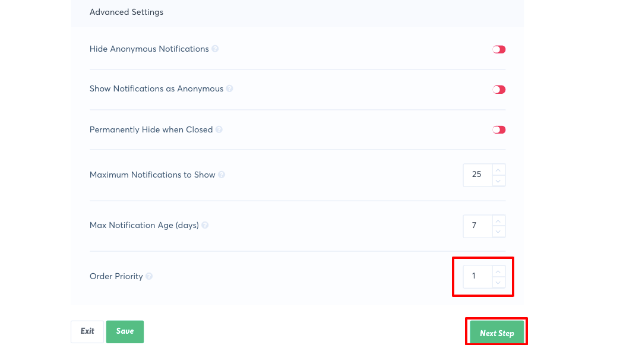
If you’re setting up multiple review campaigns, TrustPulse lets you set the order in which you want them to appear.
Simply open the ‘Advanced Settings’ menu and under ‘Order Priority’, and you can set the order for the notification.
Now, all that’s left to do is publish the campaign.
Step 5: Publishing the Capterra Review Popup
To make your notifications live, switch to the ‘Publish’ tab. Here, you can see a preview of your review popup.
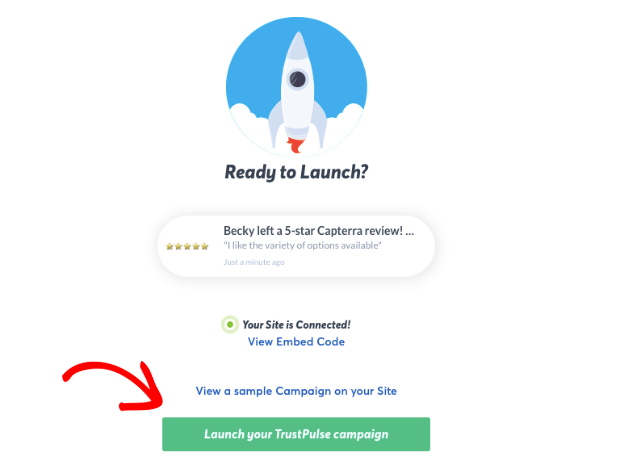
When you’re ready, hit the ‘Launch your TrustPulse campaign’ button to embed Capterra reviews on your site.
Now, your visitors will see the Capterra review popup when they come to your site.
Step 6: Tracking the Success of Capterra Review Popups
The best part about using TrustPulse to embed Capterra reviews is that you can actually see how successful they are. You can track how many people viewed and clicked on them.
This helps you track and understand exactly how much these notifications are helping your conversions.
To access TrustPulse’s built-in analytics, head over to your TrustPulse dashboard. Here, you’ll see a list of your campaigns.
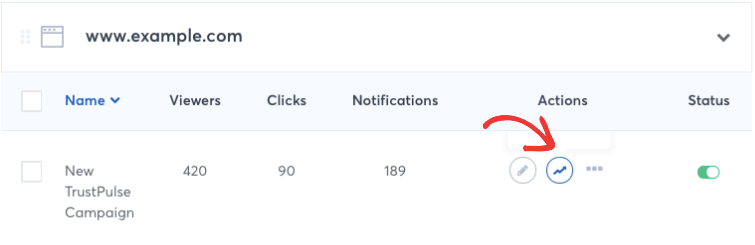
Simply click on the ‘analytics’ icon next to your campaign.
This will show you how well your campaign is performing with data and graphs that are easy for anyone to understand. That makes it great for beginners, too!
You can see the trends and performance of your popups, and find out which are your highest converting pages.
In this way, you can figure out what’s working and make adjustments to your campaigns to get the best results.
And with that, you should have everything you need to display Capterrra reviews on your site to really boost conversions.
You can also use TrustPulse to create all sorts of social proof notifications such as recent sales and live sales notifications for WooCommerce.
We hope you enjoyed this article and if you did, you might also be interested in these resources:
- What Is a Good Conversion Rate? (The Ultimate Guide)
- FOMO marketing: Everything you need to know
- The Best WordPress Plugins for Social Proof
- 9 Proven Ways How To Get More Google Reviews
These posts are packed with info that will help you leverage social proof to boost your sales and conversions.
Ready to get started with the world’s best social proof software? Sign up for your 100% risk-free TrustPulse account today!
